Walls that have the largest area in the apartment,play a very important role in the interior, and it is from them that largely depends on whether your home will look cozy or not so. Therefore, when the apartment is completely renovated or the private house is under construction / repair, the walls require the very close attention of the owners.  Roughing is needed to level the wallsbefore painting or wallpapering. Any negligence in their repair can come out sideways, and as in the portable - in the form of cracks on the surface, and in the literal sense - crooked, uneven walls it is hardly possible to decorate your home. This will help prevent internal roughing of the walls - the arrangement of a solid and even foundation, on which the final decorative finish will be placed.
Basic variants of rough finishing of walls
Roughing is a very important stageconstruction or major repairs of the house, although one of the most difficult, long and dirty. Today, to create a rough base with success, you can use plaster - lime, gypsum or cement-sand, and gypsum board, mounted on the guiding profiles or on the glue. 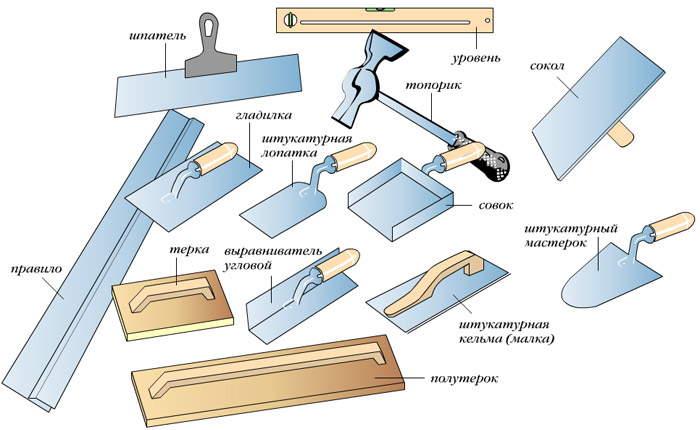 Tools for rough finishing of walls with plaster.If you wish, you can use a dozen more options, but if you plan to do it, then it is better not to use them. Roughing in itself is troublesome, and it makes no sense to add problems by resorting to its exotic options, when you will almost certainly screw it up. But whichever you choose, there is one general rule: upon completion of the finish, the wall should become as flat as possible - both horizontally and vertically, and in a plane. Remember that the most expensive and high-quality finishing coating on a curved wall will not last long, and it will not look very aesthetically pleasing on such a wall. And vice versa: even a not very prestigious coating applied to a leveled wall will delight the eye. Back to the table of contents</a>
Drywall or plaster?
Each of these materials has its pluses andminuses. The advantages of plastering include its durability - the plaster applied on walls does not require repair for 30 years, and under favorable circumstances - more. Materials for plastering are almost half cheaper than plasterboard. Although the price for plastering works is a quarter and sometimes even a third higher than for plasterboard work. But, if you plan to make a rough finish with your own hands, then the last circumstance can be ignored. Although it should be noted that a layman makes plastering of walls more difficult than finishing with plasterboard.  Scheme of plaster walls on lighthouses. Qualitatively applied plaster is a strong and impact-resistant base, which is not afraid of heavy loads. Therefore, such walls can safely hang hanging furniture or appliances, unlike the base of gypsum board, which in this case should be further strengthened. But the finishing of walls with plasterboard takes much less time and does not require the preparation of any solutions. In addition, if the walls themselves have irregularities, then for plasterboard it does not really matter, but the layer of plaster, in order to equalize these unevennesses, will have to be made thicker, thereby increasing the consumption and, consequently, the cost of the material. For the bathroom or toilet cladding, you need to use a more expensive special moisture resistant gypsum board. But in this case the service life of such a finish does not exceed 5-7 years. With plaster, such problems usually do not arise. From gypsum cardboard you can easily create arches, alcoves and other architectural forms. Finishing the same plaster will strictly follow the plane of the wall. The plaster is applied directly to the wall, while a layer of insulation can be placed between the plasterboard and the wall. It is this factor that can be decisive when choosing a material. But when decorating walls with gypsum plasterboard, a reduction in the volume of the room is inevitable, which is not the case with finishing with plaster. For small rooms this factor can be of decisive importance. Back to contents</a>
Rough finishing with plasterboard
 Scheme of rough finishing with plasterboard. Begin the finishing of the walls with gypsum boards from the mounting of the frame for fixing the sheets. The frame can be made of metal or wood, but in practice, 99% is made of metal, because it is stronger and durable, besides it is not afraid of fire or high humidity. To perform the work you need:
- drill (better electric);
- screwdriver (or screwdriver);
- level;
- roulette;
- plumb bob;
- scissors for metal (for a wooden frame - hacksaw);
- putty knife;
- cutter for gypsum board.
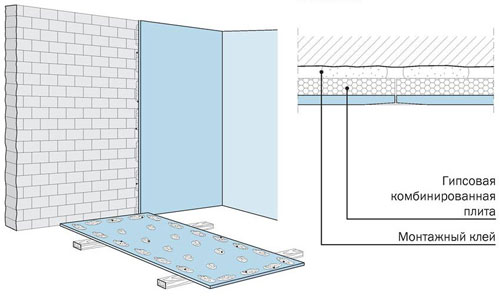
Two types of profiles are used for mounting the frame: UD and SD. UD is used as a guide along the whole perimeter of the frame, SD is inserted into them, mounting the fixing grid. Installation begins with marking on the ceiling and fixing on this marking of the guide profiles. After this, the plumb line is lowered from the fixing points and in the places where it touches the floor, also fix the profiles. Then the rack profiles are installed on the profile rails. Each sheet should be attached to three profiles: 2 - on the sides and 1 in the middle. But when installing the frame, you need to take into account that the edges of adjacent sheets of gypsum board are attached to one profile, lying on its halves from two sides. Therefore, in calculations, it is necessary to be extremely accurate, taking the width of the sheet as the initial data.  Tools for wall finishing plasterboard. To make the frame stronger, its risers are attached to the main wall with hangers. Suspensions to the plane of the wall are fixed with screws. The number of hangers in the row depends on the height of the room, usually they need 3-4 per row. Then lateral stiffeners are attached to the risers using self-tapping screws. Having finished with a skeleton, it is possible to start fixing sheets of drywall. The sheets are fastened with self-tapping screws with a countersunk head, while the fixing point should be 1.5 cm from the end of the sheet, and not less than 1 cm from its longitudinal edge. The screws are screwed in at a right angle and should be at least 1 cm in profile. There is another, frameless, way of rough finishing of walls with plasterboard. To use it you will need a special glue, with which sheets of plasterboard are attached to the wall. The choice of glue directly depends on the material of the wall itself: if it is a concrete slab, then it should be taken for a concrete surface, and if it is brick, then for brickwork. Despite the fact that for this method of decoration does not need a frame, it also has its own difficulties. For example, it is dependent on the evenness of the walls, and with their great curvature, aligning the base will be problematic. Back to contents</a>
Rough finishing with plaster
For applying to the wall a layer of plasterThe surface must first be cleaned of dust, dirt, grease stains and old paint, otherwise the plaster will not adhere well to the surface and fall off quickly. When preparing for smooth plastering of even walls, it is sometimes necessary to make notches on concrete walls with a chisel over the concrete walls, and deepening and expansion of cement joints along the brickwork. In any case, regardless of the material of the walls, it is necessary to primer the wall with a primer of deep penetration, so that the plaster hardens. If it is intended to apply a thick layer (5 cm or more) of plaster, mount an armored wall to the wall or use a mesh-netting with cells less than 5 cm. 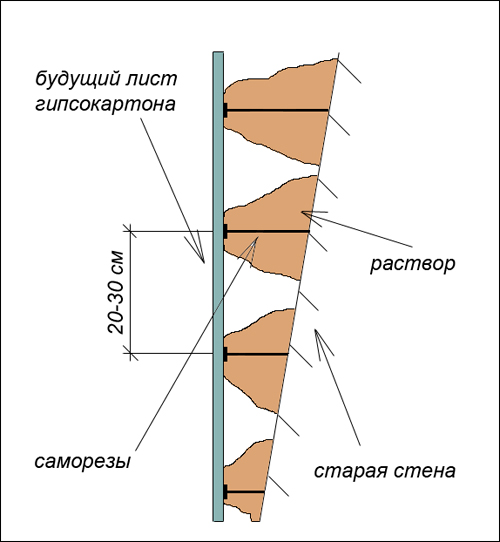 Scheme of wall alignment without a frame. To apply a rough plaster you will need:
- poluterki;
- plaster blade;
- rule;
- level;
- drill;
- screwdriver or screwdriver.
After completing the preparation of the walls, you can proceeddirectly to their plaster. There are two ways of applying plaster: spraying or spreading. Spraying can not be avoided, if the facing is done using plaster, using the plaster in all other cases. It is simpler in execution, and more economical in terms of materials consumption. The mortar for the plaster is prepared by following the instructions on the packaging of the dry putty mixture. Stepping away from the corner of 20 cm, put beacons on each corner, and then, equaling the exposed corner beacons, put out the middle beacons at an interval of about 1 m. The plaster is spread over the exposed beacons, covering the wall space between them to the desired height. Align the surface with a half-twist or rule, passing through the edge of the nearest lighthouses. After a few hours, when the plaster dried, but still damp, its grouting is carried out. The grout is made with circular movements of the hand with the grater densely pressed to the wall. Depending on the unevenness of the wall, the pressure is regulated: on the valleys it is weaker, on the hillocks it is stronger. This completes the final roughing of the walls. The final decision on the materials and the method of rough finishing of the walls must be taken in each specific case separately, in accordance with many factors: the house or apartment, the size of the room, the height of the ceilings, the curvature of the walls, etc. The only general rule for rough finishing: whatever the finish coat, it can be changed quickly and painlessly. A rough finish is the basis, and you need to try to make it so high-quality that you do not have to go back to it. Although one who has experienced this procedure once, only an extreme need can return to it. Good luck! </ ul>


