Modern variety of wall finishesstriking in its versatility. Both the appearance and the material of manufacture are different. In addition, different finishes require a different installation process. MDF panels are popular today for this purpose - they are environmentally friendly, aesthetic and inexpensive. do it yourself - a simple matter, you just need to know the technology.  The scheme of installation of MDF panels.
Interior wall decoration: nuances
To cope with the task of finishing the roomMDF panels, do not need to be a professional builder - just basic skills. MDF is similar in structure to felt, but instead of wool there are wood fibers. High mechanical properties do not possess, but are completely ecological. Optimum option for interior walls. MDF should be treated like a tree. You can glue it with any glue suitable for wood. Liquid nails in the installation are used quite successfully. However, here 1 nuance: MDF panels have a decorative coating and in case you use liquid nails, you need to pick up a suitable tone in the store so that there is no contrast. Back to contents</a>
Required Tools
What tools will be needed in the process of working with MDF panels: 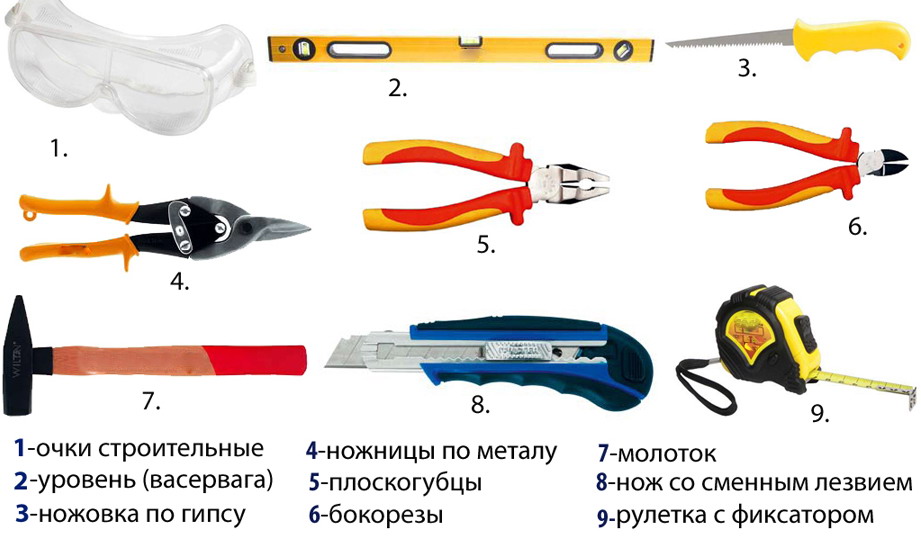 Tools for mounting panels.
- plumb bob;
- roulette;
- circular saw or electric jigsaw;
- drill (with a nozzle for self-tapping screws);
- building level;
- a metal square;
- screwdriver (although you can do without it);
- basic set of tools.
Surely you have at home a minimal settools - stock up on them. When choosing a saw or a jigsaw, rely on the budget and convenience. The saw has an advantage in its size and universal application, but it is more expensive than a jig saw. Back to contents</a>
Installation process: recommendations
It is important to prepare the surface for future finishing: if the walls of the room are ripe or there are flakes and swollen plaster sections, then it will have to be removed. Likewise, it should be done in case the plaster is applied too thick (more than 12 mm) or the coating is uneven. In general, you can get rid of the plaster in any case, so it will be more convenient to fasten the panels, besides, defects can be discovered that the plaster is hiding. You need to get rid of skirting boards.  Sheathing scheme. The walls can be decorated with MDF panels in 2 ways:
- on the crate of wooden racks;
- on the frame of the profile.
The first option is easier to install - you will needless hardware. However, the purchase of other materials will cost more than a metal frame. If you stop the choice on the crate of wood, the rails will need to be treated with a solution of mold and other troubles. If the premise is damp, it is better to abandon the wooden crate. In addition, pests in the form of rodents or insects can occur, which is not very pleasant. To install a metal frame, you need the guiding profiles, connectors and fastening systems. At the stage of wall paneling, it will be superfluous to take care of the insulation. Once the crate is ready - it is possible to fill its cells with a heater, besides it is an enhanced protection from the habitats of rodents and condensate. Back to contents</a>
Creating a battens: features
If you stayed on the option of woodenracks, it is worth to know that its attachment to the wall is carried out using self-tapping screws or dowels, which look similar to self-tapping screws - have an untypical carving. In the plastic base it must be driven with a hammer. The dowel cap has a notch under the screwdriver, so if necessary you can easily unscrew it. Wooden lathing begins with the installation of laths from top to bottom. 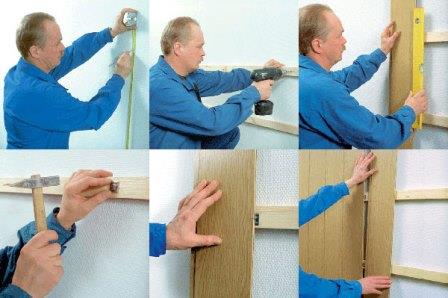 Scheme of work on the installation of panels. First it is necessary to put in each corner of the room the racks in pairs. The pair should form an angle, then arrange the racks along the edges of all the openings - window and door across the entire height. To verify the verticality of the racks, you need to use the plumb line. The next step is the installation of horizontal logs, the step between them is equal to the step of the vertical racks. The presence of logs on the openings above and below the windowsill is mandatory, even if it does not coincide with the step. The slopes of all openings are similarly made using racks - along the edges without cross bars. All available projections on the slats are removed using a plane. The profile of the profile is fixed using only self-tapping screws. The diameter of the fasteners depends on the strength of the wall: the stronger it is, the smaller diameter will be needed. Each building element has a plastic socket in the pair - you need to drill a hole in the wall under the nest and hammer it with a hammer. The minimum depth on which the fastener body should sit is 30 mm, more often about 70 mm. Choose a suitable drill - if it is too long, use the stopper. The metal crate is also mounted in a similar way: start from the corners, then go to the openings, after mounting the crossbeams. The step is the same as that used for the wooden crate. Short self-tapping screws serve as a fastener for all available elements of the crate from the metal profile. Dowel-nails for these purposes are not recommended: they either strongly break the profile, or do not give proper fastening. It will be more convenient if, when creating a metal crate, you always have a circular saw or grinder at your fingertips to cut unnecessary pieces quickly and seamlessly. Back to contents</a>
Sheathing of walls: highlights
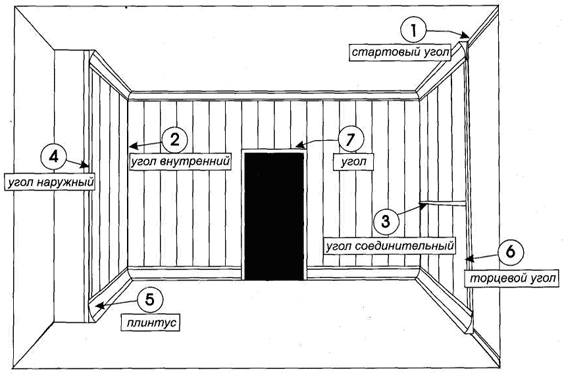 Finishing scheme for MDF panels on the walls. The walls should be paneled after all the preparatory work has been completed and the debris has been removed. The panels are joined to each other with a tongue-and-groove tongue (similar to a comb) and a suitable groove. MDF panels are fastened to rails with nails of small dimensions, they should be slanted in an angle of the groove. With the help of a hammer you need to hammer the stud all the way. It is more convenient to use a firing pin that looks similar to the punch, but has a small hollow at the end, suitable for the nail head. To the crate of metal panels are mounted in a somewhat different way - with the help of gliders, which are inserted into the groove to the end and fixed with screws. This type of fixing is more labor-consuming, but it is higher in terms of reliability. Back to contents</a>
Direct installation of panels
Installing panels on walls is the process mostplain. Start from the corner of the room, then you need to cut as many panels as you need to the nearest rack. Cutting angles should be treated with sandpaper - the first pass will be enough. From the first MDF panel, cut the comb and fasten the panel in the corner with the fastener that fits your crate. Next, you need to insert the panel with a comb in the groove of the previous panel and fix it, similarly you need to act until there is a pair of the last panels. The panel, which will be the last, needs to be cut to size with an additive of 2-5 mm, its crest should be cut off half-and half-rounded. The last 2 panels must be inserted in their place by the house and press until it clicks into place. The last panel must be pushed to the previous one until it stops and secure. Installing the last 2 panels is the most important thing in the whole process, so it's better to practice in advance on the trims of the panels. Next, you need to finish the slopes in a similar way to decorating the walls in a way. The main thing is to properly trim on the exact size. </ ul>


