Today, painting walls isa worthy alternative to any type of finishing and therefore enjoys great popularity. The most difficult stage in performing any finishing work is the preparatory work.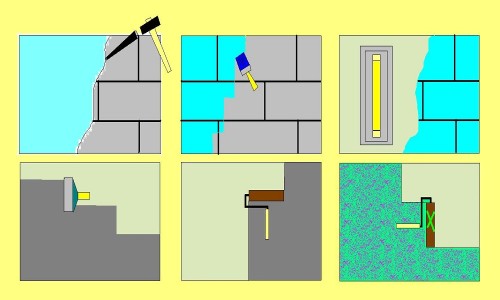 Scheme of plastering and painting a wall.And finishing walls for painting is the most difficult task. The requirements for it are very high. Only impeccable preparation will allow achieving the ideal quality of the painted surface.
Types of surfaces to be painted
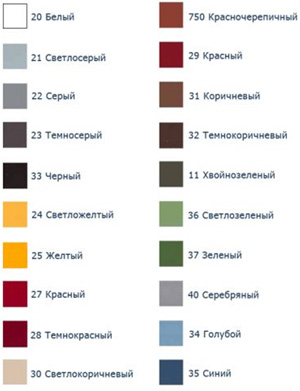 The diverse world of paints. You can paint different types of surfaces. They can be divided into the following categories:
- smooth shpatlevannaya surface;
- texture surface;
- smooth surface of the lining material (wood, tiles, wallpaper, plastic);
- relief surface of facing materials.
There is a technology for every case.preparing walls for painting. But the most complete process of preparing a surface for painting is leveling and filling the surface. Let's consider what stages of surface preparation need to be completed in order to start painting it. Return to contents</a>
Removing old wallpapers
 Scheme for removing old wallpaper. Tools:
- bucket with warm water;
- roller or sponge;
- putty knife;
- abrasive paper of medium grain size.
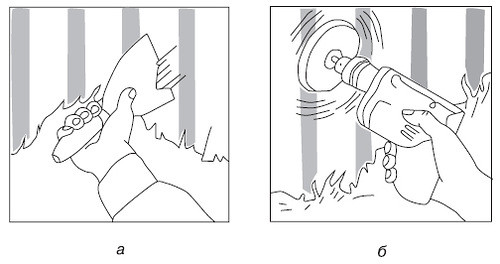
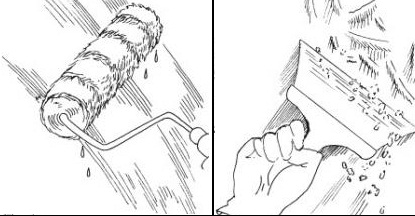
Removing old wallpaper can sometimes be a bit of a paina simple task. But it must be done. To make this work easier, the wallpaper must be generously moistened with warm water, sometimes more than once, using a sponge or roller. When the wallpaper is well saturated with water, it will become pliable for removal. First remove large parts of the wallpaper, and then remove the remaining small pieces with a spatula. Sometimes it happens that the wallpaper is glued so strongly that it can be removed with pieces of plaster. This is not scary, since the surface for painting will be carefully puttied later. Finally, thoroughly treat the walls with sandpaper or a grater. Return to the table of contents</a>
Removing the old paint
 Scheme of removing old paint. Tools:
- abrasive paper with a large grain;
- metal brush;
- putty knife.
First of all, you need to determine what type of paintapplied to the wall. Rub the wall with sandpaper. If the paint remains on the abrasive, then it is water-based paint. If the paint is easily removed from the abrasive by light shaking, then it is alkyd or oil-based. Paint must be removed from the wall carefully. To remove oil paint, the walls must be treated with a 5% soda solution. And to easily cope with water-dispersion paint, use wallpaper glue and old newspapers. The walls must be coated with glue and newspapers must be glued. When the glue is completely dry, the paint will be easily removed along with the newspapers. The method for removing glue-based paint is to apply a 2% hydrochloric acid solution to it. The wall will be covered with bubbles and the paint can be easily washed off. When the paint is completely removed from the walls, they must be thoroughly washed, dried and treated with sandpaper. Return to the table of contents</a>
Removal of rust, mold and grease stains
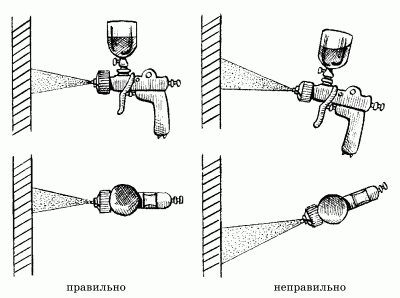 Scheme of paint application using a spray gun.Stains of grease, rust or mold can easily appear on the painted surface. Therefore, they need to be removed at the stage of preparing the surface for painting. Mold can be removed by treating the affected areas with fungicides. Grease stains are removed with a soda solution. Rust is washed off with water, and then the area is treated with a solution of copper sulfate (100 g of sulfate per 1 liter of boiling water). When working with chemicals, observe safety precautions. Wear rubber gloves and safety glasses. Choose comfortable work clothes and put on a hat. Return to contents</a>
Aligning walls
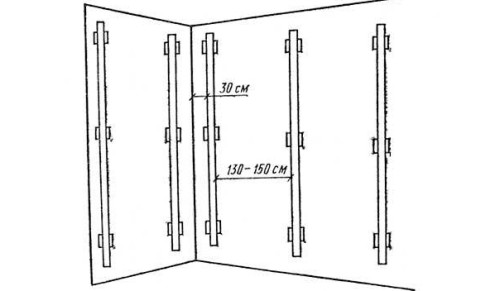 Scheme of wall alignment on beacons. The technology of preparation of any surface for painting is aimed at eliminating all irregularities. This can be achieved in several ways:
- grinding of existing coating;
- Wall finishing with plasterboard;
- plaster and putty.
Surface grinding is suitable for concretesurface when it is solid, strong and undamaged. To do this, it is enough to remove a thin layer of plaster using a grinding machine. Old coatings must be treated with antiseptics and primed. All minor damage and areas with mold are cleaned and putty. The difference in level should not be more than 2 mm. When this result is achieved, you can start puttying the walls for painting. Complete replacement of the plaster is required when there are significant differences in level and peeling areas. Drywall finishing is also suitable for this case. Everything depends on your preferences and financial capabilities. Finished smooth plastered walls must be carefully primed and left until they dry completely. It is not recommended to proceed to the next stage with damp walls. Return to contents</a>Applying the starting putty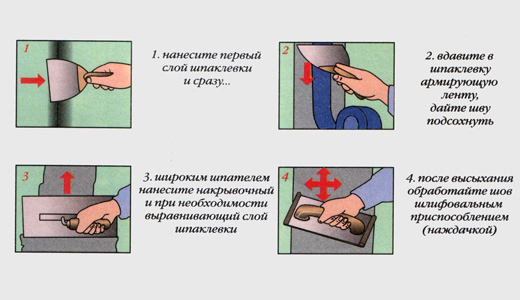 Scheme of puttying seams. Materials and tools for applying putty:
- starting and finishing putties;
- a bucket for preparing the mixture;
- drill with a mixer;
- wide and small spatula (60-80 and 20-25 cm);
- trowel for leveling putty;
- rule;
- reinforcing nylon mesh;
- Abrasive mesh of different granularity and grater.
According to technology, paintIt is not recommended to apply the paint directly to the cement-sand plaster, as its surface is very porous and absorbs moisture strongly. Therefore, the paint will not lay evenly on it and the color may change. All the roughness of the surface will also be visible. To prevent this from happening, putty should be applied to the wall surface. The first layer of putty is made with a starting putty, allowing you to apply a layer of up to 5 mm. The putty must be diluted in accordance with the instructions on the package. This must be done immediately before applying to the walls. The ready-to-use putty solution in the bucket must also be opened immediately before use.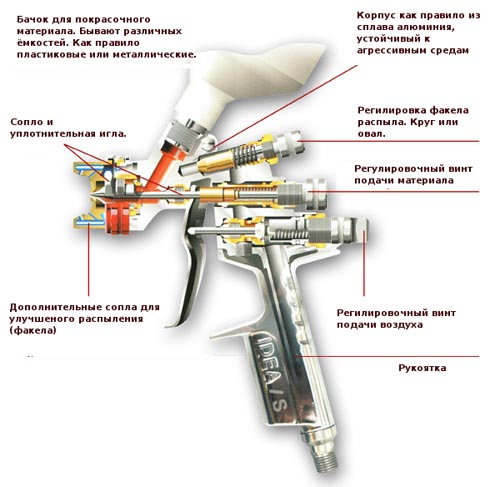 Spray gun for painting.It is recommended to apply putty under painting using a reinforcing mesh with a cell size of 2 mm. To do this, apply a 2-3 mm thick layer of putty to the wall, attach the mesh to it and press it well with a spatula. When this layer dries, apply another layer of starting putty. Very often, novice craftsmen make mistakes by trying to achieve the most even surface from the very first layer and smooth out all the protruding stripes remaining from the edges of the spatula. This is not at all necessary. The main thing in this matter is that there are no deep depressions and no unfilled areas. It is enough to run the spatula 1-2 times along the transitions between the stripes, and sand the remaining irregularities after drying. The solution should not be applied in too small portions, since in this case large irregularities cannot be avoided. With the accumulation of experience, such shortcomings will be minimal. After applying the starting layer of putty, it must be given time to dry - 6-8 hours. Then you can start sanding the surface with a 120 grit abrasive mesh. This will remove all rough uneven surfaces. Finally, the walls need to be primed and allowed to dry. Return to Contents</a>Application of finishing putty The final stageThe technology of finishing walls before painting involves applying finishing putty. Due to the fact that it does not contain large impurities, the wall surface is perfectly smooth. The paint applied to it will not penetrate deeply into this finishing layer. The finishing putty is applied in the same way as the starting one, but the thickness of its layer should not be more than 1.5-2 mm.
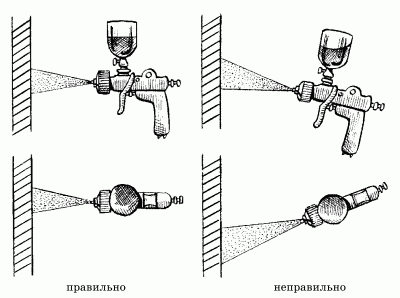 Scheme of paint application using a spray gun.Otherwise, this finishing layer may crack. A thin layer of this filler allows you to achieve a smooth surface. When the finishing layer is completely dry, it must be sanded with sandpaper or a mesh for gritty grit. At the same time, try not to sand this layer completely. The finishing layer is quite delicate and is very easy to sand, apply minimal effort. It is recommended to sand using a lamp or spotlight, the light from which should fall on the wall at an oblique angle. This will show all the irregularities and defects of the surface. It is necessary to achieve an ideal surface, because after painting the wall, all defects will be visible. If necessary, you can apply another layer of finishing filler to achieve the best result. Apply it "on the scrape". To do this, apply a little putty to the spatula and almost perpendicularly "scrape" along the surface. In this way, all small irregularities, scratches and pores are filled. This results in a perfectly smooth surface. The wall surface must be cleaned of dust remaining after sanding and primed. The surface can be cleaned with a vacuum cleaner or a dry rag. If water-based paint is to be applied, the primer must also be water-based. You can also use an acrylic primer. Enamels require the application of an alkyd primer. Return to contents</a>Preparing other surfaces for paintingIf the walls are wooden, then preparing them for painting will be different. Wooden surfaces are sanded, and if there are deep defects, they are filled with special wood compounds. After that, the wood is treated with compounds to protect against pests. If desired, it can also be covered with stain. The wooden surface can be painted or varnished. Preparation of textured surfaces for painting (wallpaper, decorative plaster cladding) consists only of priming. Wallpaper should be primed with a special adhesive composition, and decorative plaster - with a deep penetration primer.


