Some DIYers resort to a solutionmake the loggia insulated. If it is combined with the kitchen, additional space appears in the room, which can be used functionally by installing a bar counter in it. Such an interior element can be purchased to order, or you can make the counter yourself. This piece of furniture can be installed not only in the kitchen, but also in the hall, as well as in the winter garden, if we are talking about a private or country house. Bar counter diagram.Some, using the experience of American residents, try to replace the dining table with a counter, but then they understand that the idea is a failure, since it goes against our traditions. After all, it will not be possible to fit the whole family with children behind the counter. Thus, a bar counter can be installed in the dining room or kitchen, but you should not give up the main table.
Preparatory work
As the optimal height of the structurechoose 110-115 cm. The bar counter should be made even more functional than usual, for this purpose, shelves can be mounted in the lower part, and hooks for attaching glasses on top. It is recommended to equip the structure with some fashionable and necessary additions such as a built-in key for uncorking bottles, roll-out shelves, a compartment where an ice bucket will be installed. If there is a great desire, but the kitchen space is very limited, then a high structure will look out of place. In this case, it is recommended to design a system in the form of a folding extension of the dining table. Chipboard and sewer pipes can be used as the main material. Bar counter options.In the store, you will need to buy 6 sheets of chipboard with the following dimensions: 16x440x1150 mm, another 2 sheets should have dimensions of 16x1000x2000 mm. A slat with dimensions of 20x40x4000 mm will also be useful for the work. The support leg of the stand will be made of a standard new PVC pipe, the diameter of which is 180 mm, while the length of the element is 950 mm. The body of the lamp will need to be made of the same material, however, the length of the element should be equivalent to 450 mm. The horizontal leg support will be made of a metal pipe with a diameter of 50 mm and a length of 1 m. As fasteners, you should use dowels with dimensions of 5x50 mm and in the amount of 80 pcs. The screws used should be equipped with a countersunk head, you need to purchase fasteners with the following dimensions: 4x60 mm, 4x80 mm. Return to Contents</a>
Procurement of rack elements
The bar counter must endure greatloads, so it must be made strong. This involves initially fastening the chipboard sheets together with glue, and as a result you will be able to obtain sheets with a thickness of 32 mm. Two boards with dimensions of 16x440x1150 mm should be left in their original form. At the next stage, you can proceed to sawing the chipboard, from which you need to prepare: Accessories for the bar counter.
- circle Ø175 mm;
- floor element in the form of a circle Ø500 mm;
- podpyatochnuyu part of the support in the form of a circle Ø300 mm;
- ceiling hood in the form of a ring, which has an external diameter of 300 mm, internal - 180 mm;
- frame for the down tube: two rings with an outer diameter of 240 mm and an inner diameter of 180 mm;
- The wall between the shelf and the table top is 870x240 mm.
In the element below the first position should bemake a hole in the center, which will be useful for wiring. The bar counter should have smooth shapes, for this, on one side, you need to round off the slabs with dimensions of 32x440x1150 mm. You should retreat 190 mm from the rounded edge, while from the side edges this retreat should be 130 mm. In the designated place, you need to make a hole with a diameter of 180 mm, it will be useful for installing a vertically located support pipe. When making a bar counter with your own hands, in one of the 16 mm slabs you need to make a similar cutout, which will be a technological blind hole for mounting a vertical pipe. Then you can strengthen the workpiece with the second 16 mm element using glue and cut out the table top. As soon as you manage to glue, you should tighten the workpiece with clamps and wait for the composition to fully set, sawing should be done only after this. Return to the table of contents</a>
Construction technology
The sawn blanks should be slightlyprepare, which involves cleaning the ends, then they need to be puttied and sanded. Before installation, all round elements and plastic pipes need to be painted or varnished 2 times.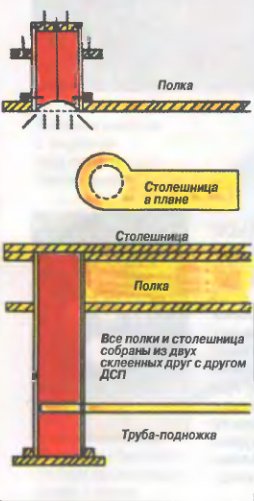 Bar counter assembly diagram.The assembly should begin with the fact that between the tabletop and the shelf located below it is necessary to install a vertical wall 240x870 mm, using dowels Ø5 mm for this. This element should be located strictly in the middle of the tabletop. Next, using a pipe, the length of which is 450 mm, with an indentation from the edge of 20 mm, it is necessary to make 6 through holes Ø3 mm along the perimeter. We are talking about the pipe intended for the lamp body. A ring made of chipboard, the width of which is 30 mm, should be put on the pipe. It should be fastened with screws through the drilled holes, they should be removed 12 mm from the lower edge of the element. A ceiling hood should be installed on the opposite edge. At this point, the lamp body can be considered ready, it is permissible to proceed to the support leg of the stand. At a distance of 200 mm from the lower end, it is necessary to drill a hole intended for the installation of a transverse metal pipe, it will serve as a footrest. In the right place, you should attach a template to the leg, for which you need to use a paper circle Ø50 mm. Along the perimeter, you will need to make a large number of holes, using a 9 mm drill. This will allow you to knock out a circle on the surface of the element, but you can make the edges aesthetically pleasing and even by using a round file. A circle with a diameter of 175 mm must be attached to the ceiling using dowels and screws. You need to pass the wiring through the hole. The lamp body is put on the circle and fixed with screws. The ceiling hood, which is on the body, should be moved slightly upwards, it also needs to be screwed to the ceiling. The upper shelf must be fixed to the ring of chipboard using dowels and adhesive. The lamp should be mounted in the hole and fixed inside the body. The support rails must be mechanically attached to the rectangular ends of the shelves. The slats fixed to the wall will hold the rack in the desired final position. Next comes the turn of the support leg, which should be fixed in the heel, a transverse metal pipe should be installed in it. The crossbar should be fixed to the wall with a coupling. Next, you can install the tabletop and shelves. If after you have finished making the rack, there are unpainted elements left, this should be corrected by applying paint or varnish, applying the composition in two layers. To carry out the work, you will need to prepare the following tools and materials:
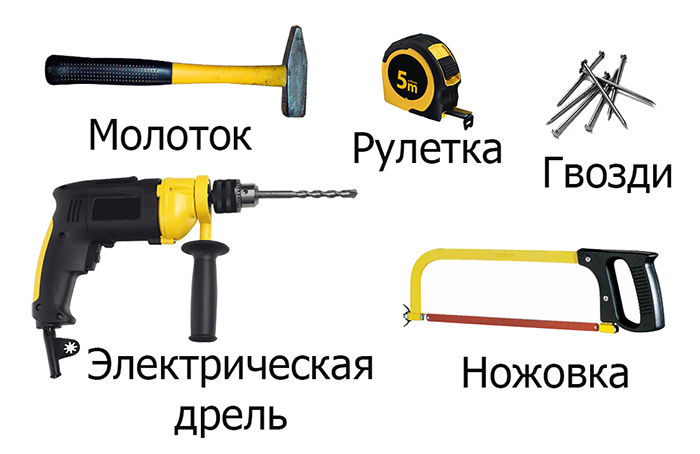 Tools for installing a bar counter.
- chipboard;
- pipes;
- dowels;
- device for lighting;
- wires;
- colored varnish;
- putty;
- acrylic paint;
- Screws;
- hacksaw;
- electric jigsaw;
- Clamps;
- drill;
- drill;
- screwdriver;
- round file;
- a grinding bar;
- paint brush;
- putty knife.
The manufacturing process itself is not that complicated, but it is preferable to entrust the cutting of the material to professionals, as they use modern equipment.


