To date, gipsokartonnye sheets areOne of the most popular materials used for leveling ceiling and wall slabs. The structures obtained from GKL are distinguished by reliability, durability and durability, successfully fulfilling the role assigned to them. But in order for the smoothing process to go smoothly, the drywall should be fastened to a special frame. It can be made both from wooden racks, and from a metal profile.  Today, most often the walls are leveled using plasterboard, but do not forget about the need for high-quality installation of this material.
Selection of materials and preparatory work
Thinking about how to make a crate, in the first placethe queue needs to consider what material will be used to create it. Both metal and wood have their own characteristics. So, if the choice fell on the lath of wooden slats, it should be noted that it can be erected only in dry and well ventilated rooms. It is not suitable for installation where there are high humidity and temperature changes. Wood will swell, due to what the wall can become undulating. The best characteristics are the crate under the gypsum board made of metal profile. This design has not only a more durable period of use, but also smooth surfaces, which allows the drywall sheets to adhere to it as flat and densely as possible. Working with a special profile is much easier and faster, with the tools that are available for every home owner. For the direct installation of the frame on the walls, you will need to prepare the following accessories:  Types of profiles for installing drywall.
- a hammer;
- Screwdriver;
- building level and plumb bob;
- drill or perforator;
- pencil or marker;
- damping belts;
- metal profiles (directing, rack);
- dowels and screws.
It is necessary to select profiles with a length of 3 or 4 m. This is explained by the fact that in modern apartments the ceiling height rarely exceeds 3 m, and the length of the walls is 4 m. If the length of any profile is not enough, the two profiles are spliced into one, fixed by 3 self-tapping screws (one in each plane). If we talk about the thickness of the profile, then the most preferable products are the thickness of 50 or 75 mm. A thinner profile is suitable for walling partitions, and a thick one is used to make a crate under the gypsum board for ventilation ducts and other communications. Before you do the crate, you need to mark out the surface on which the structure will be fastened. Depending on the unevenness, the lath must retreat from the surface of the wall slabs to a distance of about 6 cm. 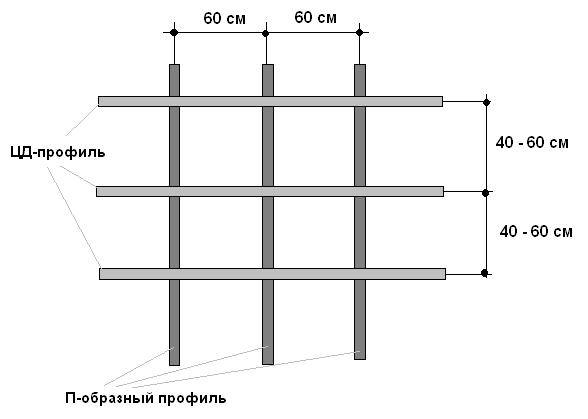 The scheme of the plasterboard under the plasterboard. This distance is marked on the ceiling, a straight line is drawn along which the guide profile will be fixed. Usually, in order for the line to be as level as possible, the building level and the plumb line are used. Then on the floor and adjacent walls are also drawn strictly parallel to each other lines. Any inaccuracy in the calculations can lead to the fact that the wall of drywall will turn out to be a curve or skewed. When all the marks are checked for parallelism, you can proceed with the installation of the frame. Back to contents</a>
Mounting of the frame for gypsum plasterboards
In order to make the crate for gypsum board, you need to remember a few basic points that will allow you to do the job correctly:
In order for acoustic vibrations from the sheetsthe material was not transferred to the wall slabs, special damping strips should be used for fastening. They can be made of foam rubber or polyurethane foam and impregnated with an adhesive. In the first place along the marked markings are attached guide profiles with a padded damping tape. Then, rackmount profiles are installed. They are attached to the walls in the same way as the guides, using dowels and screws. The distance between the posts should be determined by the width of the sheets of plasterboard. It should be such that the joints of the sheets fall on the profile. The upper part of the pillars should go to the ceiling guide profile at least 2 cm. The lower part should be inserted into the profile located on the floor. The frame is ready, and plasterboard sheets can be attached to it. As can be seen from the information provided, it is quite easy to make a lath for leveling walls. With all the rules, the design turns out to be strong enough and will serve for a long time. </ ul>


