Before you make a frame for gypsum board, you need to decide on the material from which it will be built. Gypsum board facing is carried out on metal and on a wooden skeleton.  Scheme of the structure of the frame under the ceiling of gypsum board. Of these, the metal frame is more practical, although it is more expensive. Its advantages in front of the wooden:
- not subject to decay;
- does not absorb moisture;
- Do not warp when moisture drops;
- has a more even surface.
However, the frame of wooden racks is still very oftenIt is used for facing with plasterboard. The ways and techniques of how to make a frame for gypsum board made of metal and wood are close, and you can consider them in one key.
The device of a wooden skeleton
If nevertheless the decision on manufactureframe made of wooden slats, it should be noted that the work can be done using guides, hangers and staples, which are used to work with metal crate. Their application will speed up and facilitate work several times. The production of the crate begins with a marking, and it is done first on the floor, then it is transferred to the walls and ceiling. The line marked on the floor by a plumb line is projected perpendicularly to the wall, then a mark is made with a ruler along the entire height. 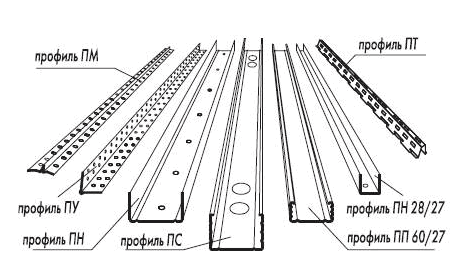 Types of profiles for drywall. If, however, the ceiling of the GKL is subject only to the ceiling, then the markings are made on the upper part of the walls. For this purpose, a water level and a paint line are used. With their help, the horizon is repulsed on the walls, then the marks are transferred to the ceiling. On it with a pencil draws a solid line and on it is fastened a wooden crate. The distance between the beams is 0,4 - 0,6 m. Layout is the most important stage of construction, it should be given maximum attention. On how accurately we make the markup, depends on how well we can make the frame under the drywall. After the completion of the markup, we proceed to the construction of the wood battens. The rail is located along the contour of the surface of the gypsum board fastening. When leveling the walls or making partitions, the wooden slats are attached around the perimeter of the area. The manufacture of a false ceiling requires the arrangement of the piping along the wall markings. Through the length of the bar holes are drilled every 40 cm, then this bar is applied to the marking line at the intended attachment point. A nail is inserted into the drilled hole, a mark is made on the wall with a hammer. Having made such marks along the entire length of the bar, we remove it, and on the marks in the wall we drill the holes and drive into them wooden choppers or plastic anchors to fix the frame of the piping under the drywall. Between the bars of the strapping string is stretched, which will serve as a reference for the alignment of intermediate racks. Bars before use should be treated with antiseptic to protect against decomposition and harmful insects, if the laths for the battens were made independently. In the trade network, the bars are already treated with antiseptics. Back to contents</a>
The lining from the metal profile
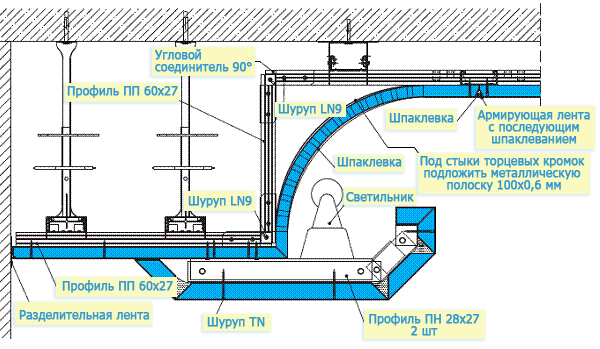 The scheme of a two-level ceiling. When partitioning and leveling the walls, as well as the production of niches, the marking for the frame crate begins on the floor. On it will be marked the frame under gypsum cardboard. Lines of wall marking must comply with parallelism, and equidistance from each other should be equal to the thickness of the wall and 40 cm along the area of the plasterboard. When lathing the ceiling markings are made on the wall lines, as well as in the wooden crate, only on the lines on the ceiling we mount the hangers for the device of the metal crate. The distance between the posts is 60 cm, and the suspension along the length of the profile is 50 cm. The installation of the guide profile is carried out depending on the manufacture of the plasterboard crate, if it is a frame for walls, then it is installed along lines on the floor and ceiling; if for the ceiling, then for the wall lines. We install and fix profile racks on walls and ceiling. With a Bulgarian or scissors for metal, we cut profiles according to size. Before making a frame, on the ceiling or on the wall, drill holes for anchors and dowels at the marking points. We fix the hangers and guides, fix the prepared profiles with screws. Loose ends of the hangers bend to the wall. You should know that when preparing a frame under a false ceiling, dowels made of plastic are not used. They can not withstand the weight of the ceiling, and the screws get out, the ceiling is jarring at the same time. Back to contents</a>
Oblacy for curly facing elements
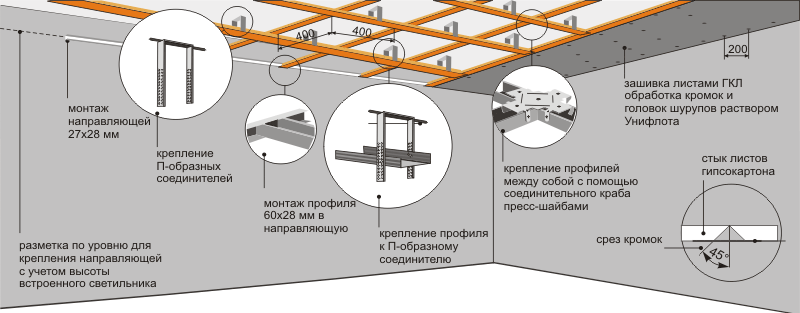 Scheme of installation of a single-level false ceiling. Before you make a framework for the curved parts of the facing of the room, you need to be able to work properly with the profile and plasterboard. For this, we draw a necessary element in full size on the installation site or on a sheet of drywall. We cut the side walls of the metal profile after 5 cm and bend it along the pattern until the desired contour is obtained. Gypsum cardboard can be processed into curly elements in two ways: dry and wet. Its thickness should not exceed 6 mm. In the dry process, the gypsum board is cut deep by longitudinal incisions to the cardboard on the other side. The incisions are made with a chamfer to correct the bending angle. The steeper the bend, the greater the angle of the chamfer should be. After the end of the work, the element is attached to the template, and the chamfers are shpaklyuyutsya. The wet method of gypsum board bending, although it takes more time, but more precisely adapts to a figured element, and work on it is less noticeable. Punctures are made from one side of the plane according to the template, about 1/3 of the thickness of the sheet, every 2 cm. Wipe the punching points with a brush until the bend is completely impregnated, until the gypsum ceases to absorb water. We attach the semi-finished product to the template, and in a day the sheet will take the prescribed shape and dry. Now you can fix it on the frame for gypsum board. Back to contents</a>
How to make a lath for an arch?
Draw an arch on the plane of gypsum board infull size, apply a drawing to another sheet, align them and jigsaw saw an archway. It turned out two details of the arch. Make a marking on the wall and according to it set the profile of the frame. Several lines on the details of arches from plasterboard are placed vertically, they will indicate the positions of the racks for strengthening the frame. Applying on the lines that are applied to the plasterboard profile, cut it to size according to the height of the arch. The lower end of the profile must be rounded along the diameter of the arch. We mount the guides, fix the profiles of the frame of the future arch. We measure the length of the semicircle of the arch with a tape measure and cut out the corresponding profile length. Sidewalls of the profile are cut with a periodicity of 5 cm, bent according to the template and fastened with screws to the arch framework. We lined the arch with previously prepared details of the GKL. Materials and tools used:
- Screwdriver;
- Bulgarian;
- electric jigsaw;
- scissors for metal;
- cord;
- level;
- knife;
- perforator;
- a hammer;
- nails;
- self-cutters SMM 3,5 / 51;
- metal profile PN 28/27;
- hangers and guides;
- drywall;
- electric drill.
You may need a heater. If the frame is made of wooden shelves manufactured independently, antiseptics are required to process them to extend the service life, it may also be necessary to treat preparations against insects that are planted in a favorable environment.


