The suspended ceiling has long taken a strong position inchoosing the finishing of the premises. It is widely used both in office premises and in residential properties. The material used in these construction works was varied before. Everyone who wanted to become the owner of a suspended ceiling chose an individual option to suit their taste and wallet. Someone could afford plywood, and some used fiberboard or chipboard. Scheme of the frame device for the ceiling fromplasterboard. But progress does not stand still. Today, an affordable and no less high-quality material has appeared - plasterboard. And experienced builders asked themselves the question: "How from plasterboard?" Despite its relatively low cost, plasterboard has high technical qualities, which significantly distinguishes it from similar products.
Main characteristics
If we talk about the frame for the ceiling, then earlierit was made of wood. Special slats were used for this. A mandatory condition was high-quality dried material. It was covered with a solution with an antiseptic. This option was good in all respects. But, like any wood, the frame made of this material was not moisture-resistant. It was impossible to use it for finishing the ceiling in rooms with high humidity. If it was used, such a ceiling did not last long. Due to the fact that the slats were constantly in contact with moisture, they were subject to deformation, which, in turn, was reflected in the ceiling. Its surface became uneven, and in some parts there were streaks. The appearance of metal profiles on the construction markets instantly changed the situation.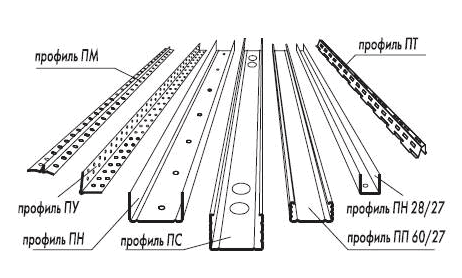 Types of profiles for plasterboard.For each ceiling, you can select a specific profile shape. You can also select a section. This allows you to make a structure even for increased loads. If you want to make a suspended ceiling from plasterboard, then the frame for it is made of two main types of profiles:
- profile of the guide type;
- profile ceiling type.
These types are ideal for performingsuspended ceiling. There is also a rack-type profile. But you should know that it is used for wall construction. It is not suitable for ceiling work. Each type of profile is manufactured according to certain standards. The material from which the forms are cast is galvanized steel. There are profiles on which the manufacturer has already provided holes for fasteners. Such a profile will cost a little more, but the process of construction work will be significantly accelerated. It is impossible not to note the convenience of such parts. If you have already decided on the frame of the future ceiling, you need to prepare additional materials. They will be required for the complete completion of the work. Return to the table of contents</a>
How to make a frame: additional materials
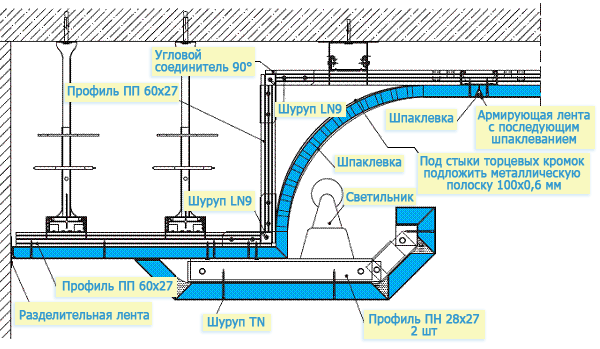 Scheme of a two-level ceiling.
- self-piercing type LN;
- screw drilling type LB.
If it is necessary to fix drywall to a finished frame, you should use:
- self-piercing type TN;
- self drilling drilling type TV.
When making a frame for a suspended plasterboard ceiling, it should be taken into account that a lot of metal profiles will be needed. Each profile performs its own function. Return to contents</a>
The process of manufacturing a frame for a gypsum board ceiling
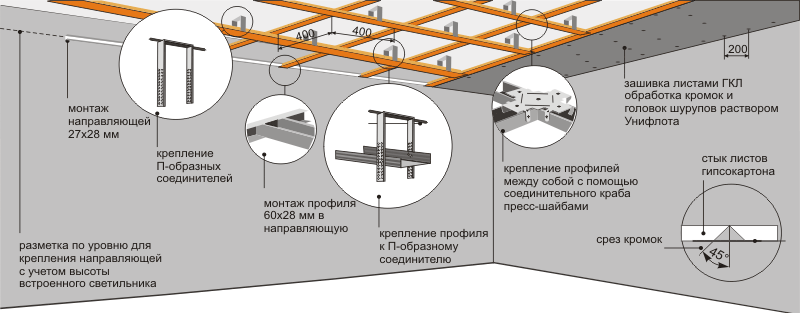 Installation diagram for a single-level suspended ceiling.Step 1. First, make some marks. Use them to outline the contour of the future ceiling. To do this, you need to determine the lowest corner point. This can be done by measuring the height in each corner. The result that is the lowest will be the lowest point. Measure a certain distance from it. This is necessary to hide cables, pipes and ventilation. Step 2. To complete the next step, you will need to use a level. Advice: it is preferable to use a laser level, as it allows for more accurate measurements. Pencil marks are made along the lines emitted by this device. Guide profiles will be located in their place. Step 3. After completing the previous step, you should use a hammer drill. Apply the guide profile to the wall. Use a hammer drill to make holes in it. The distance between them is about 50 cm. Step 4. Attach the profiles using dowels or screws. Here, you can make the work easier by using a screwdriver. Important! Make sure that the profile is exactly on the marked line. Stage 5. Marking the rough ceiling. This is necessary in order to accurately and correctly install the remaining profiles. From each wall, you should step back 60 cm. And adhering to this figure, draw parallel stripes. Straight hangers will be fixed on these lines. The distance between each hanger is about 50 cm.
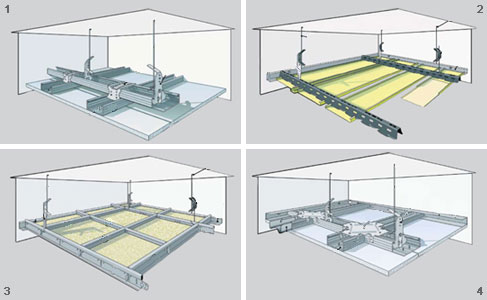 Installation diagram of the first level of a two-level systemceiling. Stage 6. Preparing the ceiling profiles. First, they need to be measured and cut to the required length. Advice! Each profile should be shortened by 0.1 cm less than the length of the line. This will help you insert the ceiling profile into the guide if necessary. Stage 7. Before installing the ceiling profiles in the structure, threads should be inserted between the guide elements. They should be parallel and create a horizontal space. The entire structure will be in this plane. Stage 8. After completing the previous stage, install the prepared profiles. They are attached to both the main guides and the straight-type hangers. Stage 9. Since the longitudinal profiles are already fixed, you need to install the transverse ones. They are cut from the ceiling ones. Their length does not exceed 60 cm. To correctly orient yourself by the size, you should measure the distance between the longitudinal profiles. Each transverse section is fixed with a crab. So, thanks to the implementation of all the above stages, you get a frame for a suspended ceiling made of plasterboard. After finishing the rough work, you can begin installing the drywall sheets themselves. They are assembled from the far corner of the room. Each sheet must be tightly and accurately laid on the frame. After that, it is attached to it using self-tapping screws. And what distance should be observed when fixing drywall sheets to a metal frame? The best option is a step of 10-15 cm. But do not forget about the distance from the edge of each sheet to the hole for the screw. It should be at least 1.5 cm. How to treat the joints between drywall sheets? The seams are treated with serpyat tape and putty. All screw heads must also be sealed. Then the ceiling should be treated with a primer. The next layer, which is applied over the primer, is a thin layer of putty. Ideally, several layers are applied. Then they wait until the coating is completely dry. When this happens, you can begin the finishing work. Return to the table of contents</a>
Tips and advice when working with plasterboard
Sometimes the drywall sheet can't fitcompletely. In this case, it needs to be adjusted to size by carefully cutting it. First, you need to make marks with a pencil. Then, with a hacksaw or a large knife, the sheet is cut. After that, a break is made on the drywall. This will make it easier to cut off the desired piece. Each edge needs to be planed. Like any construction work, making a frame for the ceiling is a complex and painstaking process. But its final result fully justifies the effort and money spent.


