Drywall has become the most popular building material for apartment renovations today. It is also used for ceiling finishing, as it is an excellent leveling material. A suspended ceiling is a structure made ofplasterboard, which is attached using profiles. The disadvantage of plasterboard is that after its installation, the room loses several centimeters in height. Therefore, it is better to use plasterboard in fairly high rooms. The disadvantage of plasterboard, due to which many people give up the idea of making a suspended ceiling, is the weight of its sheets. Some people are concerned that the lathing will not withstand them, but a properly made frame will hold the ceiling like a death grip. A suspended ceiling will not only hide defects, you can lay insulation and cables above it, which are connected to any point of the ceiling. A plasterboard ceiling is the best option for finishing the ceiling in most rooms.
Installing the battens
It is better to make a suspended ceiling from 9.5 mm thick gypsum board. For such sheets, a frame is calculated, which is assembled from:
- guide profiles;
- ceiling profiles;
- "Crabs";
- P-hangers.
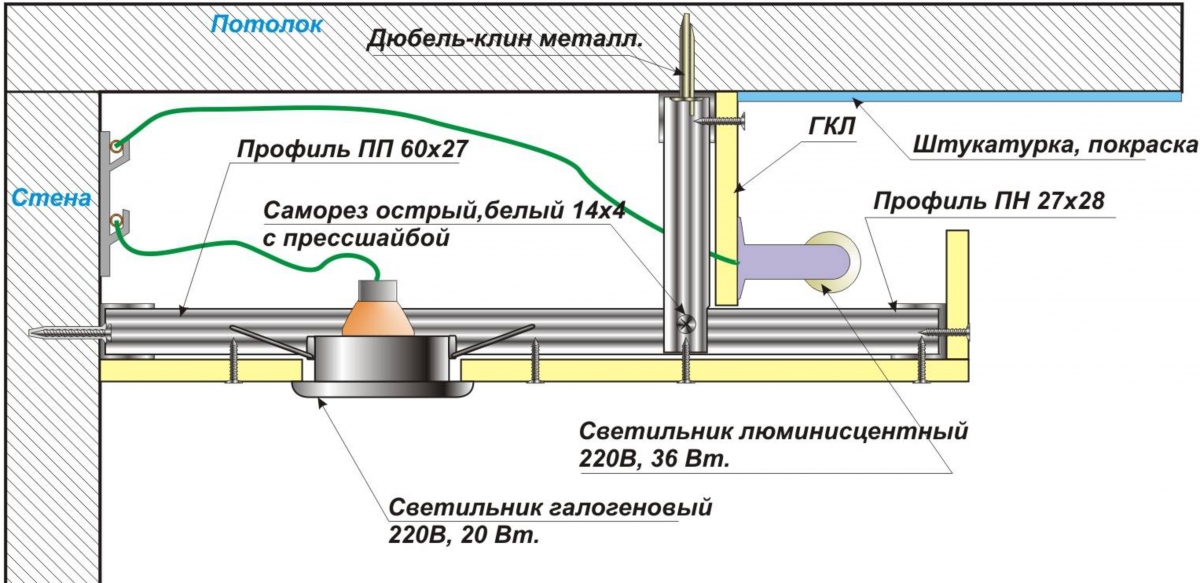 Suspended ceiling diagram.To fix all the elements of the lathing, dowel nails and self-tapping screws are used. It should be noted that U-shaped hangers are used if the new ceiling is no further than 12.5 cm below the main one. For a greater distance, adjustable hangers on rods are used. The guide profiles are installed after marking the horizontal of the future ceiling on the walls of the room. This operation is performed using a water or laser level. The lines are applied to the wall with a chalk line. Above them, the profiles are attached to the walls with 6-mm dowel nails, the distance between which should be 30-40 cm. The first ceiling profile is installed 30 cm from the wall, the distance between adjacent strips should be 60 cm, the gap between the last profile and the wall should not exceed 60 cm. The U-hangers are attached to the ceiling above the lathing strips. The strips are aligned horizontally using a fishing line stretched between the opposite walls and are attached to the hangers with self-tapping screws. The step between the suspension elements should not be more than 60 cm. Using single-level connectors ("crabs"), the crossbars are attached to the frame. After the lathing is aligned horizontally, the excess U-hangers protruding beyond its plane are bent towards the main ceiling. Before installing the plasterboard, you need to check the rigidity of the structure again and, if necessary, additionally strengthen all connections with self-tapping screws (for mounting a profile frame, it is better to use fasteners with press washers). Return to the table of contents</a>
Installation of plasterboard
Now you can start installing the drywall.The profile pitch for its fastening was not chosen by chance: the standard width of the gypsum board is 1200 mm. It is difficult to hang gypsum boards on your own due to their size and weight, so it is better to carry out this operation with an assistant. The sheets are attached to the lathing with self-tapping screws, the heads of which should be recessed into the gypsum board. The fastening pitch should not exceed 20 cm. Self-tapping screws are cut not only along the perimeter of the gypsum board panels, but also into all transverse profile slats. It is better to hang gypsum boards in a checkerboard pattern so that the joints between the boards in adjacent rows do not coincide. A 2 mm expansion gap must be maintained between the sheets. After installing the gypsum board, holes are made for the lamps, and serpyanka is glued along the seams of the gypsum board. After this, the joints and places where the gypsum board is attached to the frame are putty. After preliminary puttying, a finishing layer of putty is applied to the surface.


