If we talk about finishing the ceiling surfaces,the first material that immediately comes to mind is drywall. With the help of it, you can not only, but also create a unique design. The main advantage of this material is that even if you do not have the skills to work with it, you can easily learn it. Just before you do it yourself out of drywall, you should familiarize yourself with the process technology. Even in a small room, be it a bedroom or a living room, with the help of this design it is possible to divide the space into zones.  Layout of the ceiling under drywall.
Single-level ceilings from plasterboard with own hands: material calculation
Starting to produce such works, especially thatAs for beginners, it's best to make a plan for yourself. It will be easier to act on it, besides, you can immediately see all the mistakes and shortcomings. By the way, the ability to plan your activities significantly shortens the time for mounting, the process will not be stretched. In general terms, the entire process for the design of ceilings must go through the following stages: 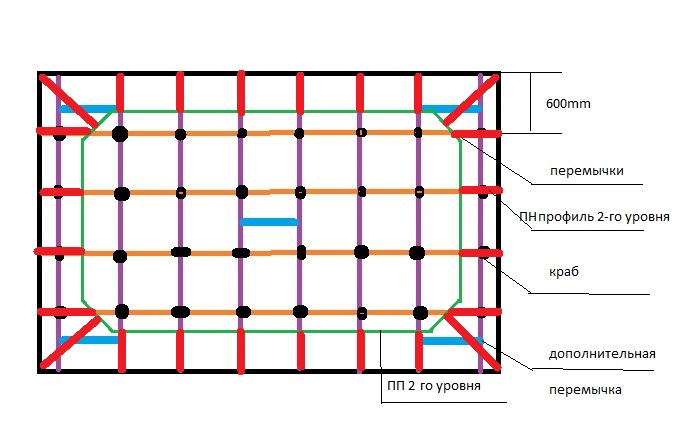 Scheme of installation of the second level of a two-level ceiling.
- training;
- the creation of a framework based on metal profiles;
- installation of GCR;
- finishing work of the received design;
- putty ceiling;
- ceiling decoration;
- installation of light.
Each stage has its own activities, whichare subject to mandatory implementation, so that the ceiling of gypsum board was made correctly. As already mentioned, correct calculation helps save time, so you should know what materials are useful in this process:
- gypsum board (there are special sheets designed for these purposes);
- metal guide profile "UD-27" and bearing profile "CD-60";
- U-shaped suspension;
- cross fastening under the name "crab";
- straight fasteners;
- plastic dowel and self-tapping screw 0.6 x 4 cm;
- galvanized self-tapping screw for metals with a cross section of 1.2 cm;
- screw 4.5 cm.
The number of listed materials should be determined in a particular case separately. After all, each design will have its own expense, which will also affect the size of the room.  One-level ceiling from gypsum board. I would like to say a few words about the drywall itself. Under the ceiling, it is better to choose a material 9.5 or 12.5 mm thick, with the first sheets being preferable, since their light weight simplifies assembly and installation. If you make your own ceiling with gypsum board in the kitchen, it is better to give preference to fireproof or moisture resistant grades of material. For bathrooms it is necessary to select the marking with high resistance to moisture. After the design is ready, it should be processed, and for this you need:
- serpyanka with a width of 5 cm;
- priming mixture;
- gypsum plaster for finishing;
- sandpaper "0";
- Grid for grinding surfaces.
A few words about the purchase of material. Creating ceilings from gypsum board, it should be remembered that there is always such a moment as the material's marriage - breakage, wrong incision, etc. Therefore, when calculating the required quantity, it is better to take it with a margin (about 5%), but not enough. As for the profiles, then "udeshki" take, focusing on the perimeter of the room. The same amount will be needed for jumpering. "Tsedeshki" are intended for fastening to "Peshki" with a step of 6 cm. The sections of the bearing profile are mounted first of all at a distance of 30 cm from the walls, that is, two strips will be attached along the side walls of the room. Further, each subsequent section of the profile goes at a distance of 60 cm, but it can be less. To calculate how much CD-60 is needed, you need to multiply the length of the room by the number of rows received. Back to contents</a>
Mounting the frame: recommendations
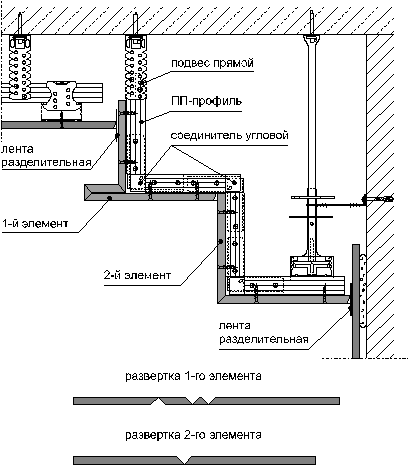 Ceiling frame scheme for broken shapesdrywall sheets. After the material is purchased and delivered to the place of deployment, you can proceed to the first stage of creation. First of all, the marking is done on the surfaces. This process should be accompanied by the application of the level. Immediately I would like to note the moment that it is best not only to markup, but also to carry out all the work together with a companion. This will help you see all the irregularities and errors, besides, despite the relative lightness, drywall is not so easy to constantly hold in your hands. Controlling the markup level, control points are placed around the perimeter of the room. And here you need to immediately note a very important point: plasterboard ceilings fall at least 30 mm. You should also remember about lighting devices. If spotlights are planned, then the ceiling should be lowered to the height of the device. Further, the resulting points are connected by a line. In this case, specialists use a special masking thread, which leaves a mark on contact with the wall. The ceiling is marked for straight suspensions and bearing profiles. After that, following the contour, the guide profile is attached. To do this, use dowels, which are screwed in at a distance of 30-45 cm from each other using a drill. After that, there is a fastening of direct suspensions at a distance of 60 cm along the markings. Each end goes down exactly 90 ° to form the letter "P". After that, "tsedeshnye" profiles are mounted to them. It is worth noting that the usual profile length is about 3-4 m, so sometimes it becomes necessary to join them using a connector. "Crabs" are mounted on supporting profiles at a distance of 60 cm from each other. I would like to note a very important point: all connections of profiles and fasteners must be carried out with a 90 ° angle. Wiring under plasterboard ceilings is as follows. After the frame for the ceiling is ready, you should do the wiring for the lighting. The entire branching system is hidden in corrugated pipes and fastened to the ceiling with clamps. Depending on the layout of the lighting, a loop of wire is released at each point. Back to the table of contents</a>
Installation of drywall yourself: recommendations
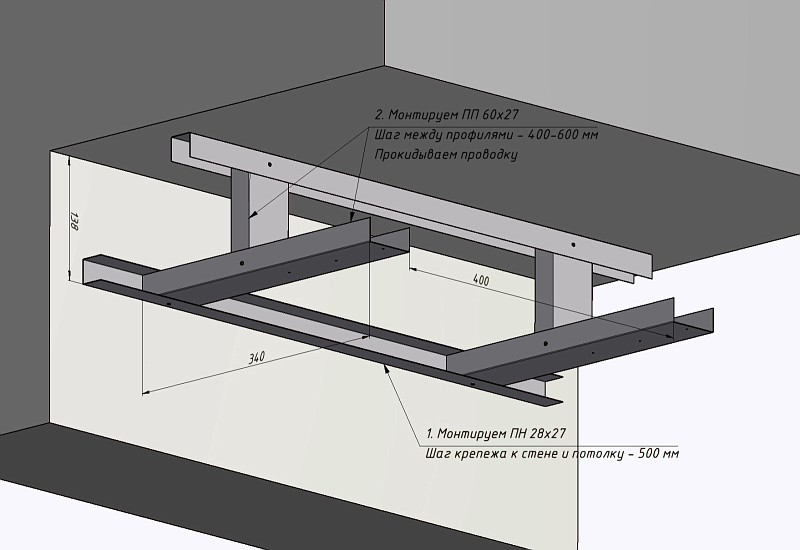 The scheme of mounting the profiles on the wall and ceiling. Regardless of the size of the room, first of all, solid sheets are attached. After laying the first row, the second is produced in the same way, but already with a displacement. That is, the connections in the first row will be covered with the material of the second, but only in such a way that it is not less than the approach to one profile. Working around the perimeter of the room, it is important to know that the plasterboard is laid on the ceilings so that a distance of about 0.5 cm remains to the walls. This is done so that the temperature and moisture expansion of the material does not affect the structure. The absence of such a gap will lead to the formation of cracks in the ceiling. After the ceiling is finished, use a drill with the appropriate nozzle to create holes for the lighting fixtures. Further, in them wires of electroconducting are deduced. Back to contents</a>
Ceiling surface finish
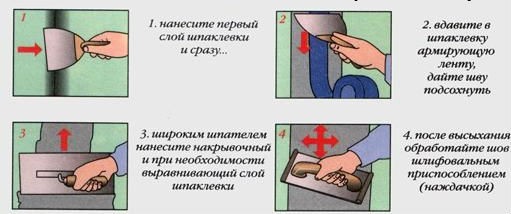 Scheme of puttying of seams on the ceiling from gypsum board. After all the above works are over, it remains to finish the finishing moments. To do this, using a roller on the ceiling of gypsum board is applied ground mixture. As soon as it dries, the surface is pasted with a sickle, with the purpose of reinforcement. Next, the putty is prepared, which will be applied by a spatula on the ceiling. Its layer should be 1.5-2 mm. After it dries, the surface of the ceiling is thoroughly grinded with a grid, and at the end also with sandpaper. Then the primer is applied. After the ceilings are completely dry, you can finish the finish. Such a ceiling from gypsum board is ready for wallpapering or painting. If the ceiling is painted, it is better to choose acrylic, latex or water-based paints. But here there is little advice: if there is a desire to use matte paint, it is better that the surface was not zashpatlevana. But then it will be applied in several layers. But for glossy paints the surface of the ceiling should be perfectly flat. As for wallpaper, there is no need to choose a particular type. All the wallpaper falls perfectly on the surface of the plasterboard. And how to install point lights in the ceilings? At one stage of the wiring lay hinges that now need to be cut and cleaned off their edges by about 2-2.5 cm isolation. Next, the terminals and luminaires are connected. To do this, it is necessary to press the springs on the body of the device and install it in the corresponding hole. Then the lamp is screwed into the base. Why exactly spotlights? In fact, drywall is not so durable, and if you hang a heavy chandelier on the ceiling, it is likely that it will not last long. Back to contents</a>
How to make the ceiling on several levels with your own hands?
 Ceiling scheme with illumination. Ceilings on several levels are done a little differently than the previous version. But at the same time such work is quite feasible on its own. In general, if you judge objectively, then this option simply assumes the decorative form of each level. Here the main problematic point is the flexing method of drywall. To solve this issue, you can use either a dry or a wet method. In the first case, grooves are made on the bending side. In the second version, a roller is used, which pierces the surface of the plasterboard, and also wets it with water in parallel. Once the sheet is wet, it is given the necessary shape. If it is necessary to create steps on the ceiling, the material is ground at an angle in those places where there will be a bend. In general, special difficulties to install a ceiling from gypsum board should not cause. Everything is elementary and simple enough. Of course, it is better not to perform such work yourself, but together with a partner. Firstly, this will greatly accelerate the process, and secondly, it is more fun. In any case, now you know exactly how to make a ceiling from gypsum board. Good luck! </ ul>


