Drywall can be called universalbuilding material. With its help you can create not only flat walls, multi-level ceiling, arches, partitions, but also various shelves that can become a decoration of the modern interior. How to make a shelf of drywall or a rack, so that you can put on them books, vases with flowers, frames with photos and even TVs and music centers, you can find out by acquaintance with the tips for creating them. It is necessary to add that you can make gypsum board furniture in the bathroom. And for operation in rooms with a high level of moisture produced moisture-resistant GKL. 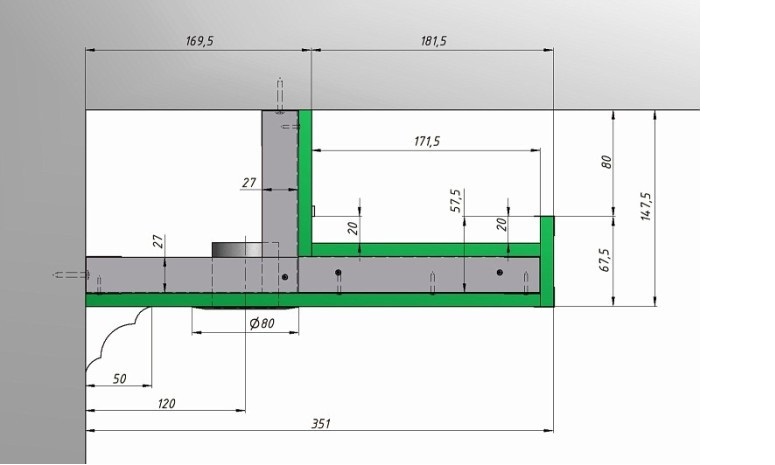 Figure 1. General scheme of the shelf from plasterboard. Drywall is extremely easy to process material. This is his main advantage. At the same time, its fragility does not allow the creation of solid structures from the GKL without the preliminary construction of the frame. The skeleton of the gypsum board is assembled from the same elements as when covering walls or ceilings. You can make a frame and from wooden bars, and from metal profiles. To fix plasterboard furniture it is necessary to the capital reasons. If the frame of the rack is not arranged near the wall, then it should be built according to the same principle as the plasterboard partition in the room. The frame of the shelf is hung on a brick, concrete or wooden wall, and its attachment to the surface from the GCR is unacceptable. If you trim the GKL room and already know how to place the shelves and shelves, then make their frames during the construction of the crate under the drywall.
What you need to prepare to create a shelf or shelf
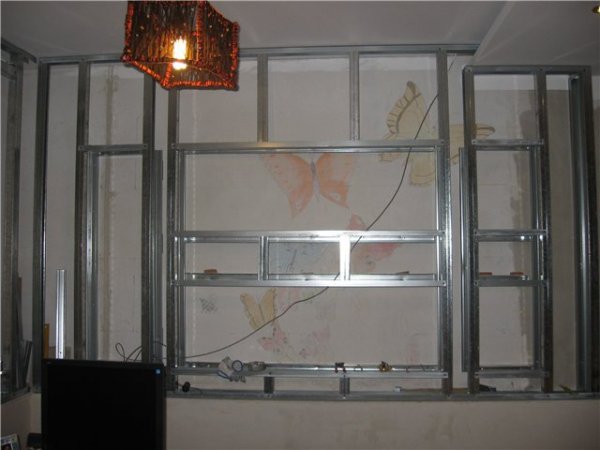 Figure 2. The frame for the shelves of plasterboard is assembled from metal profiles. Before you make shelves of plasterboard, you need to decide on their size and appearance. Although these products after installation will not look massive, their vertical and horizontal partitions will turn out to be quite thick. When making markup, consider this circumstance so that after assembling in them those objects which you intended to put there are placed. Try drawing a shelf or rack with the dimensions of the parts to facilitate your further work (Figure 1). To make shelves of drywall yourself, you need to stock up on the following tools and materials:
- GCR;
- guide (UD) profiles;
- rack-mount (CD) profiles;
- scissors for metal;
- a square;
- with a construction knife;
- self-tapping screws;
- dowel-nails;
- level;
- a marking tool;
- perforator or impact drill;
- screwdriver;
- putty;
- spatulas;
- sandpaper;
- a serpent;
- a primer;
- paint;
- roller or brush.
Guided by the drawing, you can more accuratelyDetermine how much consumable you will need to build a gypsum board shelf. After acquiring it, you can start working. Back to contents</a>
Construction of a frame
 Figure 3. Scheme fastening the frame to the wall and ceiling. The initial stage - the creation of a frame (Figure 2). If the shelf is to be installed on the wall (without being supported on the floor or suspended from the ceiling), it is necessary to build a reinforced frame with a more frequent arrangement of profiles. Doing great depth and long jumpers for it should not be. More durable are the suspended structures, in which the upper guide is bolted to the ceiling, and the side profiles are attached to the walls (Figure 3), or shelves resting on the floor. Strengthen the frame and then, when on the shelf is supposed to install a heavy object like a TV. If you are ready to start working, prepare a tape measure, a level and a pencil and apply markings to the wall. In addition, marking is done on all surfaces to which the rack will be attached. Scissors for metal cut the guide profiles into lengths of the required length. Lay out the perimeters of all the faces of the shelf. UD are laid on the floor and suspended from the ceiling. They are fixed on the surfaces by dowel-nails, but first in the profiles holes are drilled, and through them marks of attachment points are made. At these points holes are drilled for dowel-nails 6x40 mm.
 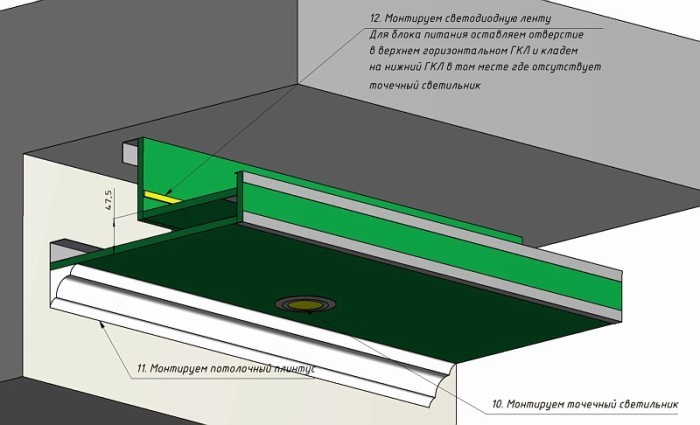 Figure 4. Diagram of lighting installation. If the walls are uneven, then for UD mounting it is necessary to use U-shaped sags. After fixing the wall bars, the other guides are installed. Between them, they are pulled together by screws with press washers. The remaining jumpers of the gypsum board are made of CD-profiles. They are fastened to the guides using special connecting devices - crabs. On the front side of the crabs do not need to install, since they will interfere with the lining of the frame with plasterboard. Perhaps you decide to make shelves of gypsum board with backlight, then lay the wiring inside the frame to the points of installation of the fixtures. As the finished frame looks like, in which the wires are laid, it is shown in Fig. 4. To facilitate the installation of luminaires, lead the wiring as close as possible to the installation locations. After that, it is better to fix the cables on the profiles. By doing this, you will quickly find the connection contacts. Back to contents</a>
Facing the frame with sheets GKL
Now you can proceed to cutting the facingmaterial for the gypsum board. GKL is easily cut with a construction knife, but special attention should be paid to the accuracy of the layout when preparing the rack parts, so do not forget to use a square and a ruler to measure the diagonals of rectangular blanks. If the markup is done accurately, the lines connecting the opposite corners of the parts will be the same. 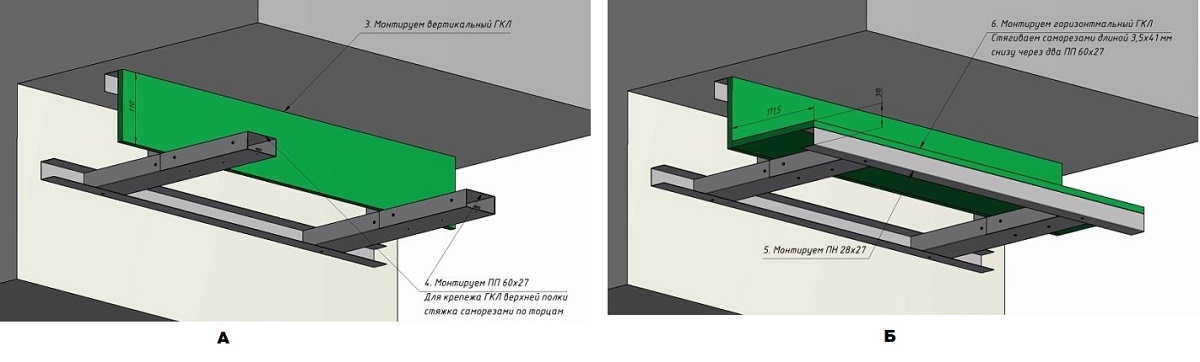 Scheme plating carcass plasterboard: A - vertical parts, B - horizontal parts. The sheets of gypsum board are screwed to the frame with screws. For the luminaires in the GKL, holes are drilled in advance (before the installation on the frame). It is best for this operation to use a drill with a crown of the desired diameter. Before drilling, it will be sufficient to determine the center of the hole. If there is no tool, you can use other tools. These include:
- construction knife;
- hacksaw for GCR;
- electric jigsaw.
The contours of the hole are applied to the finished template. For marking, you can use the compass and ruler. This method is useful if the accuracy of the installation location of the luminaires is important to you. After screwing the GCR, all seams, joints and screwing points of the screws are treated with a primer. Then the seams and joints are pasted with a sickle, and then they are filled with putty. After it is dry, the gypsum board is covered with a layer of primer. As soon as it dries, all the surfaces of the shelf are shpatted. The next day they are sanded with sandpaper. After removing dust, you can start painting or pasting the rack. Back to contents</a>
Construction of plasterboard cabinet
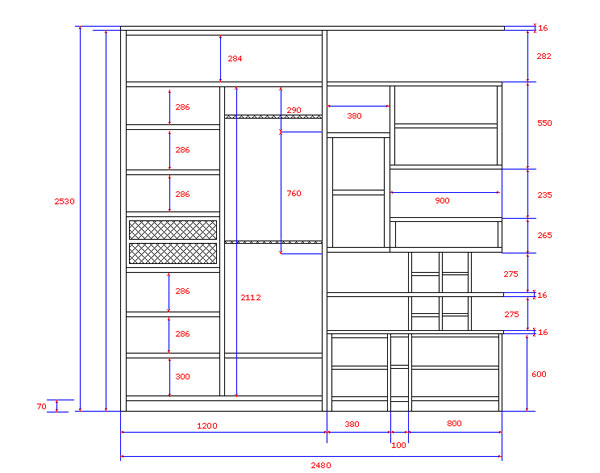 An example of a drawing of a cabinet made of plasterboard. If your design occupies the entire space from floor to ceiling, you can make it a full cabinet with sliding or swinging doors. Of course, it will not be possible to make them from the GKL. Instead of drywall, you can use chipboard, plywood, OSB or MDF. The door frame must be made of bars. Its dimensions depend on the dimensions of the cabinet. In the frame, you can make jumpers, if in the cabinet there will be 2 or more tiers with doors or additional posts for fastening the doors. The breadth of the front part of the bars should correspond to the width of the front part of the profile. The wooden frame is treated with an antiseptic and attached to them during the installation of the frame. The sides of the plasterboard are cut out taking into account the thickness of the wood. Having bought in the store material for doors, you can cut their parts to the right size. For swinging doors it is necessary to purchase special awnings for furniture. The sliding elements will move along the guides. The necessary mechanisms and guides are also sold in furniture stores. The trimmed edges of the chipboard or MDF are pasted with a melamine tape. The edges of plywood or OSB are sanded, and the materials themselves can be varnished, painted or glazed with MDF. It remains only to install on the handle cabinet doors. Back to contents</a>
How to bend a gypsum board
Sometimes the creators of plasterboard racks, cabinetsand the shelves want to move away from the straightness of the forms and decorate the products with curved elements. The front part of this cabinet is cut very easily. It is enough to apply markings on the GCR or attach a templar to it, and then cut out the detail of the desired shape. But in order to bend the sheet, it must be previously wetted. Before soaking the drywall, cut out the plywood template with an arcuate edge. On it will be a curved stove. From the GCR cut the workpiece somewhat longer than necessary, length. Then the excess plasterboard can be cut. Pierce the cardboard on one side of the workpiece by one-third of its thickness with a needle roller, an awl or fork. Wet the GCR for half an hour with a wet cloth. After that, the sheet is put in the cutout of the template and the gypsum board is given an arc shape. It persists even after the drying out of the GCR. Curved plasterboard is laid on a metal profile. On its side walls frequent incisions are made, so that the profile can also be bent into an arc. Screws to it are fastened to the front sheets. If the rack is at the wall, then one of the profiles is attached to it. After that, a curved detail is screwed onto it. Further processing of drywall is carried out with putty, serpyanki, sandpaper and various kinds of coatings.


