When repairing an apartment, many are facingchoice: paint the walls or glue them with wallpaper? To answer this question, it is necessary to take into account many different factors. To facilitate the choice, you should know that the wallpaper has two big advantages before painting: when using them, the walls are decorated with a nice pattern, they can be made textured, suitable for the design of your apartment. To do this, you just need to learn a few techniques for fast wallpaper stickers. Below are the recommendations and technology for doing such work.  Before you start to wallpaper, you need to make sure that they are all from the same lot and they are enough to cover the entire area.
How to choose a suitable wallpaper for the room
The collections of this production offered in the market and in building stores represent a huge choice on such parameters as:
- texture of wallpaper material;
- various types of design studies;
- invoice of different types;
- a variety of color compositions.
The wallpaper itself is divided into the following types:
- ordinary wallpaper, washable, waterproof - in relation to moisture;
- Heavy and light - in density;
- smooth wallpaper, with a relief surface, with a shallow or deep pattern - according to the type of surface;
- monochrome species or with small and large patterns - in color;
- combined wallpaper.
To choose the wallpaper suitable for your apartment, you must follow the following principles: 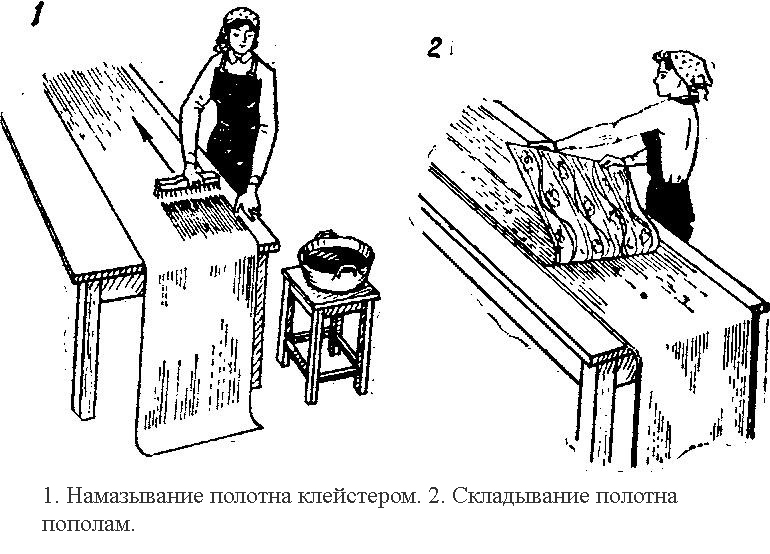 Figure 1. Scheme of applying glue to wallpaper.
Back to contents</a>
How to calculate the desired number of wallpapers
First, measure the height of the walls from floor to ceiling. Rolls are usually 10 m long. Therefore, divide ten by the number obtained in the measurement and get the number of whole panels that go to the wall from one roll. The width of the wallpaper is 50 cm, so we measure the room around the perimeter and divide this number by 0.5 (all measurements should be made in meters) and the number of cloths obtained earlier. As a result, we get the number of rolls needed for the room. To eliminate the mistake and insure against trouble, you need to purchase 1-2 rolls more than the calculated result. Pasting wallpaper on one room takes one day. When buying them, make sure that all the rolls have the same design number. Combined wallpaper itself is not recommended to stick - for this work it is better to call a specialist. Back to contents</a>
How to prepare a wall surface
 Folding the wallpaper. Wallpapers are glued to plasterboard or plastered walls. It is not recommended to paste new rolls on old ones. If the wall is painted, then it must be cleaned of the paint with a special liquid (it is sold in construction stores). On the porous surface of the plaster, before the sticker, a layer of wallpaper glue is applied, which is then allowed to dry out - this will help to move the canvas along the walls for combining the patterns. Back to contents</a>
How to mark a room
It is necessary to start the pasting from the corner - this is necessary forhiding the defects of the pattern, if it is incorrectly aligned (usually it happens on the first or last piece). When applying a large picture, it must be taken into account that if there is any architectural decoration (arch, fireplace) in the room, then the first canvas will need to be pasted along the axis of this object. The subsequent pieces are glued on both sides of the first. After finding the starting point, the roll is used as a template for marking the position of the panels on the wall. If the joint is in an uncomfortable place, then you need to shift the reference point. If before a person did not do this kind of work, then it's best to choose a wallpaper with a small pattern, when sticking, which can optionally combine patterns. If you do not want to mess with glue, you can choose rolls with a ready-made glue film - they are much easier to glue. Before the beginning of work it is necessary to determine the direction of the pattern itself - often the producers mark it with an arrow pointing upwards to the ceiling. Back to contents</a>
Tapping wallpaper
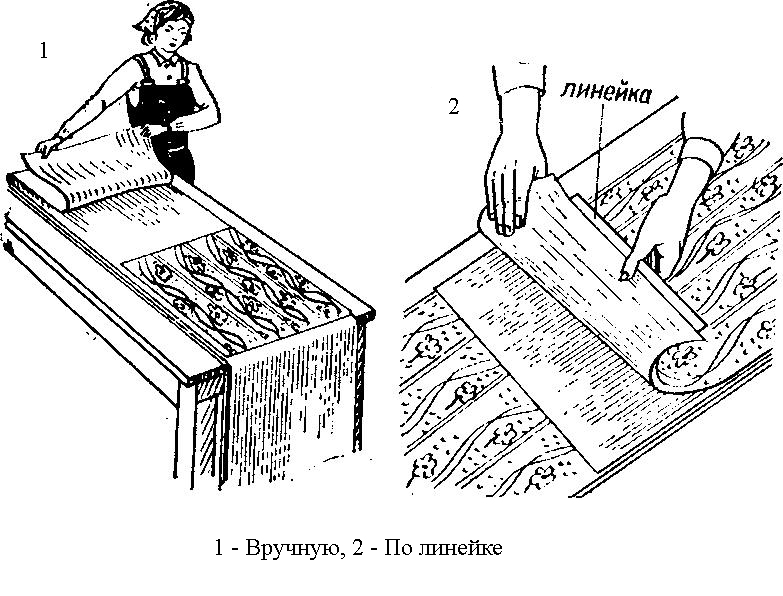
 The scheme of cutting wallpaper to length.First, you need to measure the length of the wall and add 10-15 cm to the resulting figure for fit on each side. Then unroll the roll and begin to mark the pieces. If the allowance is taken less, then there will be a need for a more thorough marking. When used in work, the table can be used as a template. From the very beginning, the first piece is cut off, making a minimum allowance of 5 cm. The drawing of the subsequent panel must be combined with the image on the first piece. Before, mark the entire roll, measuring the length along the table top and combining the patterns on all the pieces. Back to the table of contents</a>
How to choose glue
If you choose waterproof wallpaper (vinylor washable), you will need a special adhesive compound with fungicide additives that will prevent the appearance of mold on the walls. When using ordinary wallpaper, a simple wallpaper paste is bought. Its label shows the number of rolls, which can be glued, by purchasing the given amount of adhesive composition in the pack. Do not try to paste new linens on old wallpaper - the glue will impregnate them unevenly and they will lag behind the wall. To dilute it, slowly pour the contents of the package into the amount of water indicated on the label. The mixture is constantly stirred to prevent the appearance of lumps. It is necessary to allow to settle with glue (the time of this operation is indicated on the label). Its properties, it saves about 6-7 days. The marked pieces of wallpaper are laid out on the floor. They should be put downwards. The glue is applied to the middle of the piece with a brush or a hair brush spread over the whole surface of the fabric for its entire length. If the glue is on the floor, it must be immediately wiped off with a damp sponge. The smeared edge of a piece is folded with glue inside that allows to keep it from drying and gives time to transfer a cloth to a wall.  The scheme of the order of wallpaper gluing. If you work with thick wallpaper, then they need to give time to impregnate with glue. Therefore, the canvas ready for the sticker is temporarily put off and begins to smear the adhesive composition onto the next piece. It is possible to use wallpaper with a glue composition applied to them by the manufacturer. For gluing such products it is necessary to use a plastic trough in which to put a roll of wallpaper. Fill the container with water and put it near the wall. Cut a piece of the desired length (do not forget the allowances) and roll the roll top end outwards, and face up. Immerse the wallpaper in the water for the time indicated on the label, and then take them by the top edge and drag along the wall towards the ceiling. Excess water will merge into the trough. The panel is adjusted to the desired dimensions, smooth and cut off by marking. Back to contents</a>
How to stick a wallpaper: the process of stickers and fits
The first piece is glued with a plumb line. Since the corners of the room are never strictly vertical, it is not recommended to align the first sheet with them. If the piece is misengaged, a defect in the location of the main pattern will subsequently appear. Therefore, using a plumb line, apply a vertical line to the wall. The distance from the corner of the room should be 2.5 cm less than the width of the roll. For work you need a table or a stepladder, otherwise it will be impossible to reach the ceiling. Approaches to the walls should be free, because you need to work quickly until the glue is dry. Bring the canvas to the wall and bend the top edge. Shift it upward, so that it comes to the ceiling by about 5 cm. Combine the edge of the piece with a vertical line drawn along the wall. During this process, part of the canvas will lie on the next wall and close the corner. Smooth the wallpaper with a soft rag or hair brush. The direction is held from the center to the edges. Then unfold the lower part, with glue and, pressing it to the wall, smooth. The part located in the corner is carefully leveled. Back to contents</a>
Step-by-step technology for further work
To quickly paste wallpaper, you need to do the following: 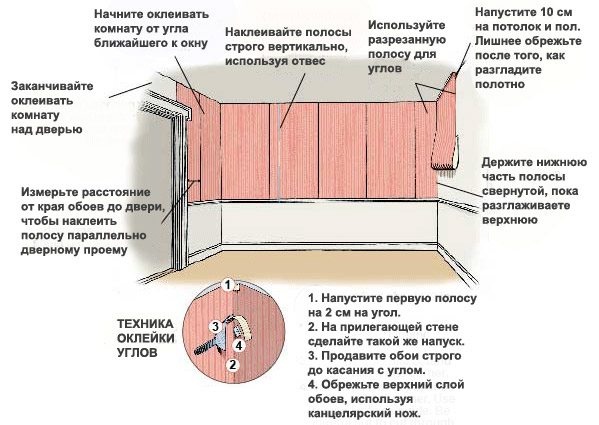 The scheme of wallpaper gluing.
Scissors or a pencil draw a line betweenceiling and wall, separate the wallpaper and cut off the markings. Then put into place and smooth. The same process is produced by the skirting boards. Apply glue and carry the next piece to the wall. Bend his top, press against the wall and combine a pattern with the previous cloth. Smooth and cut. So they stick all the rolls. It is better to start this work from the window - then there will be fewer joints. The wallpaper should go in part to the ceiling and skirting boards. When working, keep the pieces as flat as possible. If the person is a right-hander, then for convenience he must work clockwise. If he is left-handed, then the process goes in the opposite direction. During the sticker, large and small air bubbles form under the wallpaper. If this formation is large and located in the middle of a glued piece, then you can remove it in this way: you need to pierce the bubble and allow the air to escape. Then in the syringe type the glue and inject it into this place under the wallpaper. Carefully smooth the surface of the corrected cloth. Back to contents</a>
Materials, tools and devices
Independent and fast wallpapering is possible for any newcomer, the main thing - do not deviate from the above technology of doing this work and strictly follow the recommendations. </ ul>


