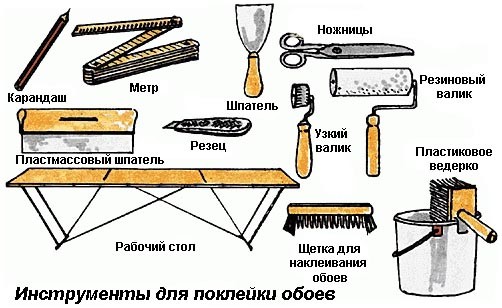
Many people like vinyl wallpaper.They have a beautiful structure, do not lose their attractive appearance for a long time, hide minor surface defects and withstand the effects of moisture with the addition of detergents. Due to their unpretentiousness, they are easy to stick on your own, you just need to follow some rules. Then the repair will be a pleasure, and the room will acquire a luxurious look. Vinyl wallpaper has a luxurious appearance and does not require careful maintenance. How to glue vinyl wallpaper? First, you need to prepare tools and materials. For work you will need:
- stairs-stepladder;
- plumb bob (you can tie a weight to the rope);
- Measuring tape measure and wooden meter;
- pencil;
- Scissors and clerical knife with breaking blades;
- Adhesive, specially designed for vinyl wallpaper;
- A wide brush or roller for applying glue;
- bucket or other container for glue;
- plastic spatula for smoothing;
- docking tape.
Before you paste the wallpaper, you must definitelymake sure that the old weak putty is removed, the surface is covered with a special primer. The windows should be closed, because drafts are unacceptable when gluing wallpaper. The sockets should be disconnected for safety reasons.
Ceiling to Walls and Walls
 Tools for gluing vinyl wallpaper.When planning to wallpaper both the ceiling and the walls, start with the ceiling. It is impossible for an inexperienced person to wallpaper the ceiling alone. In this case, you need an assistant who will support the canvas in the air. It is very convenient to do this with a mop. For the ceiling, take wallpaper weighing no more than 110 g / m². Vinyl wallpaper is glued end to end. To make the joint between the canvases invisible, they are glued on the ceiling in the direction from the window. If there are several windows, then along the long wall. Cut to length with a margin of 3-4 cm. If the pattern on the wallpaper requires combining the details of the image, then the 1st strip is cut to size, the 2nd is placed next to the 1st, the pattern is combined, cut off, etc. To avoid confusion in the canvases, the joints on the back side can be lightly marked - write the strip or joint number. Along the edge of the ceiling, draw a line with chalk or pencil at a distance slightly less than the width of the wallpaper. Stick the joint tape on this line. In accordance with the markings on the insert to the rolls, apply glue either to the wallpaper or to the ceiling (under each strip separately). After applying glue to vinyl wallpaper, fold the sheet like an accordion so that the glue does not dry out, and leave for 5 minutes. If the walls in the room are loose, apply glue both to the surface of the wall and to the wallpaper. Start gluing from the corner, aligning the edge of the wallpaper with the middle of the joint tape. Gradually straighten the sheet and use a spatula to smooth out the wallpaper to expel air bubbles in the direction from the middle of the sheet to the edges.
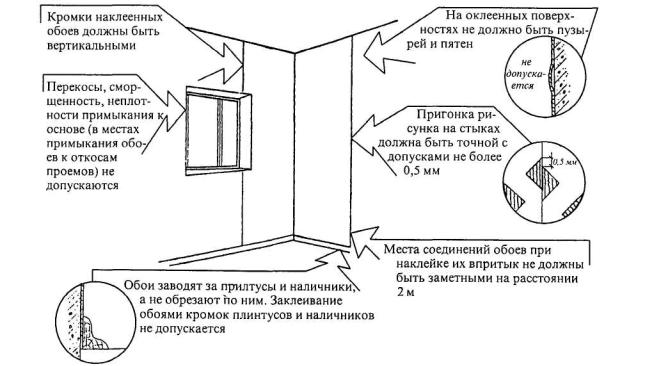 Basic requirements for gluing vinyl wallpaper.After the first sheet is glued, the next one is glued, aligning it with the edge of the first one, etc. When the entire surface of the ceiling is pasted, the excess edges of the wallpaper are trimmed with scissors along the perimeter. Check again to make sure that no excess glue or air bubbles under the sheet have gone unnoticed. You can glue vinyl wallpaper to the walls alone. Start gluing from the window or door. From the selected opening, using a plumb line, draw a vertical line under the first sheet at a distance slightly less than the width of the roll. Stick the joint tape on the line. Glue the first strip, smooth it out, drive out excess glue and air bubbles. Glue the second strip end-to-end to the first, etc. Use scissors to align the edges of the sheets at the ceiling and floor. Return to contents</a>
Sealing internal and external corners
Sticking vinyl wallpaper in corners is not very easyIt's simple, because there are almost no perfectly even corners in apartments. To get around this difficulty, apartment owners sometimes hire specialists to align the corners. However, when using vinyl sheets, you can do without unnecessary costs, having mastered some secrets. To wallpaper an inner corner, first cut a sheet 2-3 cm wider than the distance to the adjacent wall. Then generously coat the sheet and corner with glue. Glue the joint tape to the adjacent wall, then apply the wallpaper. Smooth out the sheet. Glue the next sheet tightly to the corner. It turns out that the sheets are glued end to end. Unlike the wall, this will not be noticeable in the inner corner. But there will be no folds or voids under the vinyl wallpaper. There are cases when the outer corner is well lit or the inner one is too uneven. Then the joint will be very noticeable. Do the following. Cut a strip 5-6 cm wider than the distance to the corner, glue it. The next strip is glued overlapping from the corner. Everything is aligned and smoothed out so that there are no voids or folds. In the center of the resulting double layer of wallpaper, a line is cut from the ceiling to the floor with a stationery knife. The top layer is carefully peeled off along the corner and the bottom layer is taken out. The top strip is removed from the other side of the cut. The resulting joint is carefully smoothed out. Sockets and switches are removed before gluing the wallpaper. In the places where they are installed, the wallpaper is cut crosswise and the corners are bent. After the walls have dried, the sockets and switches are put back in place. It is important to remember that the room can only be ventilated after the wallpaper has completely dried. Otherwise, the strength of their connection to the wall surface will be significantly reduced. Following these tips, you can not only save time and money, but also get a top-notch renovation in your apartment.


