Plastering of walls is the most important stageany repair. The quality of this work directly depends on two main factors: the quality of materials and the technology of performance. And these two points are closely related. Without the right technology, the quality of the material will not save you from marriage, and vice versa.  The main thing in plastering walls is the calculationthe required volume of plaster and the selection of the optimal solution. But today, most people prefer to use the services of experienced professionals, if there is a need for plaster. And this does not always mean that people do not want to work independently. Often they are just afraid of making mistakes, as they can not plaster. How can I quickly learn to do such work qualitatively? The process of plastering walls consists of several stages, the order of which must be observed first of all. Therefore, in order to learn to plaster the walls correctly, it is important to follow these steps, and also to listen to useful recommendations. Let's consider all these important moments in turn.
Materials and tools for work
Before taking on the job itself, you need tostock up in advance with all the necessary materials and tools. From this will depend not only the success of the work, but also the speed of its implementation. So, for oshtukaturivaniya you will need: 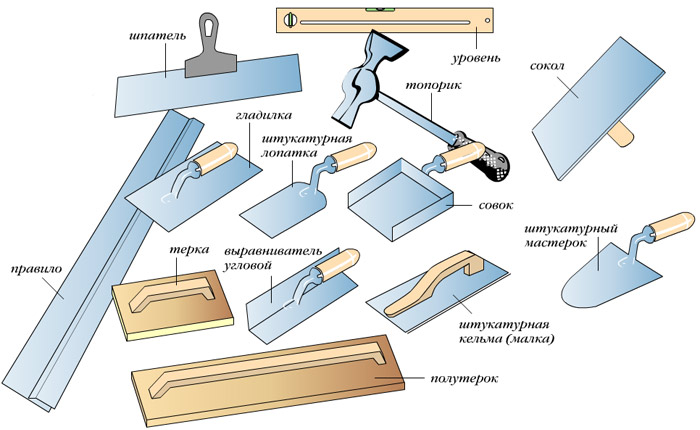 Tools needed for plastering.
- building level and plumb bob;
- Master OK;
- bucket is small for a set of solution for throwing;
- building mixer or special drill for mixing the solution;
- a hammer;
- a building hair dryer or a perforator with a nozzle to remove the old plaster coating;
- guide rails;
- roulette;
- wooden grater for grouting;
- a container of clean water;
- poluter and rule for leveling the solution;
- primer for walls;
- brush for primer application;
- a stiff brush;
- a spatula and a chisel for removing the old coating;
- fiberglass mesh;
- soft dry cloth.
Back to contents</a>
Removing the old coating
First of all, it is necessary to properly preparethe surface of the walls. If you do everything according to the rules, it can take quite some time, up to a week. But it is necessary to be guided by the fact that the preparatory work should be completed approximately 3-4 days before the beginning of the application of the main plaster. 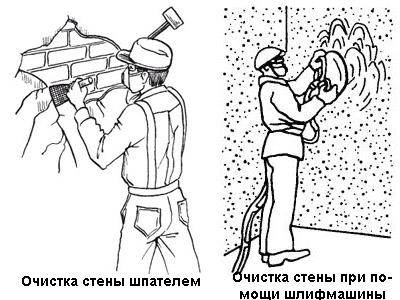 Scheme of preparation of the wall for applying plaster. First you need to free the walls from old coatings. First of all, old layers of plaster are removed, which are already poorly adhered to the wall. You can do this with a spatula, chisel. But if the process goes bad, then it is advisable to use a construction hair dryer or a perforator. Do not feel sorry for the old cover, because it still will not hold properly. After this, it is necessary to clean the wall with a stiff brush, then check the surface for cracks and depressions. All large cracks and cracks should be sealed with the base mortar. In this case, before coating, it is desirable to coat the surface with a primer so that the adhesion force is better. Back to contents</a>
Correcting Wall Defects
When applying base plaster, note that inIn the case of a brick wall, it is important to seal the cracks between the bricks not to the end, but leave small indentations. This will greatly increase the adhesion to the main plaster. The same applies to plates. Then you need to check the wall for the presence of greasy stains. Ideally, this is done by radiating through an ultraviolet lamp. But if you do not have such an opportunity, it makes sense to treat the whole wall with a special degreasing compound. Do this in order to ensure that with subsequent plastering, fat is not an obstacle to the quality adhesion of the solution. Especially it concerns the walls, where it is planned to arrange decorative plaster.  Repair of plaster. Next, you need to strengthen the weakest and most vulnerable places of the wall. To do this you will need a special fiberglass mesh. It is placed on a thin layer of mortar at the joints of the plates, wall joints from the chimneys, in the apertures, etc. Please note that this material will not affect the degree of evenness of the wall in any way. In this case, it is not necessary to use such a grid over the entire surface. Now it is necessary to wait until all this is dried, after which to cover the surface of the entire wall with a primer. Primer can not spare. The larger it is, the better the wall will be protected from the fungus and the adhesion of the future plaster mixture to the surface will be better. After the primer has dried, it can be taken for plaster. So, the ground has been prepared. Now it's time to choose the optimal composition of plaster and the way it is applied. For today the most widespread is the gypsum and cement-sand mixture. Both species are good, but there are cases when it is more advisable to use only one of them. Back to contents</a>
Rules for applying a cement-sand mixture
Cement-sand plaster.Working with such a mixture is based on three layers: spray, primer and cover. This mixture is ideal for walls that are not even enough, provided you have enough time to allow the plaster to dry completely. After mixing the thick solution, it is necessary by spraying. To do this, the solution in small quantities in the form of cakes is simply thrown onto the wall, while special attention should be paid to the deepest places on the wall. At the same time, you should not be afraid of the carelessness of the work, since all this will be corrected without problems in the future.  The layout of lighthouses for plaster walls. Then the ground is carried out. Here already, based on the thickness of the spray, just typed trowel solution and applied to the wall. In this case, it is immediately optimized for its alignment. Please note that before the primer you need to wait for the drying of the spray (approximately 1-2 days will be enough). Try to apply the soil as densely as possible while pressing the mortar trowel against the wall. Next you need to make a cover. This is a kind of grouting the wall, which is the final stage when working with a cement-sand mortar. Usually during the covering, the surface of the ground is first wiped, and then a thin layer of gypsum is applied from above. Gypsum and serves as a covering, which provides durability. During work, use water for better adhesion and a construction level with a plumb line to correct flaws in time. After this, it is necessary to allow the plaster to dry, which can take 15-20 days. And only then you can take up the device of decorative coating. Back to contents</a>
Gypsum plaster application finishes
The second good solution is the gypsum mixture. Ideal for not too deformed walls. Gypsum will dry two times faster, while the quality of the plaster will not decrease. But when using gypsum solution, you also need to consider some subtleties. 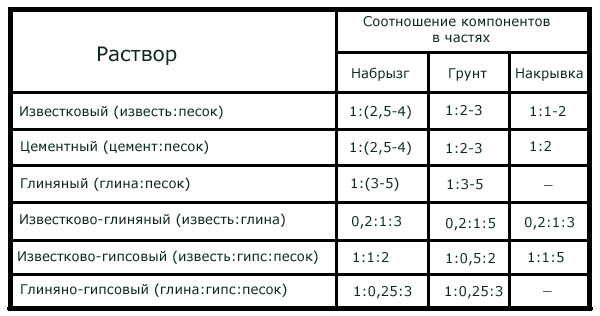 Proportions of plaster mortars. Перед тем как штукатурить стену, нужно тщательно защитить все металлические элементы в стене. Это связано с тем, что гипс является своеобразным катализатором коррозии. Металл обрабатывается ацетоном для обезжиривания, а потом покрывается 2-3 слоями масляной краски. Только после высыхания краски можно приниматься за дальнейшую работу. Теперь необходимо подготовить стену к нанесению штукатурки такого типа. Для этого специалисты рекомендуют тщательно пропитать поверхность стены по всей площади специальной жидкостью для улучшения адгезии с гипсом, после чего необходимо дождаться полного высыхания стены. Можно замешивать раствор. При этом нужно добавлять воду строго по инструкции, так как гипс не терпит переизбытка жидкости. В итоге раствор должен напоминать по консистенции густую сметану. Запомните, что при работе с гипсовыми растворами недопустимо использовать воду. Штукатурить стену необходимо абсолютно сухой. Гипс наносится на стену тонкими слоями, один за другим. При этом целесообразно использование уровня для устранения сразу мелких неровностей. Выравнивание необходимо производить сразу же, пока гипс не начал высыхать. После нанесения, когда штукатурка высохнет, можно наждачной бумагой слегка отшлифовать поверхность. После полного высыхания и шлифовки гипсовой поверхности необходимо произвести ее дополнительную обработку. Для этой цели может применяться обыкновенная грунтовка, которая даст возможность последующему декоративному материалу хорошо ложиться на гипс и потом служить на протяжении долгого времени. Итак, основные моменты по рассмотрены. Если следовать этим простейшим правилам, то вам удастся очень быстро научиться качественно оштукатуривать стены. Вы скоро поймете, что совершенно необязательно для этого быть специалистом. Следовательно, зачем переплачивать, если можно выполнить работу своими руками? Пробуйте — и у вас все получится!


