Drywall - very convenient material for platingwalls, commonly used in construction. The room, covered with plasterboard, can not be called complete. Even after skimming the walls, you can see the seams, small irregularities, grooves, obtained when screwing screws. This means that before further decorative finishing you will need to find out how to putty plasterboard walls to eliminate all depressions and roughness.  Putting putty on gypsum board.
Quality materials for work
You will need:
- putty;
- knife;
- sandpaper;
- water;
- primer;
- roller;
- self-adhesive tape;
- putty knife;
- bucket.
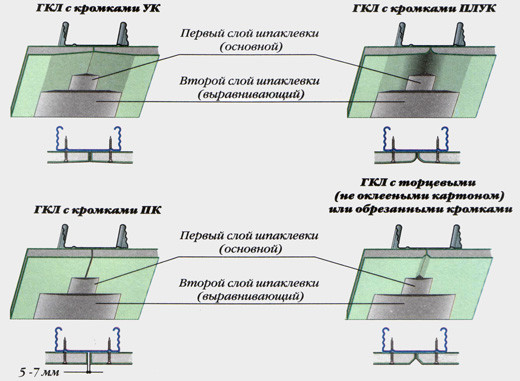 Scheme of plasterboard filler for various typesedges. The first thing you have to do is choose the putty. The assortment of any construction shop can put not too skilled repairman in a dead end. What is better to take: a liquid or dry putty, for finishing or for covering cracks? Beginners are advised to take dry mixes, as they have a long shelf life, and even after a while you will be able to use undiluted residues. In the shops there are three main kinds of putty: gypsum, polymer and cement. Spackle plasterboard walls can be any of the three. It is also important to note that a polymeric putty suitable for all conditions is considered universal. While gypsum is not recommended for use in rooms with high humidity and evaporation, such as kitchen, bathroom, swimming pool. If the plasterboard is sheathed walls in a wooden house, then fireproof putty will come in handy. But the resistance to low temperatures for interior decoration works is unlikely to be the determining parameter. The easiest option for a beginner is to purchase a universal dry mix. Back to contents</a>
How to prepare plasterboard for applying putty?
The second issue is the preparation of plasterboard for applying putty. 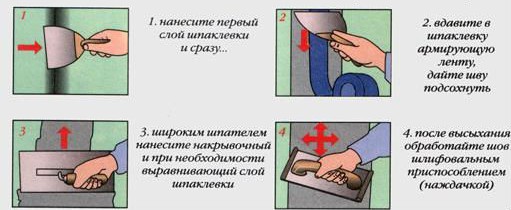 Scheme of puttying gypsum board joints. The main thing is to remove noticeable irregularities. For example, if the self-tapping screws are too recessed, they are manually twisted so that they are flush with the surface of the sheet. If you perform, wrap it stronger. After that, check the joints for the peeling of the paper from the gypsum. If nevertheless a small piece has come off, then gently lift it with your hand and cut it with a knife under the root. Handle this place with sandpaper. This procedure is necessary so that the puttying does not exfoliate together with the paper. Do you plan on painting walls? The preparation technology is similar to that described above. The seams and grooves are shpaklyuyutsya, the surface of the sheet is primed, then the paint is applied. Do not allow the plasterboard to impregnate the paint to the inner layer. This will lead to the appearance of bubbles and deformation. So, the joints are checked, the screws are twisted. But putty plasterboard walls are too early. First they must be primed. Ideally, use dry mixtures that require dissolution in water. They are applied evenly on the entire surface of the sheet. To avoid deformation, the primer is impregnated only with the top, cardboard layer. This impregnation will create a moisture-proof layer through which neither paint nor wallpaper glue penetrates. To apply a primer it is possible by an ordinary platen - the uniform layer in the thickness to 3 mm will turn out. Back to contents</a>
Puttying the walls with your own hands
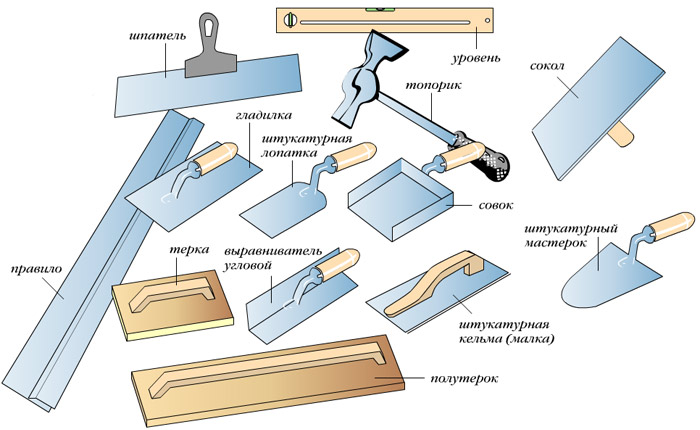 Wall filling tools.After waiting for the time allotted for the primer to dry, you can start the process. Glue the joints and corners with special self-adhesive tape. This must be done carefully so that the seam runs along the center of the tape. Dilute a small amount of putty in a bucket or bowl (do not cook a large amount of the mixture at once: the putty dries quickly). It is undesirable to dilute the dried mixture with water, as it will change its structure. Choose the amount of putty based on 30 minutes of work. Putty the self-tapping screw crosswise, lengthwise and across, for the best cover of the screw head. It is better to putty the corners in two steps: first one side, and after drying - the other. This will make the seam smoother and without streaks. Slopes of doors, windows, arches are fixed with an aluminum or plastic corner. Only then is the putty applied. After drying, clean all irregularities with zero-grade sandpaper. After completing all these actions, proceed to the last, final stage of wall putty. The already used type of putty and fiberglass are suitable here. Dilute the putty to the consistency of thick sour cream, apply it with a wide spatula over the entire surface of the drywall. The layer must be made thin and even. After waiting for the wall to dry completely, prime it again. As you can see, it is not so difficult to putty plasterboard walls. But the result will please you. Plasterboard sheets processed by this method are easily amenable to decorative finishing, and in the future it will not be difficult to remove the coating if you want to change the interior. That's all the work is done. Now you know how to putty plasterboard walls with your own hands.


