If you want to create a cozy atmosphere inroom, then a win-win option would be a plasterboard niche for lighting. This will not only help create a more interesting interior, but also serves as auxiliary lighting. If during installation of a niche made of plasterboard it is notuse a metal frame, the internal volume of the niche will increase by 2-5 cm. The convenience of such a design is also that it will help save space, as it acts as shelves on which you can place photo frames, books and figurines.
Features of niches from plasterboard
A niche is a fairly multifunctional interior element. Depending on your wishes, it can perform the role of: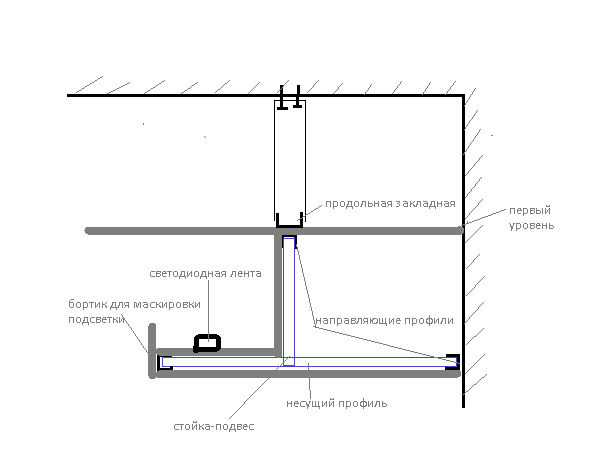 Scheme of a closed niche made of plasterboard with lighting.
Return to Contents</a>
The main working material
In order to create a niche from plasterboard, you should stock up on the following tools and materials:
- metal profiles (guide and main);
- mounting glue;
- with a knife;
- with a drill;
- screwdriver;
- screws 1.2 cm;
- LED strip.
For a niche with lighting, LEDs are better suitedin total, since they have different light intensity, and thanks to different colors, they fit into any interior. Depending on the wishes, the bulbs can be single-color or multi-color. Return to the table of contents</a>
How to choose a mounting location
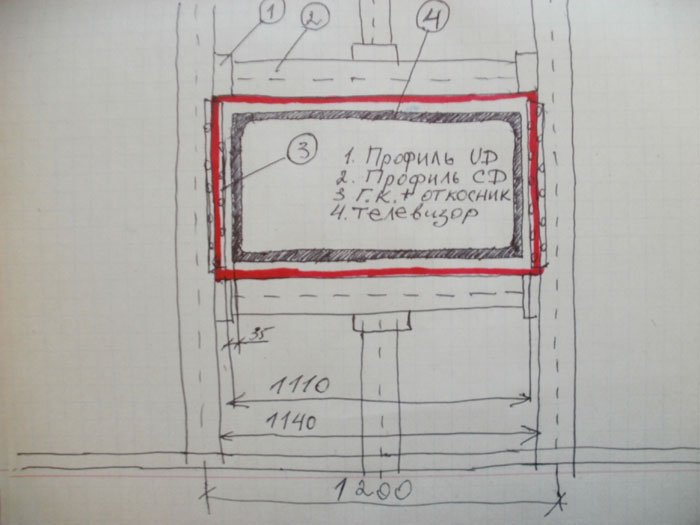 An example of a sketch of a plasterboard niche with lighting.If you have not decided on a specific place, then the niche can be located in the space near the doors. This location of the structure will help to use it as a wardrobe for clothes or shoes. The main parameter of choice should be the width of the wall of at least 3 m. In addition, since it is planned to equip it with lighting, the presence of wiring nearby is a mandatory condition. Basically, this issue can be solved by wiring through the baseboards. But you should think about this issue in advance in order to buy special elements that have channels for wires inside. I would like to say a few words about the design of the niches. The finishing material for such a structure can be any: paint, wallpaper, glass, stones, etc. There are some points that will help create a harmonious look:
Return to Contents</a>
Creating a Niche: Recommendations
The process takes place in 5 stages: marking, frame construction, plasterboard sheathing, puttying and final finishing and connection of lighting.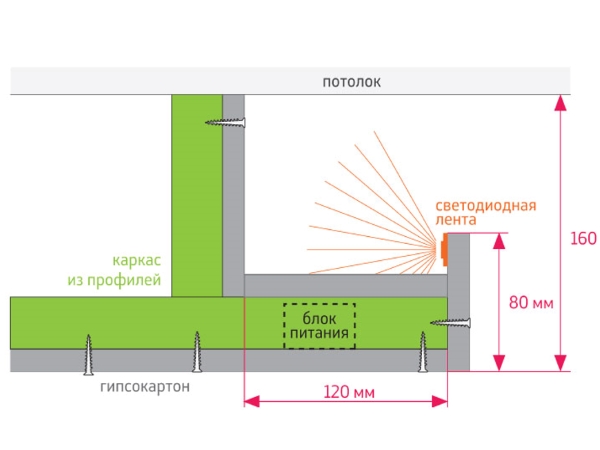 Scheme of fastening LED strips in a niche fromdrywall. Now let's look at each step in more detail. A "drawing" of the future niche is created on the wall. That is, dots-marks are placed. To prevent the niche from "falling out" from the overall picture of the interior, it is very important to maintain symmetry so that the distance to the walls on both sides is the same. The end result should be a contour to which the profile for the drywall will be attached. First of all, the guide profile is attached, which is the back of the structure. This is done with self-tapping screws. Then the main one is mounted. It is necessary to check whether the niche is firmly held, it should not move. The next stage is preparing the drywall. The sheets are cut into blanks of the required sizes. The drywall is attached along the contour of the niche frame. It is important to screw in the screws correctly until the heads are hidden above the surface. All joints should be perfectly even, especially for corners. To avoid having to deal with electrical wiring later, all wires are placed before work with the drywall begins. Next comes puttying. The entire process begins with the corners of the niche. All joints and screw holes require special care. After such treatment, the surface is pasted over with reinforcing tape, which is covered with putty on top. After the layer has dried well, the tape is carefully removed, and all irregularities are rubbed with sandpaper. Next, the surface of the drywall is opened with a third layer and sanded. For the final finishing, you will need a large spatula, which will apply a special mixture. As an alternative, you can use a general-purpose putty. It is used to treat the niche from all sides. After the structure is ready, it can be painted or wallpapered. Return to contents</a>
Correct backlight organization
If the wires were placed properly during the creation of the niche frame, there should be no problems with the backlight. Let's consider two backlight options:
A plasterboard niche is a very useful thingoriginal. It gives a special highlight to the interior. But in order for it to serve for a long time, you should correctly approach the selection of materials and the execution of installation works. If the niche will be located in a room with high humidity or temperature changes, then this should be taken into account when choosing plasterboard.


