Even the most beautiful and expensive private renovationA house or apartment can be ruined by just one small flaw - uneven walls. Decorative finishing will not hide the curvature of corners, will not conceal the insufficient adhesion of baseboards to the wall, will not hide the bumps under the wallpaper.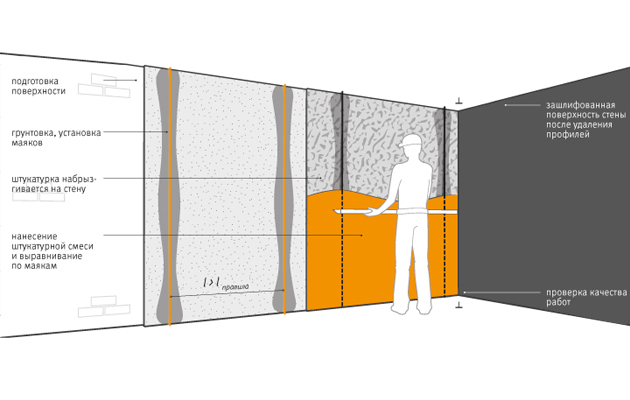 Scheme of leveling walls with plaster.In order for the finishing to look perfect, preliminary leveling of surfaces cannot be ignored. Therefore, in such a responsible matter as home repair, beginners should definitely familiarize themselves with how to level walls with plaster so that they do not “cut the eye” with annoying aesthetic errors.
Selection of plaster
Before you start the processalignment, it is necessary to correctly assess the unevenness of the surface. To measure the horizontal line, either a 1.5-meter building level or a cord that is stretched along the wall is used. The vertical is checked using a regular plumb line. Depending on the result obtained, an appropriate decision is made:
- small irregularities can be corrected by putty;
- Align the wall with potholes 3-5 cm will help plaster;
- To hide large differences, installation of gypsum boards is used.
If a decision is made to level all the wall depressions with plaster, since they do not exceed 50 mm, then which solution should be preferred? Comparative table of plasters.After all, plastering is covering surfaces with several layers of a special construction mortar. In this way, the walls are not only freed from defects and leveled, but also their heat, moisture and sound insulation qualities are enhanced. Today, the construction market offers many mixtures based on cement or gypsum, with which you can qualitatively plaster any walls. Cement-sand plasters are cheaper than gypsum ones, so they are used for large volumes of work and for external finishing of premises in order to save money. Gypsum mixtures are softer and stickier. Unlike cement mortars, they can be applied in a thin layer, but they do not hold well in damp kitchens and bathrooms, and are completely unsuitable for outdoor use. When choosing the best coating option, you need to consider what material the walls are made of.
For priming under a cement base, usethe so-called milk - water, sand and cement. Gypsum plasters require the purchase of high-quality, deeply penetrating primers (for example, "Dufa" or "Knauf", for painted walls - "Betokontakt"). Return to contents</a>
Preparatory stage of plastering works
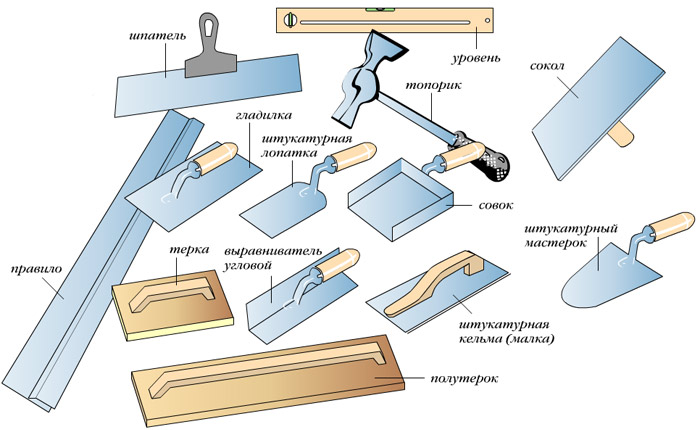 Tools for applying plaster.Before leveling the walls with plaster, a number of preparatory measures are carried out. First of all, you should purchase materials: bags of leveling mixture, if necessary - primer and polymer plaster mesh with 5x5 mm cells. The tools required for the work include:
- shovel;
- container for the solution (bucket, trough - depending on the volume);
- building mixer (if any);
- level, plumb bob;
- trowel, trowel;
- "falcon" - a tool like a tray with a handle on which the solution is placed to reduce the need to bend over the bucket or trough;
- rule - a wooden stick, long and straight;
- guide beacons - for beginners it is better to use ready-made ones;
- fine sandpaper for grinding finishing.
In preparation for plastering surfacesFirst of all, the electricity in the room is turned off. Then the walls are carefully cleaned, removing old coatings: putty, plaster, wallpaper, or paint. This must be done very carefully and cautiously, so as not to damage the electrical wires recessed into the walls. A wall properly prepared for leveling should be rough, since this is how the adhesion of the solution to the surface improves. If it is not possible to tear off the paint, notches are made on the wall, as well as on smooth concrete, and then primed. Wooden walls are covered with shingles, and brick and concrete surfaces are often covered with reinforcing mesh and secured with mounting tape to prevent the plaster from peeling off. Return to contents</a>
The process of leveling the wall with plaster
Before you start leveling,Control beacons should be installed on the walls. They are placed vertically (using a plumb line for checking), parallel (along a cord) to each other. The beacons are fixed on the wall with strips of the same solution that will be used for alignment. The distance between the guide beacons determines the size of the rule, which should rest on them without slipping. The beacons must be located in close proximity to the corners (10-30 cm) to avoid distortion. If there is a doorway in the wall, beacons are installed from it, since the door frame sets the level of the required alignment. Then you can proceed directly to plastering work. To do this, very scrupulously, according to the manufacturer's instructions, prepare the solution for alignment, mix it with a mixer, collect it on the "falcon", scoop it up with a trowel and throw it onto the wall between the beacons. Then move the rule from the bottom up, leveling the layer of plaster. After the plaster has dried and settled, all imperfections and roughness are sanded with fine sandpaper. This results in a perfectly flat surface, and the wall is considered absolutely and qualitatively prepared for decorative finishing.


