Drywall is a sheetbuilding material with many positive qualities. Its smooth and even surface allows easy construction of plasterboard walls that perfectly fit into any interior.  Scheme of installation of plasterboard on metalprofile. Gypsum plasterboard walls have sufficient strength, provide sound insulation. The simplicity of the process of manufacturing such walls is explained by the high technological nature of the material. Drywall is easily cut, drilled and covered with any finishing elements.
Gypsum wall constructions
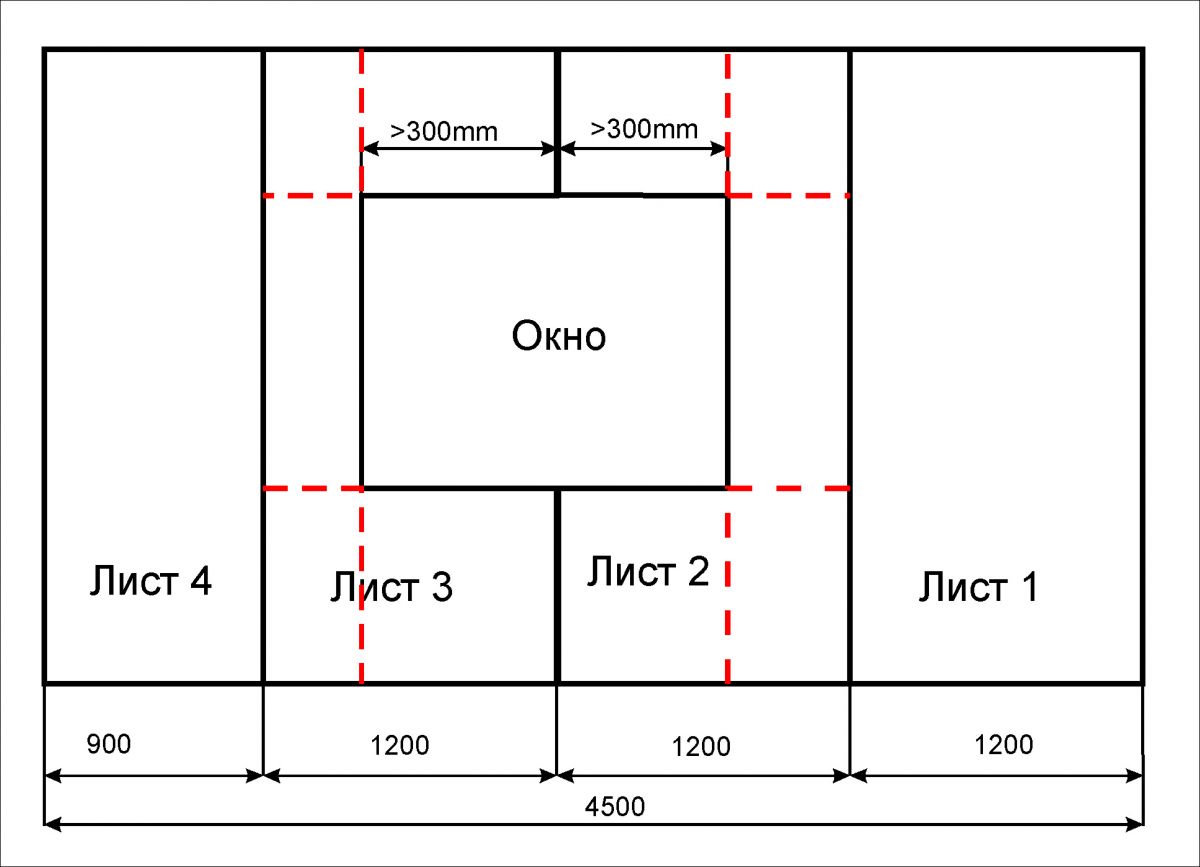 Scheme of calculating drywall on the wall. Gypsum plasterboard walls are divided into two main types: a partition and a finished wall, covered with plasterboard. The plasterboard partition is an independent interior wall intended for dividing the room into rooms or zoning spaces. A gypsum board wall, installed as an additional layer on an already prepared concrete or brick wall, is usually designed for insulation, soundproofing or decoration of the room inside. The structure of the baffle includes a double-sided frame, inside of which a filler is placed. On top of both sides the frame is covered with sheets of gypsum board, on top of which external coatings are applied. The partition must have sufficient mechanical strength, sound insulation and the ability to install doors and windows (if necessary). Spatially, it can be attached only by its ribs:
- on each side - to the wall;
- below - to the floor;
- from above to the ceiling.
The partition frame must carry the power function andcan be made of metal profiles or wooden beams. An additional wall of plasterboard is installed on the finished wall and does not carry a load of force. Its task is to improve the thermal insulation and soundproofing properties of walls (usually having contact with the external environment). This wall has a one-sided frame, filled with a heat insulator, and plasterboard sheathing. The frame performs only an assembly function and can be made of lightweight profiles or wooden beams. Back to contents</a>
Selection of suitable materials
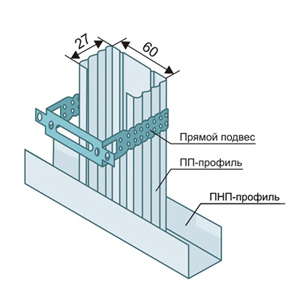 Scheme of assembly of profiles for installation of drywall. Drywall is realized with standard sheets 120 cm wide, 250 and 300 cm long, 6, 9 and 12.5 mm thick. A typical GKL drywall consists of two sheets of cardboard, between which is a solid gypsum mass. Gypsum cardboard of GKLV type is produced, which has an increased moisture resistance. Due to the use of special fillers, gypsum board acquires improved heat resistance (GVL type with fibrous filler), increased sound insulation or acoustic properties. Most often used Gypsum plasterboard type GKL, but in rooms with high humidity it is recommended gypsum cardboard type GVL. The frame of the partitions is made of metal profiles. For vertical arrangement, rack-mount profiles (C-shaped) of the PS type are used. Standard sizes are 50x50, 65x50, 75x50 and 100x50 mm (the first digit is the width, the second is the leaf height) and is produced in lengths of 3 and 4 m. The horizontal profiles (U-shaped) of the PN type are horizontally fixed. Standard sizes are 50х40, 65х40, 75х40 and 100х50 mm. Profiles are produced in length of 3 m. When making a wooden frame, you can use a wooden beam of 40x40 or 50x50 mm. For the frame of an additional wall, you can use the same profiles as for partitions, but it is recommended to use lightweight profiles with a wall thickness of 0.55-0.8 mm. It is enough to install the following profiles: rack-mounts - CD (PS) 27x60; The guides are UD (PN) 27x28. For a wooden frame, beams 30x40 or 40x40 mm are suitable. Back to contents</a>
Step-by-Step Instruction: Editing the Partition Frame
 Scheme of installation of the partition from gypsum cardboard. Installation gipsokartonnoy septum independently begins with the installation of the frame. First, the layout of the wall is made: strictly vertical lines are drawn along the walls using a plumb line (a mark is made at the top and is repulsed with the help of a colored construction twine); then they connect on the ceiling and the floor. In the horizontal position on the floor, the first side of the carcass and sheets of plasterboard are laid out. Rack and guide profiles are cut to size. If it is not possible to select a profile of one length, then it is connected from the segments using a U-shaped standard connector in 40-50 mm or metal slats. The connection must be rigid and strong. In the guide profiles holes are drilled for fastening at a distance of 40-50 cm from each other. Plasterboard sheets are scraped according to actual dimensions, taking into account the openings. The guide profile is applied to the ceiling along the marked line and marks are made on the ceiling through the holes. On the marks with a perforator or an electric drill holes are drilled in the ceiling with a diameter of 6-8 mm and dowels are installed in them. Screws with screws self-tapping are fixed in dowels. Similarly, guide the profiles on the walls and floor. Before attaching the profile on its outer surface, a sealing tape is glued. When installing the profile on the floor, it is necessary to take into account the location of the doorway, where the profile at the bottom is not installed. Rack profiles are installed strictly vertically and necessarily one length. First, the profiles that define the boundaries of the doorway are fixed. They are inserted at the bottom and at the top in the guide profiles and fixed with self-tapping screws. The profile base should be directed to the front side of the future partition. Then the other racking profiles are tightly fixed, evenly distributed between the wall and the installed profiles in steps of 50-60 cm. Between the vertical posts, horizontal bridges are cut, cut to the actual size from the PS profile. First, a jumper is fixed, which defines the upper boundary of the doorway. The attachment between the vertical posts and the bridge is as follows. At the end of the jumper with a metal scissor, a length of 20-25 mm is made along the curve of the profile bend. Lateral sections are bent to the sides. The size of the fastening section must be taken into account when cutting the jumpers. The bent petals and the continuation of the base of the profile are attached to the surface of the posts by self-tapping fleas. The jumpers are fixed throughout the frame strictly horizontally with a step of the order of 60 cm. The lattice of the first side of the frame is formed. Similarly, the second side of the frame is mounted at a distance equal to the thickness of the partition, minus the thickness of the two sheets of plasterboard. Between the two sides of the frame, transverse jumpers are installed from the sections of the rack section. These jumpers are first attached to the corners of the doorway; then uniformly along the entire frame at a distance of 1-1.2 m between each other. Back to contents</a>
Installation of drywall by own hands
 Types of drywall edges.The final starts with installing drywall sheets on the first side of the frame. First, the entire sheet is attached, starting from the upper corner. Fastening is done with self-tapping screws. In the attachment points, it is recommended to pre-drill according to the screw diameter. The distance between the screws is 10-25 cm. At the bottom, a gap is left between the sheet and the floor of about 10-15 mm. In this way, the entire side of the first frame is veneered. Then the space between the two sides of the frame is filled with filler. Most often, mineral wool is used for this purpose. Foam sheets or tiles can be used. After dense filling of the frame, the second side of the frame is lined with plasterboard by analogy with the facing of the first side. The surface of the partition is putty on both sides. At the joints of drywall sheets, a strip of mounting mesh is first glued. Then a starting putty is applied to the joints and fastening points with screws. After it dries, a finishing putty is made on the entire surface of the partition on both sides. Back to the table of contents</a>
Making an additional wall
Installing an additional wall over the capitalThe walls are produced in much the same way as the partitioning. Initially, the profiles are fixed to the ceiling, floor and walls at a distance of 3-8 cm from the surface of the wall to be closed. Rack profiles are mounted vertically and the lintels are horizontally mounted. The pitch of the horizontal jumpers can be increased. The space inside the frame to the wall is densely filled with thermal insulation. Before filling and from above, polyethylene film for waterproofing is laid. Over the frame are fastened sheets of plasterboard. Back to contents</a>
Required Tools
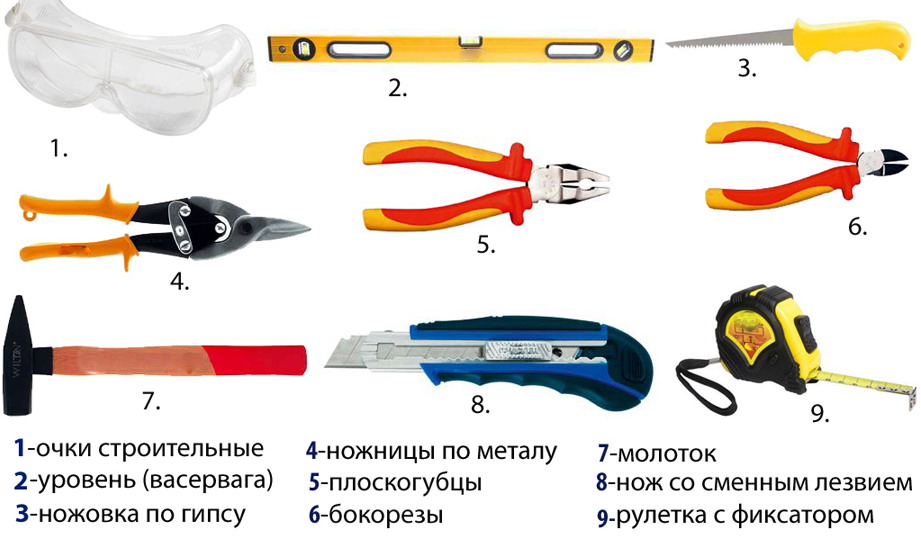 Tools for the installation of drywall. When making a gypsum cardboard wall, the following tool is needed:
- Screwdriver;
- electric drill;
- perforator;
- putty knife;
- scissors for metal;
- hacksaw;
- screwdriver;
- pliers;
- a hammer;
- mallet;
- knife building;
- roulette;
- line meter.
The plasterboard walls are comfortable and simple to manufacture. They provide re-planning of the room, warming, zoning. You can install such walls yourself.


