it's not a difficult task, but it requires certainskills, tools and time. In order for the renovation of the premises to please with its quality, you need to know what preparatory work needs to be done and how to properly putty the walls. The most important task of putty is to level out all the depressions and unevenness on the surface.
Preparatory work
If you have to wallpaper old onesplastered walls, first they need to be examined and problem areas identified. These can be cracks, crumbling areas. Cracks should be widened and deepened. Crumbling areas should be knocked down to the edges where the old plaster holds firmly. These areas need to be cleaned of dust, washed with water using a hard brush or sprayer, then re-plastered with plaster mortar or filled with gypsum mixture to reduce drying time. It is necessary to remove the remains of old wallpaper and paint. Particular attention should be paid to the joints of the walls with the ceiling and floor. After fixing the baseboards, all irregularities and defects will appear. You can check the evenness of the joints with a ruler, if there is none - with a stretched thread. Mark the depressions, eliminate large ones with plaster or gypsum mortar, minor ones - with tile adhesive. Before puttying the walls, they must be primed. The primer, penetrating into the pores, will strengthen the plaster, increase the adhesion of the putty to it and reduce its consumption. After priming, it is necessary to wait the time indicated on the package, usually 12 hours, and proceed to the next stage. Return to the table of contents</a>
Tips and advice on how to putty the walls for wallpaper
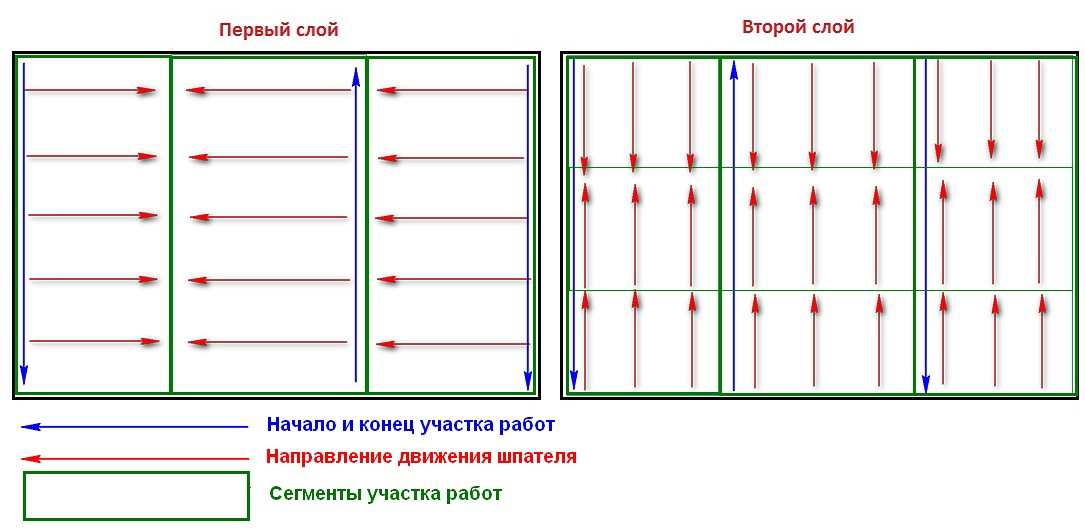 Wall puttying scheme.When preparing the mixture, you need to follow several rules. Pour water into a clean container, then add a small amount of powder. Mix the mixture using a special mixer, drill or hammer drill with a mixer attachment. Then gradually add powder and mix constantly. Usually the solution is thickened to the consistency of sour cream, but it can be different for different types of work. Usually the thickness is selected experimentally. If the putty is made on a gypsum base, it should be taken into account that it hardens very quickly. Therefore, it should be diluted so much that the solution has time to be used up. Initially, it is recommended to apply a thin layer of liquid putty with quick, vigorous movements using a spatula with a blade length of 60 cm. Do not press the spatula hard. In this case, the spatula cuts off small irregularities. The solution lingers on the protrusions and does not fill the depressions, so after drying, irregularities appear, which are later filled with a thick solution. In the corners, along the joints of the walls with the ceiling and floor, the spatula should be moved horizontally, on the rest of the wall - with arcuate movements. At the next stage of preparing the walls for wallpaper, noticeable depressions are eliminated. They are filled with thick putty, which is leveled with a 60-cm spatula. The direction of movement of the spatula at the junction of the walls and ceiling is from top to bottom. It should be taken into account that do-it-yourself wall puttying will require significant effort at this stage, but it is difficult to achieve a good result with a smaller spatula. Next, you should wait until the putty has completely hardened. You should carefully inspect the surface, eliminate irregularities with fine sandpaper. After this, apply the finishing layer of liquid putty.
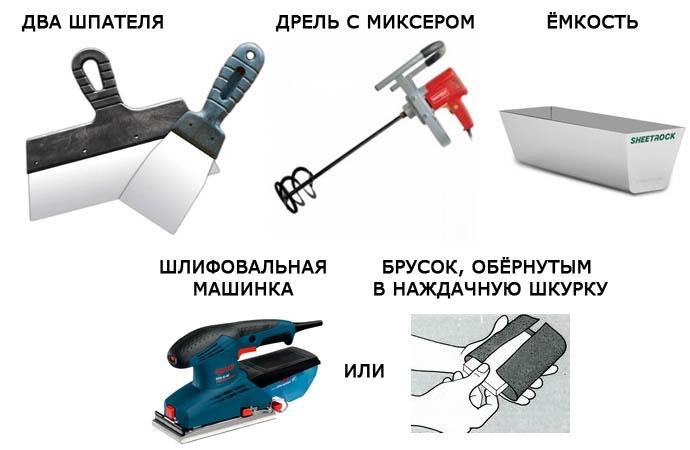 Tools for wall puttying.If the walls are covered with plasterboard, then puttying the walls with your own hands is much easier. It is enough to seal the joints of the sheets with masking tape and fill them with a thick mixture, then smooth the mixture with a spatula. After drying, treat with sandpaper and apply the finishing layer. In order for the corners, door and window slopes to be strong and even, they can be reinforced with metal corners. Initially, they are attached with small nails or a gypsum mixture, then putty. Before gluing the wallpaper, the walls need to be primed again. The primer will give the putty additional strength, fill the pores, remove the dust formed after grouting. Any work must be done efficiently. But puttying the walls under the wallpaper is not as responsible as puttying under painting. Small defects will be hidden by the wallpaper. Return to the table of contents</a>
Tools and materials
For work you will need the following tools:
- capacity for putty;
- mixer or drill (perforator) with a mixer nozzle;
- rule or thread;
- spatulas with a length of 5-60 cm;
- brush or atomizer.
Materials:
- putty mixture;
- gypsum mixture;
- painting tape;
- fine sandpaper;
- primer.
Knowing how to putty walls for wallpaper, you need todecide whether to entrust this work to specialists or do it yourself. Puttying walls with your own hands will take some time, but will allow you to save a lot of money on your family budget.


