Many are perplexed about the need for afterplastering them, because the plaster seems to have been applied over the lighthouses, so the surface turned out to be perfectly flat, and you can already glue wallpaper on it, apply paint or finish with other materials. Plastered walls do not need to be putty only if tiles are subsequently laid on them, MDF boards or fiberglass wallpaper are glued. But these materials practically create new surfaces. And the putty allows you to make the most even base for finishing with paint or more traditional wallpaper.  The most important task of the putty is to straighten all depressions and irregularities on the surface.
Why do I need puttying?
So, putty the walls should be at least for 2 reasons.
 Scheme of applying putty on the wall. After sticking the wallpaper or applying paint all the slightest irregularities will stick out very reliably. In addition, the particles of the top layer of the plaster are poorly adhered to each other. Uniform coatings these defects can not hide, and the textured finish or coatings with a pattern printed on them mask the unevenness only partially. At once it is necessary to preempt a possible question about whether it is necessary to put plasterboard (it is a very smooth and smooth material), an affirmative answer, since the sheets of drywall are joined together, fixed to the profile by screws. During the installation, dents, excess holes, etc. may form on them. In addition to sealing seams, unevennesses, and holes, the puttying creates a uniform, leveled surface on the GCR, interacting with the coating on the same extent throughout its area. By the way, joints of any plate materials (plywood, OSB), prepared for subsequent finishing with paint, varnish, etc., are puttied. Do not forget about one more reason for the puttying of surfaces. It is carried out (even if you have not plastered them again) after washing off the whitewashed walls or ceiling, cleaning the surfaces of paint or old wallpaper. In any case, after removing the old finishing materials, the planes need to be leveled. It remains to be hoped that the answer to the question of whether it is necessary to coat walls and ceilings was exhaustive. Why putty, found. It remains to be understood how to do it properly, so that the walls under the wallpaper or the ceiling are really perfectly even. First of all, the correct choice of leveling compounds is required, which are best suited to various operational conditions. Back to contents</a>
How to choose a filler
 Known brands of putty mixes. Today, manufacturers offer dry and ready mixes. And those and others have their advantages and disadvantages. Dry compositions can be stored for a long time, but in diluted form they are only suitable for a short time. At the same time, dry mixtures are cheaper, but also have high versatility. Ready-made solutions have a long shelf life, but are more expensive than dry ones. In addition, the putty putrefied by the manufacturer have a habit of settling. The mixtures are also divided according to such an indicator as an astringent component. They are:
- plaster, which are easy to apply, process, practically do not shrink, but are afraid of moisture;
- cement, suitable for work in premises with high humidity, but losing volume when hardening;
- polymer, providing a better leveling and elimination of surface defects, besides these putties are very elastic, but they are the most expensive.
Spackling mixtures differ by one more feature - the purpose for a certain stage of work. They are divided into: 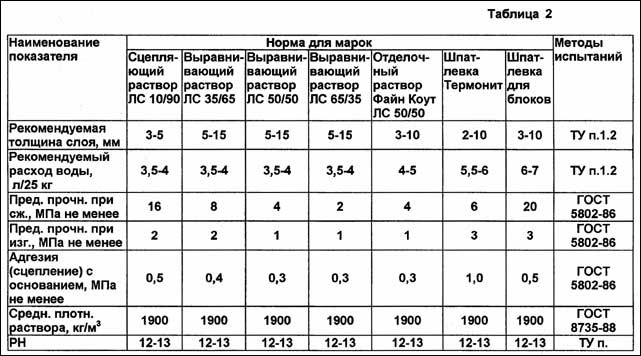 Table characteristics of putty solutions.
- leveling (the first layer), which are used for preliminary application;
- finishing (second layer), used for final alignment;
- universal, which fit both the first layer and the final, true, their universality is achieved due to deterioration of characteristics in relation to "narrow-profile" mixtures.
Choose shpatlevochnye compounds that are most suitable for your "front of work." The recommended field of application of the putty is marked by the manufacturer on each package of this product. Back to contents</a>
How to putty right
Back to contents</a> Puttying under the wallpaper is not difficult. Putty is collected on a spatula and stretched over a certain area. But in order for the work to be carried out efficiently, you need to follow the recommendations. 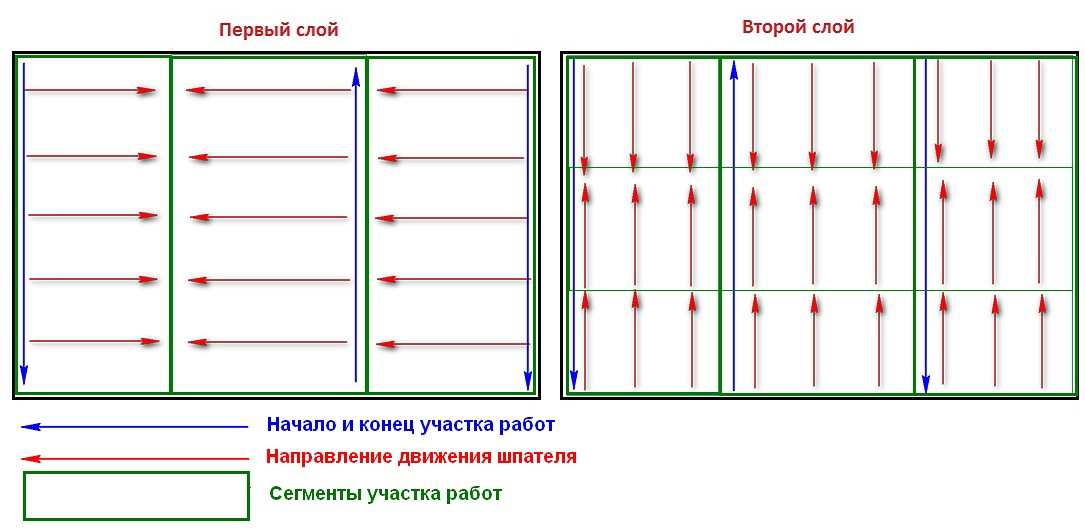 Scheme grouting joints.
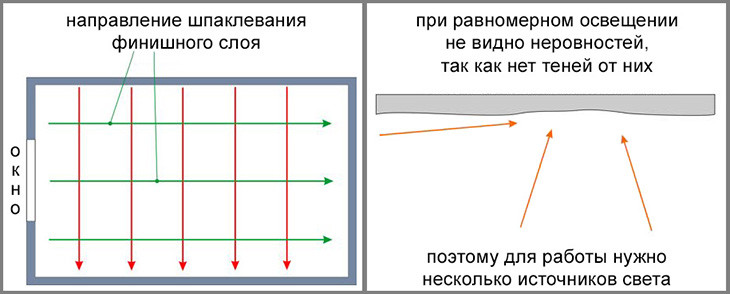
Back to contents</a> Alignment for painting 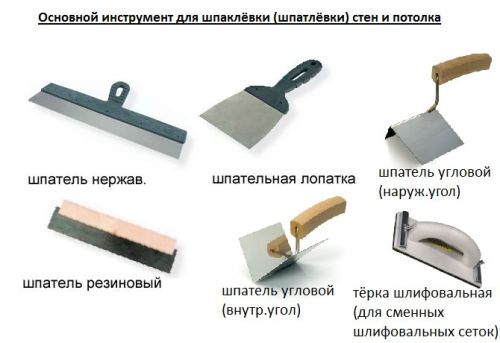 List of the main tool for wall plasteringand the ceiling. Still, the wallpaper is less demanding on the state of the surface than the paint. The walls under it should be finished with greater care. True, water-based coatings in some way are able to hide small deficiencies in the surface, and enamels, on the contrary, will bulge them. Therefore, puttying for painting is carried out by a large number of layers of leveling, a spatula with a smaller width, and sanding is carried out with a thinner abrasive. Attention should be paid to the fact that defects can remain invisible or, conversely, appear at different lighting angles, so sanding of each layer should be done with light close to the surface of the lamp. There is another way to determine how correctly the plane is formed: a rule is established on it, and a flashlight is switched on from the opposite side. All the bends of the surface will be visible as in the palm of your hand. Excess of putty is removed by pencil or spatula, and cavities are delineated in pencil. After this, unevenness is sealed with an equalizing mixture, and a new layer of putty is applied. Back to contents</a>
What you need for puttying
So, for shpaklevaniya do not need a lot of tools. It is enough if you have:
- a set of several spatulas with a blade width from 80 to 600 mm;
- corner spatula;
- rubber spatula, which may be needed in hard-to-reach places;
- abrasive mesh;
- fuganok on which it is attached.
As you can see, so that the walls or ceilings are even, you do not need much. Just be patient and do the work with due diligence. A positive result will not keep you waiting.


