Plastering is one of the most important stages andwhen building a house, and when repairing it. Many home-based craftsmen want to know better how the plastering of walls with their own hands is done to make this work themselves. Interest to this process arises for obvious reasons. Among them there is a high price for the work done by the plasterers employed, and the healthy curiosity of a person who, if not all, wants to do a lot himself.  The main thing in plastering walls is the calculation of the required volume of plaster and the selection of the optimal solution.
Advantages of plastering
Some qualities are unique, so its difficultreplace with other finishing materials. After all, the solution does not only level the surfaces, with which, for example, drywall copes successfully (and at low labor costs). Plaster strengthens surfaces, fills voids, protects walls from adverse external factors (the list goes on). With the advent of more modern fillers on the market, plaster began to perform not only the functions listed above, it turned into one of the finishing materials that are used in wall cladding. Yes, plastering walls is a laborious operation, but knowing the rules of this process, you can cope with it on your own, gaining invaluable experience that will come in handy more than once, and saving significant money. Back to the table of contents</a>
Preparation of surfaces for plastering
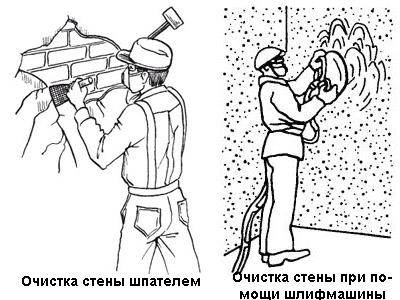 Scheme of preparation of the wall for applying plaster. However, we need to move from words to deeds. Of course, you know that the plastering of the walls with your own hands, like any serious work, begins with the preparatory stage. In preparation for plastering, both newly built walls and surfaces on which the mortar has already been applied are in need. Properly conducting preparatory measures before plastering will give you a guarantee that after its application the walls will be served with "faith and truth" for a very long time. Preparation for plastering the wall begins with the cleaning of its surface. With it you need to remove all old coatings to the very bottom. It is advisable that the old plaster is removed from the wall (the higher its age, the less it is suitable for restoration). Take into account that the wall needs to be cleaned and from the paint, because there is no worse adhesion basis than the painted surface. For the sake of justice it is necessary to say that removing deeply embedded in the wall of paint is not an easy task, but applying notches, processing with special primers (concrete contact, for example) or abrasives is only a half-measure. Therefore, the paint should be tried to remove, knock out, finally, cut down from the wall. It is necessary to remove from the wall and greasy stains, since they will not contact plaster with them. To do this, use solvents, soda, soap solutions and even clay of increased fat content. It is smeared with dirt spots, and after drying the clay is removed, and the wall section is washed with water. This procedure has to be repeated several times. Back to contents</a> Preparation of bases of concrete and brick The bases of different materials differ in different ways and interact with the plaster, so there are some differences in their preparation.
 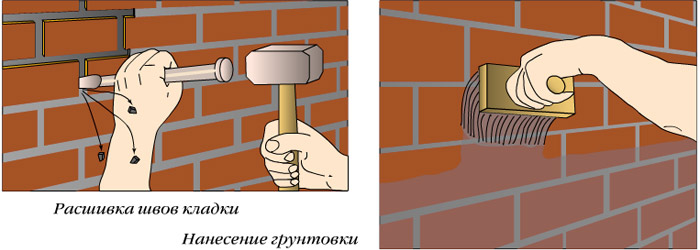 Scheme of jointing and primer application onbrick wall. In the masonry (here you can also include masonry from the blocks), you need to separate the seams to a depth of 1 cm, so that the solution fills these cavities and thus strengthens the adhesion to the surface. If the wall is laid out of a smooth brick, then on it you need to make an ax, chisel or other tool to make frequent short incisions directed in different directions. So you get a surface that can contact the solution. Notching is done and in a smooth concrete wall. Furrows should not be less than 3 mm in depth and 1.5 cm in length, they should be directed in different directions and be located from each other no more than the width of the match box. Of course, the walls must be cleaned of dust and treated with primers. But even better, if before applying the primer, the walls would be impregnated with antiseptic compounds. It is worth remembering that the application of impregnations should be carried out in turn and only as the previous composition dries. Back to contents</a> Preparation of walls from wood Plastering of wallswith their own hands is not only on concrete and brick surfaces. To plastering resort and when repairing wooden walls. It is difficult to imagine such incongruous materials as wood and cement-sand mortar. However, the base of wood can be prepared for the plaster to stay on it for a long time. First of all, the wall must be cleaned, treated with antiseptic and impregnated with a primer. After that, 2 layers of shingles are fastened on it, which is packed diagonally. Shingles are slats 3-5 mm thick. They are beaten as follows.
  Preparation of wooden surfaces for plastering.
It should be noted that shingles in front of the devicethe battens need to be wetted. In this case, entering the reiki, nails will not be able to split them. Before plastering, the surface of the wooden wall should be moistened. Instead of the shavings from the shingles, the wooden surface can be reinforced with a metal mesh or wire. The wire is stretched between the nails and wrapped under their hats, and the nails are driven into the wall in staggered order. The distance between them should not exceed 10 cm. Before plastering the wall, metal fittings should be sprayed with liquid diluted cement. Back to contents</a> How to deal with metal? 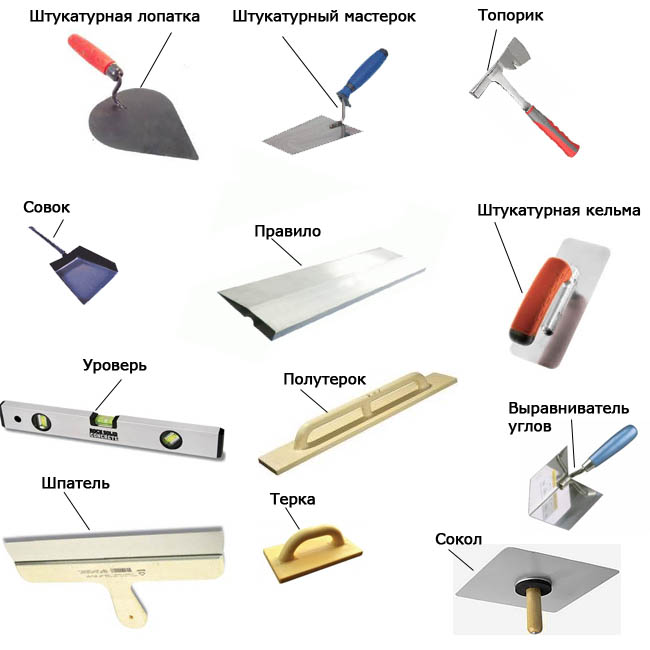 Tools for plastering works. Now we need to mention the preparation for plastering the metal. It happens that steel walls are embedded in the wall, etc. A solution on the metal will not hold, so the surface of the jumper must also be reinforced. You can weld it to it or attach a grid to the metal with self-tapping screws. Only the reinforcement should extend to the area near the metal product. The steel surfaces themselves should be freed from any kind of coatings (eg paints) and degreased. By the way, if you can not get rid of the paint on the wall, you can still frame the wall, tightly pressing the reinforcement with dowel-nails. All the preparatory measures, except for cleaning the walls from the old coating, are applicable to surfaces that will be plastered for the first time. Back to contents</a>
Plastering
Sufficiently even walls can be covered with a solutionwithout beacons. To assess the degree of curvature of the walls, it is necessary to apply a building level to different parts of the surface. The plaster of the wall should be started with a spray of the surface with a solution diluted more liquidly than the compositions of the subsequent layers. In this way, additional priming of the wall is carried out. The thickness of the first layer on brick, concrete and similar surfaces is about ½ cm, and a layer of up to 1 cm thick is applied to the wooden walls. It is possible to spread a spray solution with a bucket, trowel and even a whitening brush. The list of tools for plastering is as follows:
- level;
- grater;
- semifunctional;
- an ironing board;
- rule;
- Master OK;
- falcon;
- angular equalizer.
Their diversity should not frighten you. The purpose of the level is to check the vertical and horizontal surfaces. Half-rubbed surfaces are completely rubbed. The grater handles small and adjacent to the corners of the wall. Smoothing can be applied to the mortar and level it. The rule is applied when stretching the solution along the lighthouses (more on this later). Masterkom (trowel) is recruited, thrown, leveled and pressed down plaster mixture. Falcon - "palette" plaster, on which is part of the solution, which allows the worker once again not to lean towards the container with it. The last one in the list of tools is the angular equalizer. It is extremely useful when plastering corners. To use it, you need to lay a solution in the corner. The equalizer removes its excess and smoothes out the surface. The second layer is applied after the drying of the "spray". The mortar thrown on the wall is spread with a grater and a half-wiper. After hardening, the second layer is moistened and covered with a finishing layer of plaster. After application, it is rubbed with a grater or a smoothing pad. Back to contents</a> Leveling by lighthouses Plastering of walls withSubstantial irregularities are carried out after the installation of lighthouses. They are attached to the surface with gypsum. And the alignment of the guides is carried out according to the slings - the threads stretching on the wall forming the plane. Provesy are made simply:
After the gypsum has hardened, it is possible to apply plasterand align it with a rule based on the beacons. A day later, the beacons should be removed and the grooves closed up with mortar. After their leveling, the final layer of the mortar is applied. Back to contents</a>
Compositions for decorative plastering
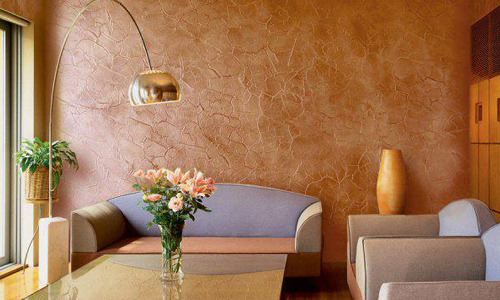 Picture 1. Venetian plaster can have a glossy or matte surface, similar to marble. At the very beginning it was already mentioned about the decorative qualities of the plaster wall. Of course, they have not the usual cement-sand mixture, but liquid wallpaper. They can be applied to the plastered surface after it has been treated with a primer. With liquid wallpaper, you can trim the wall with a sprayer, as well as in a more traditional way - a spatula. Then the liquid wallpaper is more evenly distributed by the roller. "Venetian" - also decorative plaster of walls. How can the surface finish it, shown in Fig. 1. Work on this mixture only on carefully leveled surfaces. The walls that you plastered over the lighthouses are quite suitable for this definition. Now it's enough to just double-primitate them. The Venetian plaster itself is applied in several layers, this gives the surface a rather attractive texture. The first layer of "Venetian" is applied with arbitrary brush strokes with a spatula. Are obtained scattered spots of finish. The second layer closes the gaps between the previously applied strokes. After 4 hours, the wall is polished with fine sandpaper, and then rubbed with a sponge impregnated with a special wax mastic.


