The ceiling falls within the field of view of thea person's room is one of the first. Therefore, it is recommended to put it in order in a timely manner. Repairing the ceiling with your own hands is not too difficult, but some knowledge of the construction will be necessary.  The ceiling is one of the most important elements of the room,so it needs timely maintenance. The impression of the interior can be spoiled if the ceiling is uneven, dirty or with traces of leaking water, so it is very important to maintain the ceiling in good condition and timely repair it. This is not the easiest occupation, therefore, in order to repair the ceilings, choose the most durable cover of all possible. Types of repair of ceilings, which can be performed independently, are different, among the most common methods can be identified the following:
- coloring;
- whitewash;
- wallpapering;
- suspended ceiling;
- stretch ceiling.
 High-quality finish of the ceiling will make the interiorrooms finished. Each of these types of surfaces has its advantages and disadvantages, design features, consisting in the cost of repairs, expended forces and time. Any type of repair begins with surface preparation. It is necessary to remove the old coating and level the surface with a primer, while repairing existing on the ceiling seams and joints. The costs of time and effort during cleaning and surface preparation directly depend on the planned coverage. Suspended and stretched ceilings do not require a perfectly flat plane, and for painting or wallpaper it is necessary.
Repair the ceiling with your own hands: surface cleaning
You can skip the original coverOnly if the repair of the ceiling occurs in the room immediately after its construction. In all other cases, the priming of joints and their repair is done only after the surface has been cleaned. Most often the covering of old ceilings is whitewashing, plastering or wallpaper. Such finishing materials can be removed without much difficulty. In order to repair the ceiling with your own hands, an ordinary paint roller with a long bar is useful. It is moistened in warm water and squeezed so that the water only slightly drips from the surface. When rolling on the surface, before you repair the ceiling, you need to start with a slight pressure, which increases with each time. As soon as the water on the roller becomes small, it again needs to be wetted and repeat the entire operation on a nearby stretch of the ceiling.  When repairing the first thing you need to clean the ceilingfrom the old cover. When the area of 1-2 m² so it will be wetted, take a spatula and begin to scrape off a wet whitewash or wallpaper. To make repairs qualitatively, you need to clean up to a concrete foundation or to a layer of strong putty. The found layers of the old putty should be checked for strength, using a spatula for this. A well-kept coating can be left on the ceiling. If the putty crumbles and exfoliates, it is easier to remove it completely and apply a new one. The hardest part is to prepare the ceiling for repairs with your own hands, if previously it was painted with water-based paint or oil paint. Remove this coating by mechanical or chemical means. When cleaning with sandpaper or spatula, a lot of dust is formed. When the paint is softened with a special rinse, an unpleasant smell will remain in the room all the way to full softening. A spatula with a metal thin blade can remove from the ceiling pasted on it decorative elements or tiles made of expanded polystyrene. Some types of glue are removed with great difficulty and only with the help of special tools. If the ceiling is repaired with tension or suspension structures, you must first disassemble and remove them with care, so as not to damage. Back to contents</a>
How to prime the ceiling?
 The scheme of a priming of a ceiling. After the whole surface of the ceiling has been completely cleaned from the original coating, it is possible to begin the preliminary priming. First, on the ceiling, check all the seams and joints. They fill with a solution of plaster or gypsum, which will stay in them firmly and reliably. If the solution in the joints after drying begins to crumble or collapses from light impacts, it is better to clean the joints and fill them with a solution of a different composition. Used for this is usually a special mortar with the addition of fiber, used in many construction works, gypsum or cement mortar. When the seams are filled, the surface is leveled level with the rest of the ceiling plane, the solution is left until it dries completely and freezes. To strengthen the surface and improve its adhesion, you can apply a primer of deep penetration, without which the repair of the ceiling does not do. When applying any composition to the ceiling with a brush or roller, care must be taken to protect the hands and eyes. The primer is left to dry, after which the repair by one's own hands can be continued. Back to contents</a>
How to repair the ceiling: putty and plaster
This stage of work is considered a necessity, sincerarely concrete slabs are perfectly even. Especially critical is to approach the putty if the ceiling repairs will be done by wallpaper or painting. The choice between putty and plaster is made by each master independently, being guided by the conditions of repair. The plaster will reduce the height of the room by 2-3 cm and has a high weight. The application of the putty requires several layers, the material thus shrinks, which generally requires additional time and is quite difficult to perform. But the repair of ceilings is most often performed with the help of putty, as this material allows to achieve a perfectly flat surface with a minimum weight and a small layer thickness. Before you do the repair of the ceiling with plaster, you need to prepare everything you need: 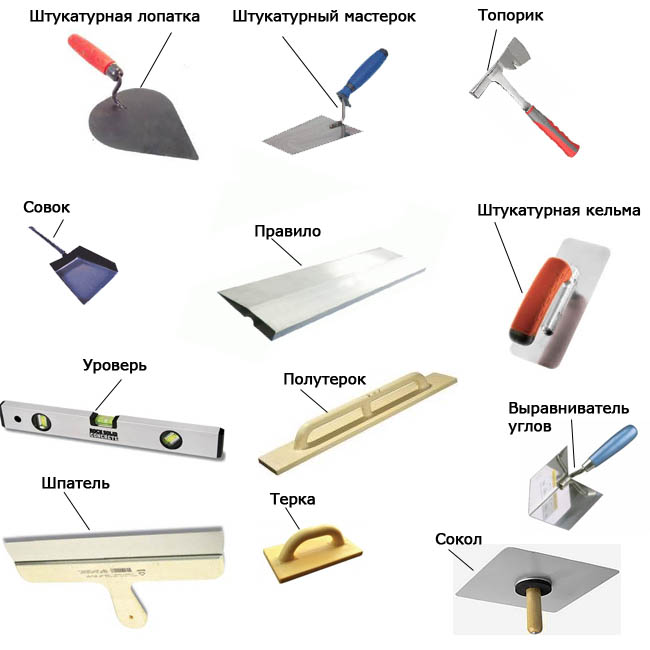 Tools for plastering works.
- a primer for concrete;
- building mix;
- building beacons;
- rule of 1.5 m;
- perforator;
- drill;
- self-tapping screws;
- guides;
- construction level.
After the surface of the ceiling is cleanedall the rules, from the wall retreat 15-20 cm and put on this place a mark for the guide. The second is put in the same way at the opposite wall. A thread is stretched between them. Then from the first beacon retreat 1, 25 m and repeat the sequence of actions. When marking is applied to the whole ceiling, it is necessary to drill the holes for the fasteners. The guides for the ceilings with their own hands are attached to the self-tapping screws. At the same time, with the help of a level, you need to carefully ensure that all guides are in the same area and strictly horizontally. Self-tapping screws designed to adjust the height can be loosened or twisted slightly. Once all the guides have been exposed in the same plane, they need to be fixed with a mixture of plaster, mixed sufficiently densely, and left to dry completely. 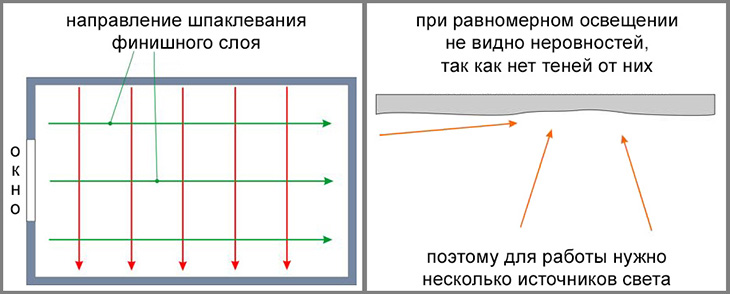 Scheme of the first and second layers of puttyingthe ceiling. The free space between the guides is filled with the plaster mixture and the metal rule is leveled, oriented to the guides. The process is more complicated than plastering walls, although the sequence of actions is the same. The difficulty lies in a non-vertical surface above the head. When the plaster dries, a smooth surface prepared to finish the finish should be obtained. To make putty on the ceiling surface you will need:
- putty rough;
- putty finishing;
- Painting mesh;
- primer;
- a set of putty knives;
- capacity.
Aligning the surface with a puttytakes more time than plastering the ceiling. In this case, the construction and finishing experience in handling the tool and knowledge of the material properties is useful. If, after the ceiling plate has been cleaned, potholes or large differences in the plane along the height were found on its surface, then rough coats are applied to them in thick layers first. The shrinkage of such a filler is not high, with the thickness of the applied layer can be up to 5 cm. For alignment of the ceiling plane and elimination of excess material, a rule is used, as well as a wide spatula.  Stages of applying plaster to the ceiling. When a layer of coarse plaster is applied, a paint net is laid on it, and it is necessary to have time until the composition begins to solidify. This is an alternative to reinforcement, giving whitewash and the entire plane additional strength. To place the mesh inside the filler layer, press it inward along the whole surface of the ceiling, passing with a small pressure with a wide spatula. In the event that the ceiling surface can be considered flat and has no large distortions and potholes, it can immediately use shpatlevke fine, fine grinding. It is applied with a wide spatula, excess material is removed in the same way. Using a finishing putty, you can apply a paint net to further strengthen the ceiling. When the base layer of the putty dries completely, it is possible to apply the finishing coat of the putty and flatten the plane completely. In order to obtain a surface that is perfectly even and ready for painting, specially designed for leveling gratings, sandwiched with sandpaper, are used. When the surface is leveled and smeared according to all the rules, it is checked by level, it can be applied wallpaper or paint, whiten according to the original design. Back to contents</a>
How to paint the ceiling?
 Scheme for painting the ceiling. All tools and supplies for repair work on painting the ceiling are easy to obtain, for their use does not require special skills or experience. In such premises as a bathroom or kitchen, it is the painted ceiling that is the most practical way to preserve quality finish for a long time. The surface to be painted should be perfectly aligned, since the slightest irregularities on the painted surface are evident. The following are required for the work:
- paint;
- roller;
- brushes;
- capacity;
- ladder.
Usually the ceiling is painted with oil orwater-emulsion paints, previously mixing them to the desired degree of density. Painting begins with the corners and edges of the room, gently staining them with a brush. The remaining area is dyed with a roller. It is necessary to put at least 3 layers, letting each layer dry out so that the coating turns out to be of high quality and durable. Back to contents</a>
How is the whitewashing of the ceiling done?
Until recently, the most common typeRepair was the whitewashing of the ceiling and walls. The surface, whitewashed in compliance with all the requirements for work quality, is suitable for any interior. But whitewashing the ceiling is much more difficult than painting it. Pellet composition is most often made of quicklime, stirred with water and filtered through a fine sieve, after which the solution is ready for application to the ceiling or wall. Used for work roller, brush and spray gun. The application by brush or roller is necessarily carried out in several layers, otherwise the coating will not be uniform enough, the spray gun is therefore considered the best option. Ceiling whitewashing can not be considered as a durable coating as painting. At least once a year whitewash needs to be updated or simply cleaned completely and applied again. But whilst whitewashing the ceiling is a budget option, as materials are affordable and inexpensive.


