Over the years of its existence, roll wallpaper has become perhaps the most common type of wall and ceiling decoration. But such popularity does not mean that everything is clear and simple with wallpaper. Vinyl wallpaper does not allow air to pass through well, but it does servemuch longer than paper wallpaper. This is especially true for modern types of wallpaper, such as, for example, relief vinyl wallpaper. To make a solid and beautiful room, it is not enough to know the composition of the glue or the properties of the polyvinyl chloride coating. For high-quality finishing, you need to study the rules for gluing vinyl wallpaper.
Materials and tools for gluing wallpaper
Experienced craftsmen adapt aloneeven stick wallpaper on the ceiling, not to mention pasting the walls. But for this, experience and the corresponding properties of the material are not enough. For successful pasting of vinyl wallpaper, both experienced craftsmen and beginners in the construction business will need the following materials and tools: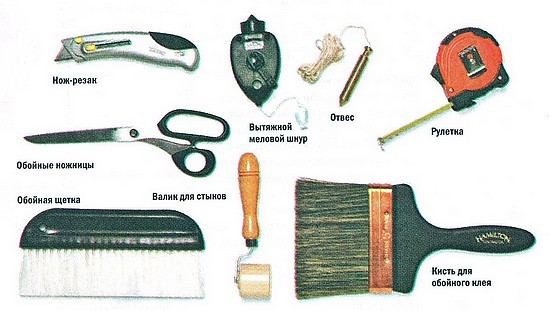 Wallpaper pasting tools.
Return to Contents</a>
Some general rules for pasting vinyl wallpapers
Despite the widespread use of wallpaper inrepair and construction work, many take on finishing without knowing well how. And although this operation is not a difficult matter, you should understand some rules in advance.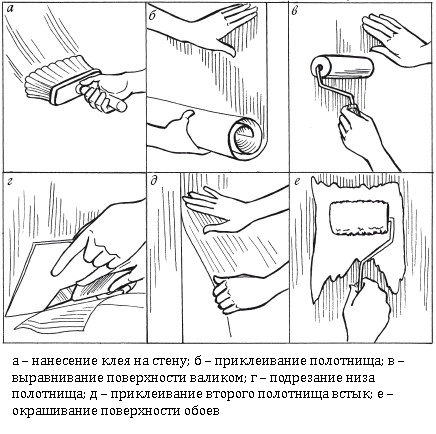 Sequence diagram for finishing a wall with wallpaper.Before wallpapering a room, the electricity must be turned off to avoid a short circuit or electric shock. Therefore, work should be done during daylight hours. First of all, you should remember the main thing - vinyl wallpaper is glued only end-to-end. Due to the increased thickness of such wallpaper, gluing with an overlap will lead to the formation of rough, unsightly seams. In addition, the glue does not soak the top PVC layer well, so gluing with an overlap will be fragile. Gluing with an overlap (and even then situational) is allowed only when the last strip of wallpaper in turn is attached to the wall. As a rule, it can be glued end-to-end to the previous strip, but it is almost impossible to do the same with the next, closing strip. In this case, the glued fragment should overlap the already glued strip by approximately 4-5 cm with its edge. After this edge forms a noticeable bulge with the edge of the glued strip, you should make a cut in both strips along this bulge with a stationery knife. Then the edges of the strips are carefully turned outward, the trimmings are removed, after which the resulting edges are carefully glued to the wall again. Finally, it is not recommended to stretch the vinyl wallpaper during pasting.
 Recommended direction for gluingvinyl wallpaper. As already mentioned, after applying the glue, they can increase in size. After drying, the wallpaper will definitely shrink. If you stretch them during installation in order to precisely fit the edges, then noticeable seams will certainly appear. Therefore, the glued strip should be applied to the joint of the previous strip freely, carefully creating the overall pattern. You can glue vinyl wallpaper to the ceiling only if you have an assistant. Return to the table of contents</a>
How to glue vinyl wallpaper: a sequence of actions
Before you start gluing wallpaper on the ceiling andwalls, the surfaces should be prepared. For this purpose, the remains of old wallpaper, dirt, mortar drips are removed, potholes and cracks are filled. Then the walls and ceiling are primed. The wallpaper is cut into equal strips along the height of the room, and the length of the pieces should be 5-10 cm longer. It is recommended to cut as many fragments at once so that they are enough for the entire area to be pasted. A vertical line is drawn on the prepared wall using a level. This will become the starting line from which the pasting will begin. The process itself should begin from the corner, but if vinyl wallpaper is applied to the ceiling, then they should be glued from the window towards the depth of the room. In accordance with the instructions attached to the wallpaper rolls, glue is applied either to the wall or to the back - paper - side of the wallpaper. It is recommended to glue the strips in such a way that while one piece of wallpaper is being applied to the wall, there are always 1-2 strips in reserve so that they have time to soak in the glue sufficiently. As for cases when the glue is applied to the wall or ceiling, it should be applied only to an area equal to the area of one strip.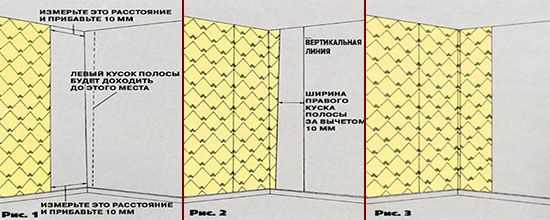 Scheme for gluing vinyl wallpaper in corners.The starting strip of wallpaper is carefully fixed strictly along the drawn line. To do this, the craftsman will have to climb a stepladder, since the strip is adjusted along the beacon line from top to bottom. After laying the starting strip, it is carefully smoothed with a spatula or roller. If the wallpaper is glued to the ceiling, it is necessary to hold it with your hands for some time. All subsequent strips are glued to the previous ones end-to-end and in such a way that the overall pattern of the panel is not disturbed. Each individual fragment of the wallpaper must be smoothed with a spatula, which removes excess glue and air. In this case, the roller should be especially careful along the seams. If glue is applied to the wallpaper, it must be spread with a thin layer using a brush. You can unfold the cut strips for gluing either on a special table or simply on the floor. Each glued strip in a rolled up form must lie and soak in glue for 5-7 minutes before fixing it on the wall. Return to the table of contents</a>
Useful tips to consider when applying vinyl
There are a few important nuances to mentionsuccessful gluing of vinyl wallpaper. First of all, you need to slowly and carefully select the wallpaper in the store. The buyer's attention should be focused on the fact that all the rolls are free of defects and mechanical damage, the shades of the rolls exactly match each other. The difference in the color scheme after gluing will be very quickly revealed, especially if the wallpaper is glued to the ceiling. It is advisable to conduct a preliminary inspection of the rolls before unpacking them, otherwise it will be very difficult to exchange unsuitable parts. In order not to waste time during the work, before starting it, you need to prepare the necessary building materials and tools. Everything you need should be at hand, right down to a small piece of rag, which can remove the remains of glue from the wall and wipe your hands. Preparation of glue for vinyl wallpaper. Proper preparation involves pouring the dry adhesive mixture into a container filled with water, and not vice versa. The powder should be poured gradually, in small portions, while stirring the solution until lumps of glue are removed and a homogeneous mass is formed. If the worker is pasting vinyl wallpaper for the first time in his practice, it is recommended to make sure that his first movements, if they are not very dexterous and high-quality, are not too noticeable on the wall. For this, you can, for example, try yourself first on those surfaces that are most likely to be covered with furniture or carpets. And only after making sure of a good result of your actions, you can move on to open surfaces in the central rooms. Before starting work, it is necessary to eliminate any possibility of drafts that are harmful to the wallpaper. A guarantee of this will be tightly closed doors and windows in the room being pasted during pasting. It is necessary to remember a clear rule - vinyl wallpaper is pasted at a temperature inside the room that does not exceed +23 ° C. If the room is too dry, the air in it should be slightly humidified. To do this, it is enough to place buckets of water in the corners of the room. Otherwise, the wallpaper may simply peel off the walls and ceiling. If the worker follows these fairly simple rules, he will achieve excellent quality of his work. But don't rush too much - working with wallpaper doesn't tolerate sloppiness and fuss.


