Drywall is a versatile material thatcan be used at any stage of construction work. With it, you can level the walls, ceiling, build shelves. At the same time, the shape of the structures can be the most intricate and complex. But the main advantage of this building material is its ease of installation, regardless of the complexity of the configuration. So, it is quite possible to do it yourself from drywall. This requires a clear design, correct marking, and precise adherence to the fastening technology.  Two-level ceiling allows creating a unique design of the room.
Required Tools
In order to perform the installation of drywall with your own hands, you will need the following tools and materials:  Tool for working with plasterboard.
- stepladder or construction goats;
- sheets of plasterboard;
- aluminum profiles of various shapes;
- hangers and special cross-shaped fasteners;
- self-tapping screws, dowels, spring suspensions;
- Roulette, ruler, plumb line, twine for marking and pencil;
- construction knife;
- scissors for metal cutting;
- electric drill or perforator;
- Screwdriver;
- plaster for sealing hats and joints sheets;
- perforated self-adhesive tape;
- roller, which is equipped with needles, allowing you to perform bending of gypsum board;
- spatulas.
Back to contents</a>
Stages of work execution
There are several basic steps, providedcompliance with which the installation of two-level ceilings from plasterboard will be executed qualitatively and the coating will last a long time. Each next phase of work should be started only after the previous one was completed. These include: 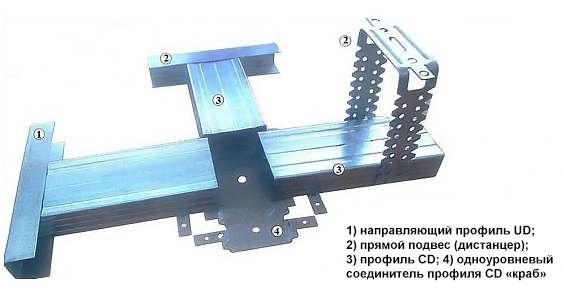 Scheme of installation of the frame for a suspended ceiling from plasterboard.
Back to contents</a>
Preparatory stage
 Scheme of a two-level ceiling made of plasterboard. After the work on the cleaning of the ceiling is completed, it is possible to proceed with the design of the project and choose the principle by which the frame will be installed. There are 2 main ways of mounting the frame:
- First, a framework of level 1 is installed, and then the next one is mounted to it;
- on long spring suspensions fasten the 2 level directly to the ceiling, and then on the marking mount the frame 1 level.
This choice depends on the complexity of the finalconstruction, skill and availability of skills of the person who performs the work, and is determined by the geometry of the room. For example, for a small room it is not advisable to perform a complex ceiling configuration, as it will look cumbersome. And in rooms of strictly rectangular shape when choosing two similar figures as a two-level ceiling, which are located in each other, it is necessary to take into account that a small rectangle should be only in the center of the large one. Another their mutual disposition or a shift to either side can lead to an imbalance in the interior of the whole room. Back to contents</a>
Ceiling marking and frame assembly
 Types of metal profiles for gypsum board. On how accurately and correctly this stage will be performed, the whole appearance, the durability of the ceiling from gypsum board itself depends. Therefore, it should be taken responsibly and all markings should be carefully checked. The markup begins with setting the zero starting point on the wall, from which further all the markup will be executed. Using a water level, draw points along the entire perimeter, and then draw lines using a cord. If the two-level construction consists of several geometric shapes, then the grid on the entire ceiling is applied using a cord. The distance between parallel lines making up a grid of 50 cm on perpendicular straight lines is 60 cm. These dimensions must correspond to the direction of sheet fastening. That is, the gypsum board must be fixed in the middle (the screws are fixed in the perpendicular profile) and along the edges (the screws are screwed into parallel guides). A drawing of the curly part can be transferred to the ceiling with a template that is made of cardboard.
 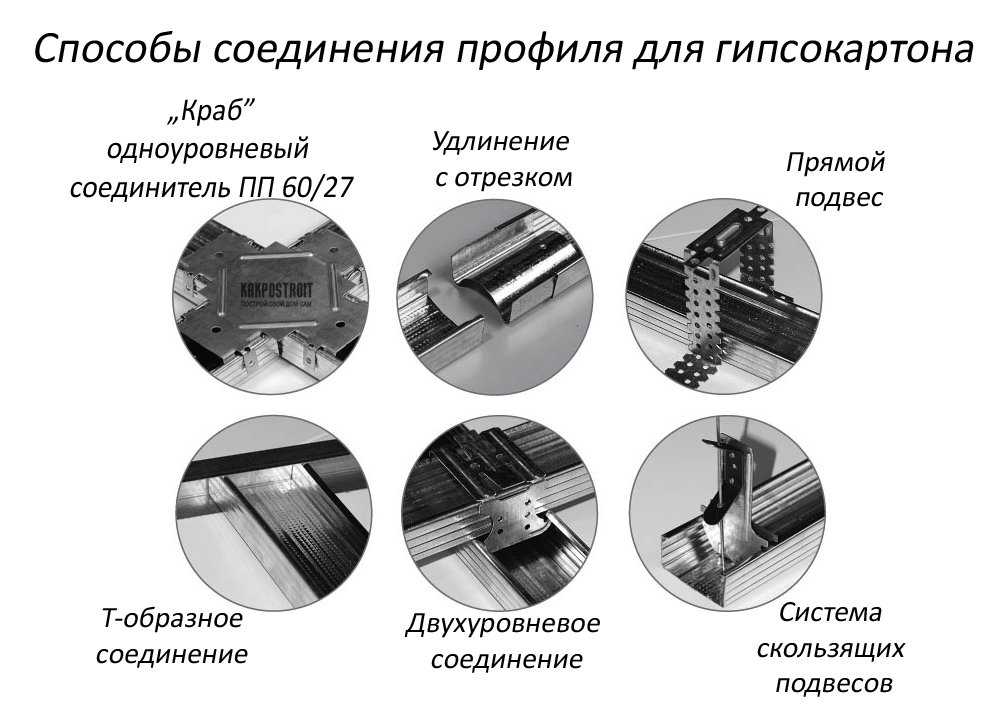 Types of fixing the profile for gypsum board. On the applied marking, the installation of the frame of level 1 is carried out. The appropriate types of aluminum profiles are attached to the walls and ceiling on the dowels. When installing the profile to the ceiling using suspensions, unnecessary ends of which must be folded. In addition, when mounting the curved part of the structure, it is necessary to use metal scissors. With their help, the profile is made with slits that allow it to be bent at any angle to the desired shape. Cross profiles are attached to the screws with a screwdriver. The framework of level 2 depends on which method of its installation was chosen initially, and on the configuration of the final structure. If its installation was planned for 1 level, then this is done after 1 tier is sewn. Back to contents</a>
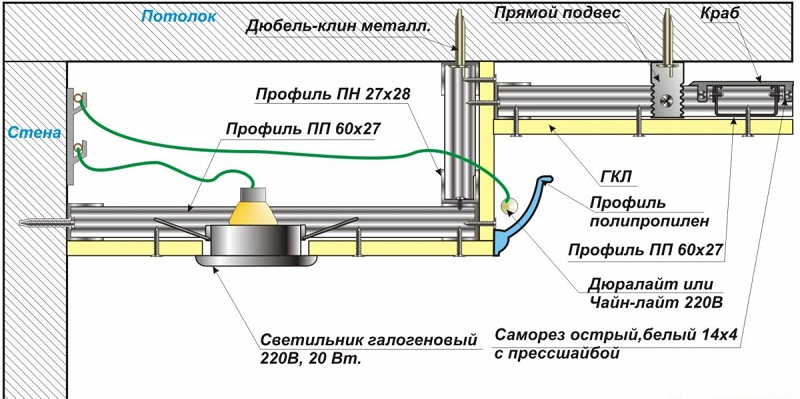
Laying of communications
All engineering communications, whichare provided in the room and pass through the ceiling (lighting, ventilation, air conditioning), must be laid in special boxes. They must be mounted directly to the ceiling, which will avoid damage when performing frame work. Wiring that provides power to lighting fixtures mounted directly in a false ceiling can be fixed to suspensions. It can not be placed inside the profile - when the carcass is plastered with plasterboard it can be damaged. The ends of the wires, to which the built-in fixtures will be further fixed, must be left sufficiently long, reliably insulated and attached to suspensions close to the terminals. Back to contents</a>
Sheathing and finishing work
When installing drywall sheets, useself-tapping screws, which slightly lighten the hat. To trim the curly part of the ceiling with a sheet of drywall curved over the template, it is necessary to process it with a spiked roller. He will make a lot of small holes, which will allow to slightly bend the sheet of drywall. This will allow them to be embedded in the future. After the installation of gypsum plasterboard sheets of level 1 is finished, you can proceed to install the 2-level frame. It is made similarly to the first, on the hangers. Use self-tapping screws and screwdrivers. After the frame is assembled, it is plastered with plasterboard. With a large ceiling area, the sheets should be staggered. The step between the screws on the long side of the plate is 40-50 cm. This will secure it securely. The holes of the future fixtures of the built-in lighting fixtures must be made. Wires that were previously left should be pulled out and attached to the fixtures. Joints, hats self-tapping shpaklyuyut special composition, use a spatula. After all has dried out, perform a fine shpaklevanie finish line-up. After grouting and installing the bulbs in the fixtures, the installation of a two-level ceiling made of plasterboard is finished by hand. </ ul>


