When we glue the wallpaper ourselves, we not only finishroom to your liking, but also save money. The diverse design of the material makes it possible to realize any artistic solution. To qualitatively make self-pasting, you will need to comply with technology, patience and accuracy. The longevity of the coating depends largely on the quality of the glued material, the preparation of the walls and the correct choice of the glue.  For fast gluing, you need high-quality wallpaper: paper, non-woven and vinyl.
Types of coatings and glues
The following types of wallpaper are common:
- paper, on which the drawing is rolled;
- vinyl, obtained by the method of gluing PVC on the basis of paper;
- coatings based on non-woven fabric;
- materials having a glossy surface;
- washable coverings.
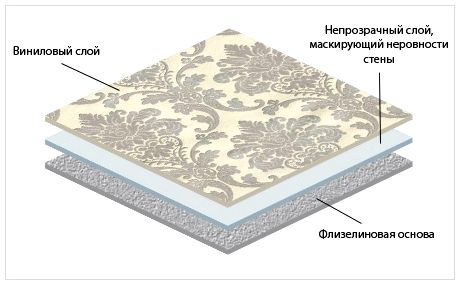 An opaque base of non-woven wallpaper allowshide all the unevenness of the wall. The most durable are vinyl wallpapers. Patterns applied to the material can be machine or manual (more expensive). In machine printing, the colors of rolls in a batch are the same. When handmade, the colors of patterns in rolls may vary. The adhesive glue is purchased together by rolls. Conventional wallpaper is glued with any adhesive, for heavy types of coating use concentrated glue. Washable, vinyl, metallized varieties of coatings are glued using a strong glue containing fungicide. Such glue prevents the development of mold on the walls during the long drying of the materials. Back to contents</a>
Instruction on wall gluing
Before beginning the pasting, it is necessary to preparewall surface works. Old paper wallpaper is moistened with a solution of soap, which is added a bit of glue. Thick paper is cut for better penetration of the liquid. After soaking, remove the old coating using a metal spatula. If the walls are painted with enamel, they are cleaned with a large emery cloth. Wash and water emulsion soak and clean with a spatula. If the black has a thin layer, it, using a sponge, rinse with hot water. The surface of the walls, removing unevenness, shpaklyuyut and plaster. On the most prepared for pasting the foundation you need to know that it must be aligned, cleaned and dried. 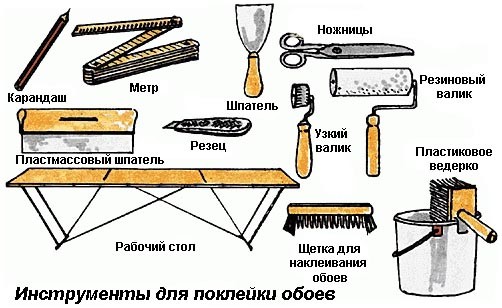 Tools for gluing wallpaper. Wallpapers can have different options for combining, information on this can be obtained from the markings on the insert. To work, you need tools:
- roulette;
- meter;
- Roller used for seaming;
- a shear knife and scissors;
- building level and plumb bob;
- roller;
- container for glue;
- sponge and rags,
Materials:
- wallpaper;
- wallpaper glue.
Pasting is done on pre-prepared walls. Performing the following steps in order, we glue the wallpaper with our own hands: 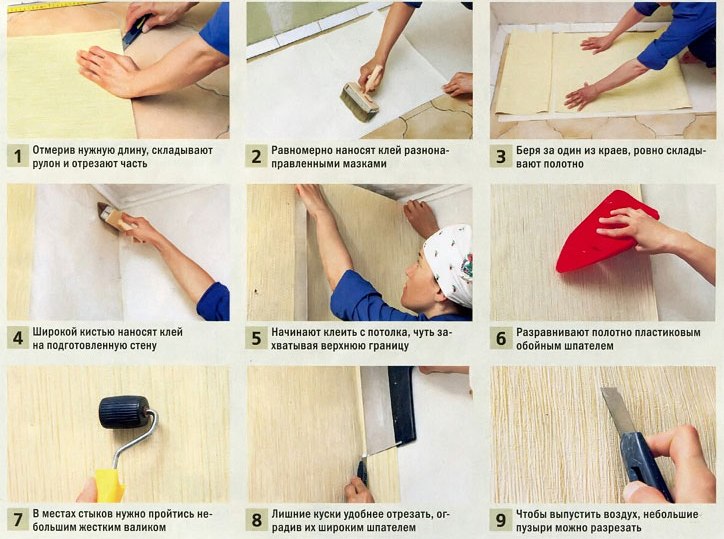 The process of gluing the wallpaper.
At work, an important point is the pasting of such complex places as corners. When pasting corners, observe the following rules:  Sequence of wallpapering.
Similarly, using the appropriate glue, you can cover the walls with vinyl wallpaper. Bubbles on vinyl panels pierce with a needle and, pushing out the glue, glue to the wall. Back to contents</a>
Pasting with non-woven fabric
Pasting the walls with a non-woven liner (1.06 m wide) makes it possible to hide defects. Such wallpaper can be designed for painting. To work on pasting you need these tools:
- laser level;
- roulette;
- a roller having a long pile;
- brush;
- plastic spatula;
- knife;
- bucket;
- sponge.
Materials:
- glue;
- wallpaper coating.
We work in this order: 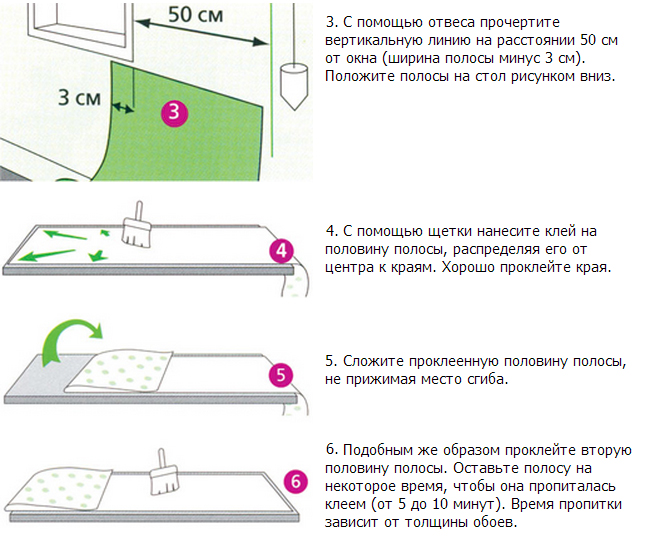 Scheme sticking flizeline wallpaper on the walls.
When we glue wallpaper with our own hands, the process of pasting andsubsequent drying should be carried out indoors. The non-woven coating is afraid of drafts, although not as much as vinyl. With flizeline material it is easier to work, since it is plastic and does not require the application of glue on the glued panel. If the material on the non-woven base is intended for coloring, it can be dyed immediately after drying. To successfully perform the work for each type of wallpaper, you need to properly choose the glue and dilute it in accordance with the instructions. Pasting should be done by technology, working carefully and carefully. It is convenient to glue the wallpaper together, but one person can quite cope with this kind of work. Completed on technology independent design for a long time will make the room cozy and beautiful. </ ul>


