In recent years, our country haspopularity has gained stretch ceilings. They first appeared in Switzerland, but France managed to popularize the technology of the installation of stretch ceilings, and they began to be produced in large numbers. In Russia, to establish in the rooms such ceilings began by the end of the twentieth century. Many craftsmen, having studied the technological process, tend to create stretch ceilings with their own hands.  Arrangement of tension ceilings. Basically, under the stretch ceiling is meant a film that is strongly stretched and fixed with special profiles. This ceiling has many advantages over the ordinary plastered ceiling. Today stretch ceilings come in a variety of shapes and sizes:
- arched;
- arched;
- conical;
- two-level;
- wavy;
- multilevel.
The options are huge, the type and shape of the ceiling depends on the customer's desire and design of the room.
Stretch ceilings: what can be required for installation?
For work you will need a special tool: 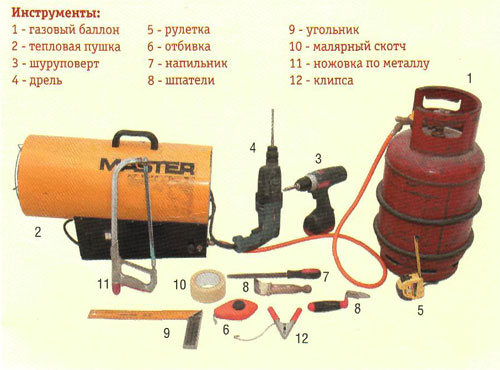 Tools for the installation of stretch ceilings.
- perforator;
- Screwdriver;
- roulette;
- level
- heat gun;
- profiles;
- cloth.
The industry produces two types of profiles for stretch ceilings:
- aluminum;
- plastic.
More reliable is the aluminum profile. It is much more beautiful, has higher reliability and is designed for long-term operation. If the ceiling is done personally for yourself, then it is best to mount a similar profile. There are several ways to fix this ceiling:
- harpoon;
- wedge;
- glazed;
- clip-on.
By the harpoon method the film is fastened, the clip-like method is chosen for the fabric base. Profiles also come in several forms:
- Ceiling;
- walled;
- universal.
Each species has its own method of attachment. Already reading the title, you can easily understand where to install the profile.  Types of profiles for stretch ceilings. The most practical, having high reliability is the harpoon method. Throughout the area of the canvas, using a special machine, welding hooks is performed, the material for which is a ceiling film. The hook is hooked to the fixed profile, and the web tension takes place. In the case of the harpoon method, it is necessary to cut the canvas very accurately. Dimensions of the film must be reduced by 7% relative to the ceiling area. When a wedge mounting method is used, the web should have a larger size. The ceiling itself does not need to be cut and measured to a millimeter. Back to contents</a>
Cloth Tension Shelves: What is required for installation?
Baguette, made specifically for stretching fabric,It is also capable of retaining other types of material. For example, it perfectly withstands synthetic leather, any elastic fabric with increased density and non-destructible edge. Self-assembly of such materials can be carried out in rooms with small areas:
- hallways;
- pantry;
- corridors.
In other words, the width of the room should not beexceed the width of the fabric. Such a baguette is suitable for the manufacture of a false ceiling from sheets of gypsum board. Tools, without which it is impossible to mount a fabric ceiling: 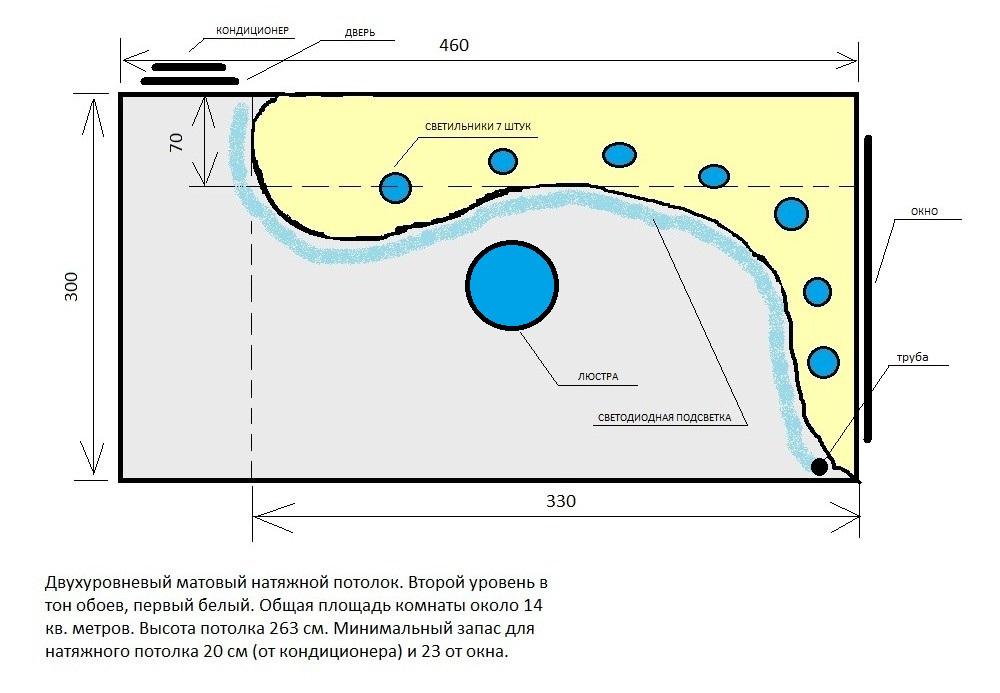 Diagram of a two-level matt tension ceiling.
- putty knife;
- ladder;
- stool;
- construction knife;
- Pull out cord.
It is not possible to mount a tensioning cloth without having:
- The canvas, which in its dimensions should exceed the area of the ceiling by approximately 5 cm from all sides;
- elements of a baguette corresponding to a method of installation;
- self-tapping screws;
- dowels.
Back to contents</a>
Baguette installation: some nuances
Stretch ceiling is attached to a variety ofways. Basically it is mounted to the main brackets or walls. In most cases, use the second method. The ceilings almost always do not look absolutely even. Ceiling mount practically does not hide the paved communications, does not allow to mount point fixtures. First, the level of the ceiling to be mounted is measured. The whole area of the room is marked with a padded cord. Then the baguette is applied to the wall and, in accordance with the markings, using a perforator, holes are drilled. 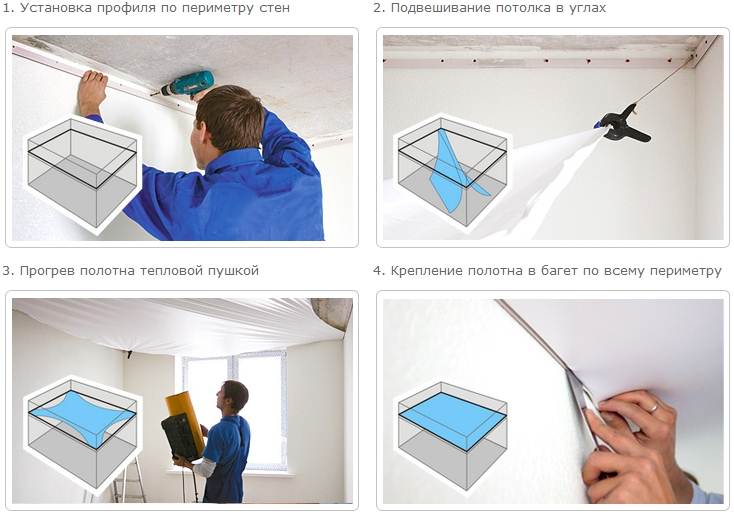 The order of installation of a tension ceiling. They insert a dowel and screw the screw. The step of fixing the baguette should be at least 8 cm. The next detail is joined with the previous one. Before fixing the part, its end should be sawed, maintaining a small angle. This is necessary to get a more dense docking connection. The end of the baguette should be removed from the scraper at a distance of more than 2 cm. After the installation has been carried out, installation of mortgages intended for lighting is carried out. Thus, it is much easier to calculate their level. In this regard, directly at the bottom of the opposing baguettes, a string is laid that demonstrates the level of the ceiling to be mounted. In this case, the height of the hangers should be 3 cm less than the distance that was formed between the ceiling and the padded cord. Back to contents</a>
Installation of film tension ceilings with their own hands
Preliminary room warm up, for whatuse a heat gun. The heating temperature is 40 degrees. At the next stage, the film is unwound so that it is not located near the heat gun. The fixing of the film begins to be performed from the angle taken for the base. The film is heated by a heat gun until the temperature reaches 60 degrees. After this, a diagonally opposite angle is fixed. All operations are repeated until all corners are used. When the harpoon method is performed, a spatula is taken, which is harnessed into the special groove that exists in the profile, until a click occurs. The film must be warm all the time. When other methods of installation are used, fastening is done with a glazing bead, in some cases a special wedge is used. Surplus material, after the end of installation, cut with a construction knife. After the temperature of the film becomes room temperature, it will stretch and take an absolutely even look. Back to contents</a>
Installation of fabric ceiling
In the case of the use of a cloth web thermalyou do not need a gun. The work begins with the fixation of the canvas in the center of the profile. The end of the fabric should be out of the profile, approximately 5 cm. Then, slowly, every 80 cm, the fabric is pulled up and straightened on both sides. The tension is drawn from the center of the room towards the corners, while simultaneously securing the fabric in the profile. Mounting in the corners is done at the very end. If there are wrinkles, they need to be smoothed out with a construction hair dryer. When making circular motions, it is necessary to warm up the problem place. The heating temperature should not be more than 200 degrees, the distance to the hair dryer should be kept within 20 cm. When the installation is completely finished, excess pieces of cloth are cut off, decorative caps are installed. You can paint the fabric ceiling in any color or draw a picture on it. You just need a fantasy. As you can see, it is not difficult to install tension ceilings in your home. Good luck in repair! </ ul> </ ul>


