The result of the finishedperfectly smooth and smooth walls. Used in most cases, multi-layer plaster is so long and slow process, which leads to despondency of performers and customers. The covering of walls with plasterboard and analogues is also not an ideal solution and has its drawbacks. The output can be textured plaster with your own hands.  Textured plaster is able to decorate anyroom, with it does not require certain skills and great accuracy in its application. Almost for all methods of textured plaster production of materials, components and tools is established. The presence of a large range of components of this type of work makes it possible to apply textured plaster yourself, without attracting specialists, which will reduce the cost of construction or repair. The cost of materials for any decision will have to be paid to you, but on the payment of work you can get considerable savings.
Surface preparation
Your room is successfully prepared for the nextwork, passed the previous stages of construction or repair and is in expectation of final finishing works. You came up with the idea to finish the walls using textured plaster. Specialists are ready to help, but their services are quite expensive for your budget. The way out is to make textured plaster by yourself. Inspect once again all corners, slopes and other mates. If a crack is found, use a sickle (a tape of a fine grid). Cut a piece of the necessary length, apply a layer of primer on it or on a crack, press it and hold it for a while. 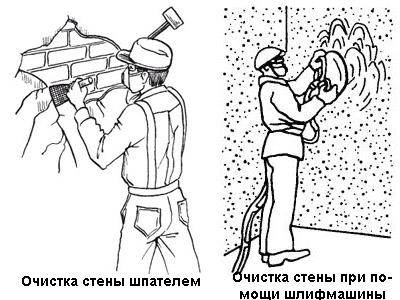 Scheme of preparation of the wall for applying plaster. The primer thickens quite quickly. Having processed all the detected chips, cavities and cracks in this way, go to the primer of the wall surface. The process is simple, it is necessary to prepare for it:
- container with primer;
- a pallet for priming a roller;
- roller with a long handle, allowing you to reach the upper corners.
Pour a thin layer of primer into the pallet,Apply it to the roller, rolling several times on the pallet for complete coverage. We make rolling it on the wall, controlling the uniformity of the distribution of the primer on the surface. After the end of work, give time to dry according to the manufacturer's recommendations, which are on the packaging. The roller and the pallet must be cleaned of primer residues in the manner recommended by the manufacturer. Before the next stage, carefully examine the result, discard the stains with a small emery cloth, unpainted places finish with a small brush. Work sandpaper is more convenient, wrapping it around a small wooden bar, convenient for holding in your hand. After completion, again drying, after which it is possible to apply a textured plaster. Carefully read and follow the safety precautions listed on the packaging material. Back to contents</a>
How to apply textured plaster?
Before the beginning of the next stage, you must deletedust from the surface, especially in places of sweeps. To do this, you can use a vacuum cleaner, a soft broom or a brush, a clean, slightly moistened cloth. For work you will need the following tools and materials:  Tools for applying textured plaster.
- trowel, roller, sponge;
- grater;
- semifunctional;
- small spatula (width 5-8 cm);
- figured spatula or roller with a decorative nozzle, depending on the chosen design;
- solution of textured plaster.
Textured plaster in the absence of experience is betterfirst put in a secluded place, which will subsequently be hidden by furniture. For the first time there may be flaws, which can not always be removed easily and simply. The plot for processing is small, 1-1.5 m2. Prepare the plaster solution: add the filler, if necessary, shake well, thoroughly mix. Observe the proportions recommended by the manufacturer. When buying a ready-made mixture with a color and filler, you must mix it thoroughly. Apply a thick layer of mortar along the long edge of the trowel with a small trowel. Then, leaning this edge of the trowel to the wall at an angle of about 30 °, smoothly guide the tool up. The mortar layer should be uniformly spread over the wall surface. The thickness of the layer should not be more than the diameter of your filler.  Types of decorative plaster: smooth, textured, relief. When you finish the portion of the solution on the trowel, repeat everything. After you finish the first section, wait a while, the solution should slightly thicken, but do not harden. In this state, you can smooth it with a half-trowel or apply a relief depending on your choice. Take in hand the necessary tool and with a light click in the chosen direction. To eliminate too sharp depressions and protuberances, you can smooth the surface with a damp cloth. With a smooth smooth surface, the layer is rubbed with a float for strengthening. But with modern materials it is not necessary. After checking your abilities and positive result, start the main work. This time, you need to start from above, so that the falling remnants of the solution do not spoil the lower part. To work at the top it is better to use a sturdy table and a stand for a container with a solution installed on the table. For this purpose, you can use an ordinary stool. This will protect your back from unnecessary slopes. The use of a ladder is undesirable, one awkward movement - and you are on the floor with splashed solution. Well, if you get off only bruises, but serious injuries are possible. Plus to all troubles - the spoiled floor and the lost solution. After completing the covering of the upper part of the wall, we go down, examine the lower part, remove the solution that has gotten and continue the work. If the work with the trowel is inconvenient and the result does not suit you, the solution can be applied with a roller, sponge or grater. Roller roll in a tray with a solution, put a mixture on the sponge spatula and smear or roll over the surface. Further processing is the same as when working with a trowel. After passing through all surfaces, your textured plaster is almost ready. After the time for drying, determined by the manufacturer, the surface can be slightly smoothed with a fine emery cloth. This completes the work. Back to contents</a>
How to diversify textured plaster?
If the result obtained at the previous stages is not satisfactory, we will consider how else it is possible to apply the textured plaster or ennoble it. There are several ways to do this:
- painting with the effect of depth;
- textured plaster without texture;
- variational plaster;
- painting with the effect of depth.
You can paint the entire surface in one color. It is more colorful to use two tones of the same color. First the whole wall is painted in a dark tone. At work it is better to use a brush. The protruding parts are wiped with a cloth. After drying, a second layer of light tone is applied. Apply a roller with a small amount of paint only on the protruding parts. Back to contents</a> Textured plaster without texture 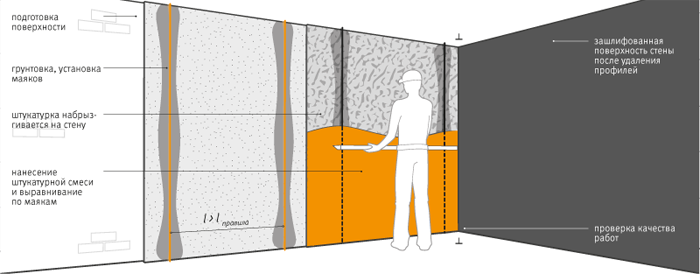 Scheme of the plaster wall. With this method, the textured plaster can have the form of marble, leather, fabric, antique parchment, fabric and other materials with the effects of rubbing, wrinkled and with imitation of cracks. The first layer is applied as described above. The subsequent layers are put in separate places randomly or strictly according to plan according to your imagination. The lower layer does not overlap. Each layer is given a texture according to the chosen color scheme. Layers are laid in series, strictly after drying of the previous layer. Defects are removed with an emery cloth. Refine the texture plaster with the imitation of the texture of the painting with a clear varnish or a coating of wax. Back to contents</a> Variational plaster This method is recommendedfor the treatment of street walls, a solution based on cement - not the best option for interior decoration. Difference: the base component is supplied separately as a dry mix, separately the filler. The ability to choose the filler and appearance is created. Such textured plaster with their own hands is applied quite simply. Trowel or trowel is used to throw small portions of mortar on the wall. Then the flattened surface is leveled with a half-hammer and rubbed with a float. With a good throw technique, you can so beautifully sketch that alignment and smoothing will only spoil the look. The main difficulty is mastering the technique of throwing. Usually, after a little training, the process is established. It is better to work together. While one is throwing a surface, the second is working with a half-wiper, and then with a grater. The specific gravity of the solution is quite large. The container for the solution needs a decent size and, as a consequence, a solid weight. It is difficult to move it alone. Back to contents</a>
Special formulations: application
To create a unique surface for yourpremises, you can use special fillers that create various effects in the picture. A solution with such additives is applied in an even layer over the entire surface and aged until the thickening stage. Then it is processed over the entire area in a circular motion with a grater. When mashing, crumb and granules move and create a pattern of grooves. The movements of the float do not have to be rotational. It all depends on your imagination. In the same version, you can use granules with a filler. When grouting, they burst, and the dye creates a unique color scheme. Now you know how to make a textured one. Good luck with your work!


