Many people sometimes need to fence off some of the apartment. For example, a child or children (a boy and a girl) have grown up, and they can not be left in one bedroom.  The scheme of the device of a wall from gypsum cardboard. To separate any part of the apartment, a balcony, a room or a house, you can build walls of plasterboard with your own hands. It is only necessary to make the installation in the correct sequence.
Advantages and disadvantages of construction
Positive sides: 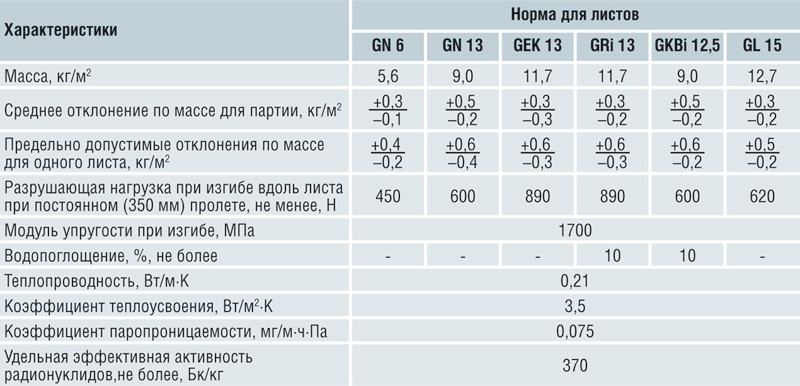 Physical and technical characteristics of gypsum boards.
Negative sides:
Back to contents</a>
Construction: elements and materials
 Types of profiles for drywall. When forming and it is necessary to know and take into account many small nuances. For example:
- what profile for GCR to use in this or that case;
- what size (minimum and maximum) can be the cells of the framework;
- how to properly fix individual elements;
- other.
Only under this condition will you have a durable, strong and reliable wall construction. For the installation of drywall with their own hands, the following basic materials are needed:
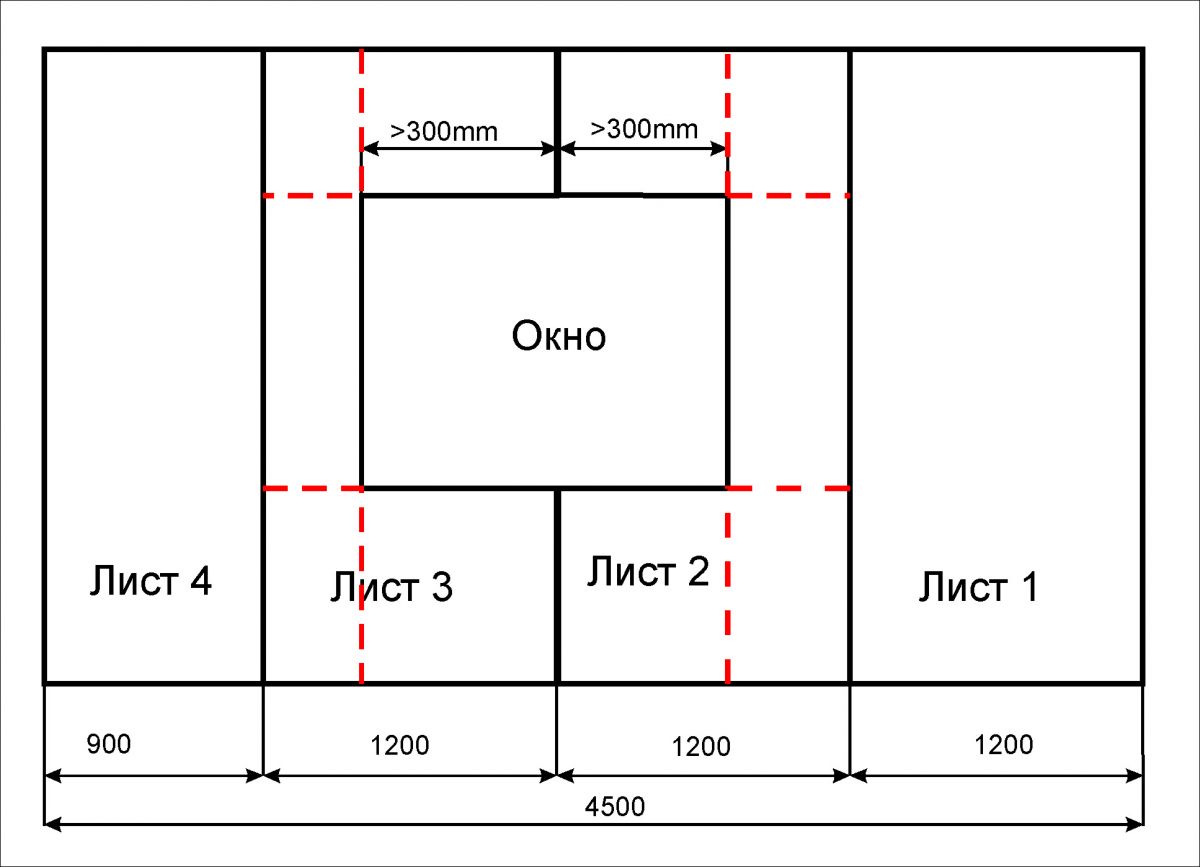 Scheme of calculating drywall on the wall. For the erection of the wall, a 12.5 mm thickness gyro is used. The remaining dimensions are standard and therefore not included. The sheet must have a special chamfer on each side. The color of the material depends on the place where the design is installed:
- for the bathroom or kitchen use a moisture-resistant green or bluish gyro;
- For ordinary premises - gray or white sheets GKL.
Some walls and partitions block the passages(corridors, doors). In such walls, openings are provided, which are formed at the stage of assembly of the frame. If you need to install a door or window in the opening, then the structure is reinforced with wooden rails or with beams. For reliability, the beam is usually inserted into the profile or screwed to it with screws. Back to contents</a> Profiles made of metal and additional fasteners 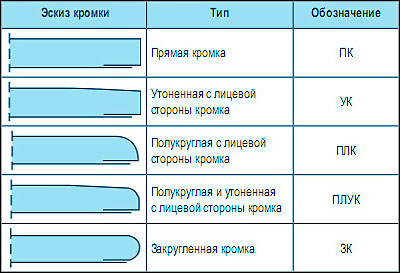 Types of edges of plasterboard. About these elements need to be said specifically. In order for the construction of your wall to be correct, reliable and durable, it is necessary to form and mount a framework of metal U-shaped elements called profiles that are designed for gypsum. Their usual length is 3 or 6 meters. The remaining sizes are only two:
Both of these sizes are:
 Tools for the installation of drywall. The frame can be assembled either by all kinds of profiles simultaneously, or by one of them. For example, only a reference or only a guide. If the assembly is carried out by several types, it is necessary to insert the reference profile "C" in the carrier "U", and not vice versa. In practice, the following options are used:
- 100 mm - the maximum;
- 75 mm - medium;
- 50 mm is the minimum.
- 50 mm - the minimum;
- 75 mm - medium;
- 100 mm is the maximum.
They also apply a special "UA" profile -enhanced version of "CW". Its walls are much thicker. For a conventional partition (up to 100 mm), the variants "UW" and "CW" are used, and for a wide partition - "UD" and "CD". In the second case, to provide the necessary width, two frames are put and connect them by perpendicular stiffeners of the same profiles. Additional fasteners are:
- conventional hangers;
- hangers are universal (called crabs), if there is no crab, then mount the frame with self-tapping screws and simple ones, and with a tip like a conventional drill;
- Plastic dowels - to fix your partition to the wall.
Back to contents</a>
Layout of surfaces under the future wall
 Scheme of installation of plasterboard on metalprofile. If you spend marking in a habitable apartment, then it can be done directly on the wallpaper (paint) on the walls, on the ceiling and on the floor. If the partition is temporary - a parquet or other covering can not be removed. If it is put for a long time, it is advisable to disassemble the cover and attach the lower guide to the concrete. When marking an unfinished room (we bought an apartment-frame, for example), it is desirable that the floor was leveled (with a screed), and the walls were plastered. But this is not always necessary. Especially if you put a stationary wall. The main thing is to properly fix the guides and risers, and everything else will close the gyro. First you need to determine the position of the future wall. To do this you need:
Back to contents</a>
Assembly and installation of the frame
When assembling the following order of execution is necessary: 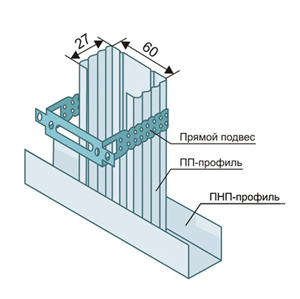 Scheme of assembly of profiles for installation of drywall.
Under all supporting profiles, directlyfixed on the ceiling, floor and side walls, it is necessary to lay a special sealing tape. To increase the rigidity of the construction, you can insert the cross members. They are easier to insert, if you have completed the entire framework of the "UW" -profile. When using the "CW" elements, their folded edge will need to be cut and bent at the places where the cross members will be installed, for a more snug fit. For the uniform distribution of verticals, the following method is used:
- at a distance of 0.5-0.55 m from both supporting walls set up two verticals;
- measure the distance between them and calculate the number of racks so that the distance between them does not exceed 0.6 m.
Example: the width of the room is 5 m. After installing two verticals, there will be 4 m: 5-0.5-0.5 = 4 m. Then determine the maximum length (less than 0.6 m), which can be divided without a remainder of 4 m. This 0.5 m: 4 / 0.5 = 8 gaps. In 8 intervals 7 racks will be installed. Back to contents</a>
Forming openings
 Scheme of applying glue for walls from gypsum board :. (a- for flat walls, b- for uneven walls). If you mount a wall in a renovated apartment and you have a door or a passage for it, then the frame is done like this:
- mark the place of the opening on the floor guide;
- strengthen it with dowels so that they do not hit the marked spot;
- mount the main verticals near the walls and two racks along the edges of the opening;
- cut off a piece of the bottom guide where there will be a passage.
- if it is planned to install a door, it is desirable to strengthen the passage profiles with additional posts 20-30 cm from the verticals of the opening and cross-bars;
- then the upper guide for the door frame or door is reinforced;
- further in the vertical of the opening and in the upper profile of the door insert wooden beams (reinforcement) and fix them with screws;
- to these beams nail or screw the door frame or strengthen the door hinges on them (depends on the design).
In the case of mounting a wall with an opening in the apartment, wherethere is still no screed, the lower guide can not be cut, but left as is. The opening for the window is executed in the same sequence. The difference is that the lower profile is not cut. To form the base of the frame of the window at a height of 75-90 cm from the floor, mount the cross bar into which the beam is inserted for reinforcement. The following actions are the same as described above. Back to contents</a>
Processing and fixing of GCR
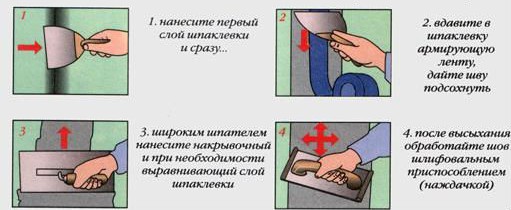 Scheme of puttying gypsum board joints. After the complete formation and installation of the frame, the process of installing the gyro plates is started. Drywall has three main dimensions, which differ only in length. The width is standardized and is 1200 mm. The lengths are 2000 mm, 2500 mm and 3000 mm. Most often on sale there is an option with a size of 2500 mm. The first and last sheets of the flat adjacent to the wall are chamfered (chamfered from the side), and the sheets are placed on profiles 2-3 mm from the wall. This is done to strengthen the end face of the GCR (when filling the slot with putty) and secure the adhesion of the sheet to the wall. The trimmed strip (with chamfer) can be up to 5 cm wide. For cutting gypsum, use a construction knife (for GCR) with a retractable blade. Branch occurs as follows:
- A sheet of plasterboard is laid on a flat plane with the back side;
- outline the cut line with a pencil or "paste";
- apply a flat bar or ruler;
- Cut cardboard from the back;
- break off the line and cut the paper from the other side.
For reliable adhesion of sheets on their edges it is possibleto make a bevel. When installing, a groove is obtained, which, when filled with putty, will securely attach the sheets fixed to the frame. The lateral chamfer is made using a special device - a plane for drywall. Sheet GKL strengthen on a skeleton by special screws-samorezami. First, attach the edges, and then the middle part of the sheets. The hat of the screws should go deeper into the gypsum by 0.5-1 mm. To avoid deformation of the sheet, screws are screwed in turn through 20-25 cm. The sheets should be fastened with some displacement:  Scheme of fixing the metal frame under gypsum board.
- set the first sheet and attach it to the frame;
- measure the piece to the ceiling, cut the GCR and attach it to where it should be;
- The second sheet is raised under the ceiling and screws are screwed;
- The empty space left at the bottom is covered with a corresponding piece of gyro.
- The other sheets of both sides are also reinforced with offset.
Back to contents</a>
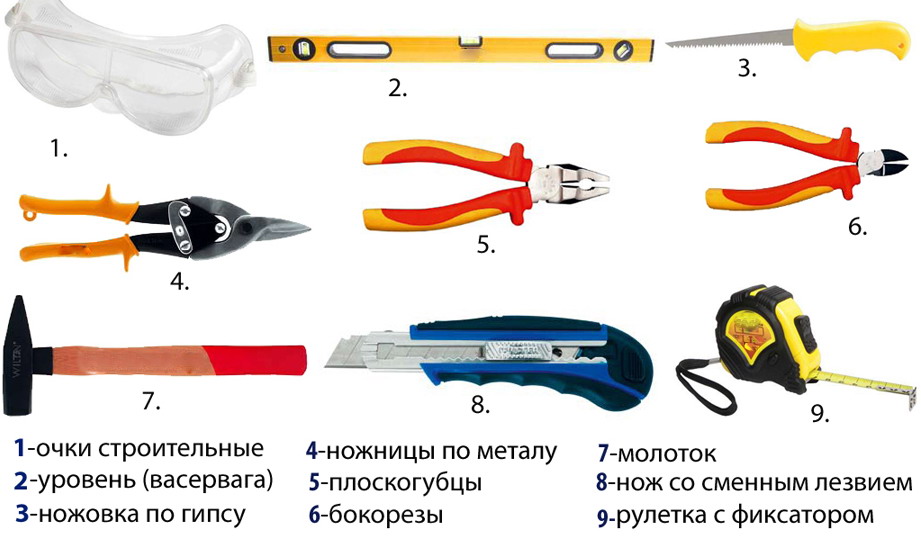
Tools and materials
- GCR;
- roulette;
- rope, plumb line;
- level;
- knife, metal scissors;
- screwdriver.
After the carcass plating shpaklyuyut all joints and surfaces. </ ul>


