Aligning wall surfaces at all timeswas considered a very difficult process. But the qualitative result of such work can then please you not only in the decorative sense, but also in its functional characteristics.  The walls in the panel houses are usually not exactly level, which is why they need to be leveled.
Why you need to align the panel walls
Today, about half of all residentialhouses are. But it is important to determine the main points that make the alignment of the walls in a panel house with your own hands necessary. After all, a panel house is easy to build with the availability of technology. And the time spent on the construction process is significantly reduced. 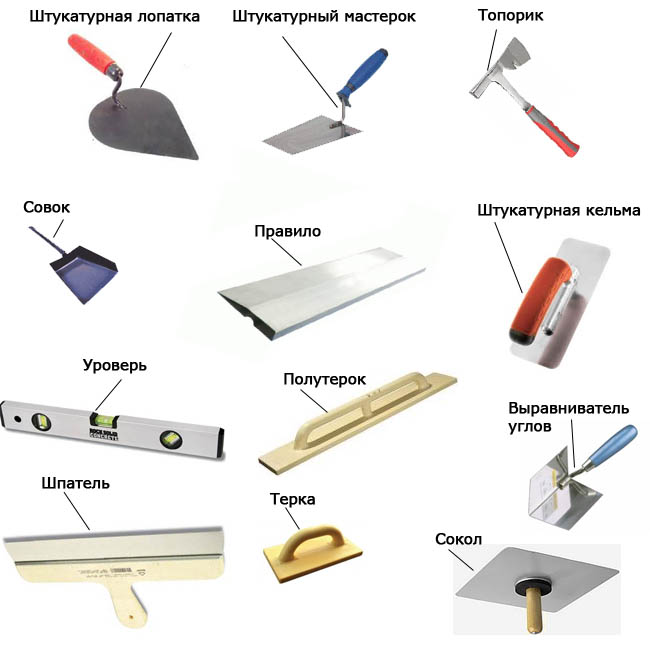 Tools needed to level the walls.
To achieve all of the above advantages andto carry out work qualitatively and in the shortest possible time, it makes sense to consider in detail the main methods that are now used to level the panel walls, to determine the basic rules and subtleties, the observance of which will help you do everything yourself with no extra financial costs. Back to contents</a>
Alignment with plaster
So, the first material that is appropriateuse for work in a panel house, is a common mortar. Any old Khrushchev in a panel house has such walls that it is impossible to dispense with a solution. How to level the walls with a solution? Let's consider features of alignment of internal surfaces. Back to contents</a> Selection of material and tools 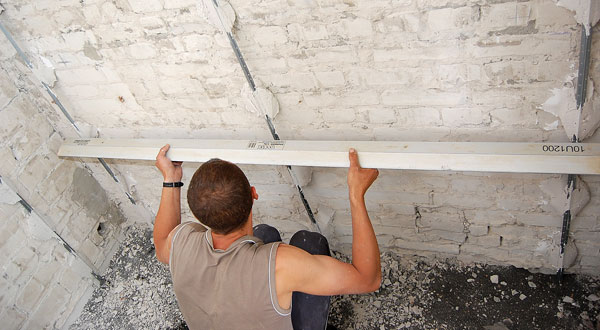 Alignment of walls by lighthouses is madecement mortar with the help of the rule. Aligning walls with plaster is one of the most effective and economical methods. This coating will have more advantages, but with the wrong approach and drawbacks can also occur. The main ones are: peeling of the material, the inability to correct the irregularity of the thickness of the layer in different areas, and the laboriousness and the presence of a large amount of dust. To the minuses you do not bother, you need to stock up in advance with such tools and materials:
- rule;
- mixer for mixing the solution;
- construction plummet and level;
- a container for stirring and picking up the solution;
- dry clean rag;
- Master OK;
- a set of putty knives;
- brush;
- primer;
- putty;
- mounting foam;
- tow;
- construction knife;
- a hammer;
- wooden flat spatula for subsequent grouting.
 Scheme of wall alignment with plasterboard for glue. When you buy tools, you need to pay special attention to the choice of mortar for plaster. For leveling of panel walls it is best to buy specially designed dry mixes for such purposes, which are diluted with water to the desired consistency just before the work itself. It is best to choose a solution with a high content of various plasticizers in it. They will be able to ensure the most tight fitting of the material to the wall. Well, if the solution is quartz sand. He can make the surface as strong and strong as possible. This will not in the future prevent mechanical damage to the integrity of the plaster layer. It is also important to determine correctly the amount of solution mixture. As a rule, all calculations are made independently. The landmark is that usually about 1 square meter of the wall uses about 16 kg of the solution, diluted to the required consistency. This is in cases when it is planned to level the wall by a layer of 2 cm. Accordingly, the smaller the layer, the smaller the consumption of the solution. Pay attention to the instruction: there are usually also written approximate proportions. Back to contents</a>
Surface preparation
 Scheme for aligning the seams of a plasterboard wall.So now it is necessary. For this, the completely old coating is first dismantled. The wall must be tapped well, while removing even those pieces of mortar or putty on the panel that seem to hold firmly, but the sound during tapping is ringing. After all, this already suggests that such a coating will soon fall off. When the dismantling is finished, proceed to covering the panel walls with a primer, after thoroughly cleaning them from dust. It is best to add extra antiseptic to the primer. This will not only destroy the existing fungus and prevent the formation of a new one, but will also help ensure a more reliable adhesion to the wall surface of the leveling plaster. If there are large cracks on the wall and open gaps between adjacent slabs, they must be repaired separately. To do this, it is good to use tow, which is pushed into such cracks, and then poured there with a thick cement mortar. You can combine the use of a solution with polyurethane foam, the excess of which, after hardening, will need to be immediately cut off with a construction knife. Visible pores also need to be repaired, but this is best done with a putty. Minor cracks are repaired in the same way. Back to the table of contents</a> Aligning the wall with a mortar
 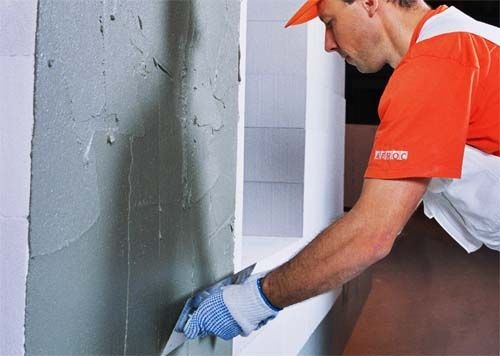 Wall alignment can be performed usingplasters. After drying, the wall is again covered with a primer. Now you can safely produce and align. First, it is necessary to fix the beacons from top to bottom, which will serve as vertical plumb bobs. They should only touch lightly the most convex part of the wall. It is on it you need to navigate during alignment. After all, a thicker layer of the solution will not hold tightly enough. Horizontally, you need to pull several rows of threads that will serve as beacons. Make sure that they are parallel to each other, do not sag and lightly touch the most convex parts of the wall. It is advisable to verify their smoothness by the rule. When all this is done, it's time to work with the solution. To level the panel wall, the solution must be scooped up with a bucket from the container and scribbled onto the wall. When approximately one square meter will be sprayed with a solution, it is necessary to make a slight alignment with a trowel or spatula, after which proceed to a thorough leveling by means of a rule. The rule should be pressed against the wall and carried from the top down. Ideally, after leveling, the wall will be flat exactly for all installed beacons.
 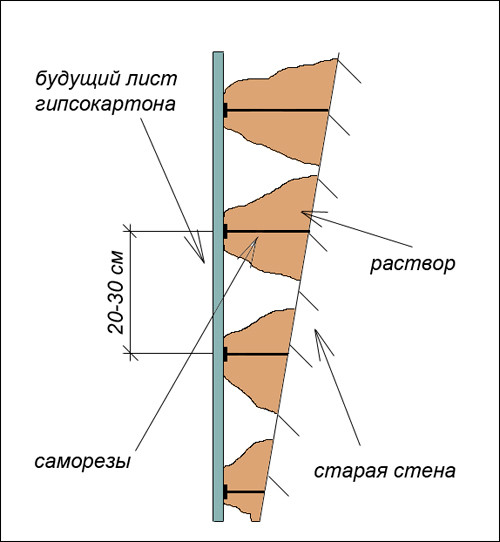 Diagram of wall alignment with plasterboard. So parts are completely equalized the entire surface of the wall. When the solution grit slightly, you need to grout. To do this, take a wooden trowel and, dipping it in water and dry cement, make a grout. So the wall will be stronger and more resistant to all kinds of influences of unfavorable factors. It is necessary to allow the wall to dry well in a natural way, preventing cold from entering the room, direct sunlight and excessively hot air from central heating or heaters. After 5-7 days, it is necessary to coat the surface with putty, after which it is possible to finish already level walls in the panel house by any desired method. Back to contents</a>
Alignment with plasterboard
Another quality and widespreada way of leveling walls in panel buildings is to use drywall sheets. The use of this material makes it possible without the appearance of a large amount of dust in the room and large labor costs. But it is also important to take into account the fact that part of the interior space of the room will simply go under the plasterboard structure. And in rooms with a high constant level of humidity, drywall is considered not the best option. Back to the table of contents</a> Material and tools So, if you decidealign the wall with this method, you need to buy all the materials and tools. First, buy gypsum boards and guide metal profiles for them. The amount directly depends on the surface area. You still need to make a small margin for unforeseen expenses. In addition, you will still need:
- Screwdriver;
- a set of screws and screws;
- putty;
- spatulas;
- roulette and pencil for markings;
- a hammer;
- brush;
- building level;
- primer;
- building knife.
Back to contents</a> Mounting the frame and plasterboard So, now forwork! First, the surface is prepared in the same way as described above. Then the frame for the gypsum board structure is installed. As a rule, it consists of metal rails and profiles. First they are attached exactly along the perimeter of the wall, after which the marking and fixing of the profiles and on the middle of the wall are made. The distance between the slats is about 45-50 cm. The distance between the fasteners should be approximately 25-30 cm. Be sure to use the level! Mounting the frame is done with screws or screws. If the panel is very thick and hard, it is better to give your preference to the screws. In other cases, you can do with screws. Do not forget to plaster the plastic dowels before attaching them. Holes for them are drilled with a perforator. After the structure of the frame, it only remains to fix the sheets of drywall. Prepare the material in advance by cutting out the right size sheets and making notes on them in the places where you are going to mount. The distance between the screws should be about 25 cm. When the sheets are installed, you will only have to seal the joints between them. For this you need to use the putty. If the slits are large, which is very undesirable, then they need to be filled with a mounting foam that has a minimal expansion. A special thin tube will help you fill even qualitatively with such foam even narrow slits. When all is solid, the foam should be cut off. On top of it you need to apply putty. It is most convenient to work with a narrow spatula. That as a result of joints it was not appreciable absolutely, it is necessary to try accurately to thrust shpaklevku in a crack, filling them completely. And when this is done, you need to remove the excess from above, focusing on the main part of the sheet. During this, you need to use a level. The final stage is a primer with an antifungal composition, after drying it follows a thin layer of putty to cover the entire drywall. Now you can safely decorate the wall with the desired method. So, the main two methods of leveling walls in panel houses - with the help of plaster and drywall - are considered. Both methods are good, you need to choose only more suitable for your room. If you take into account all the subtleties, you can achieve an almost perfectly flat wall.


