Almost any person who carried outrepair work indoors, you had to level the walls. The need to organize such work appears at a time when you want to create a flawlessly flat surface. For example, prepare a base for painting or gluing wallpapers. Aligning the walls with their own putty will allow to solve such problems. Similar work is associated with the passage of several stages, which can be performed by everyone. The recommendations outlined below will make it possible to cope with the work clearly and systematically, avoiding mistakes and errors.  Scheme of proper surface plastering. Usually the walls are leveled in small areas, with the help of ready-made compounds or prepared independently from a dry mix. Such work can not be performed if the following tools are not available:
- gypsum plaster;
- spatula of large and small size, including angular;
- grinding grater;
- roller for priming the surface;
- rule;
- drill with a mixer;
- capacity for spreading putty.
Preparatory work
Aligning the walls with your own hands is inseparableis connected with the preparation of the foundation. So, brick overlapping shpaklyuyutsya only after drawing on the plane of plaster, for concrete surfaces such works are irrelevant. 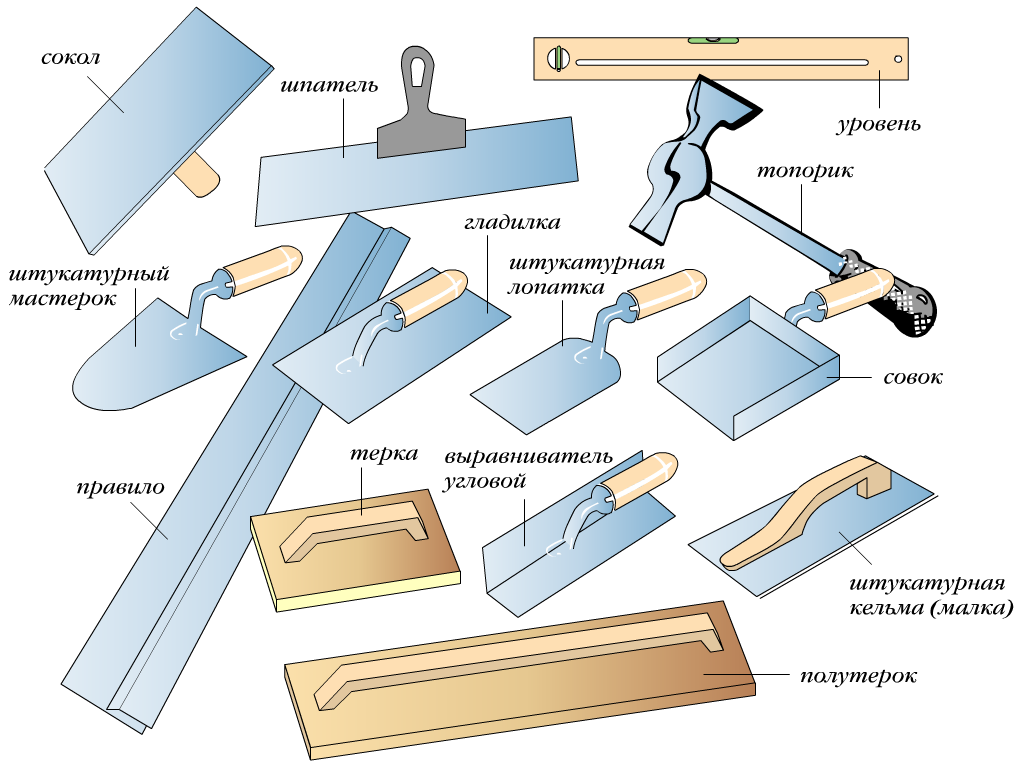 Tools for wall leveling. If there are traces of finish coatings on the partitions on the partitions, they should be disposed of. Cleaning activities are not particularly difficult. Old wallpaper on the base, a layer of water-based paint or gypsum plaster is washed off equally. The surface is treated with water in small amounts, after which it is scraped off with a spatula. If the canvas is processed in full size, then other types of coatings are wetted in small areas. As it absorbs the putty with moisture, it is easily cleaned. If an acrylic or alkyd paint was applied on the floor, you will have to work hard. Special means of the old layer of enamel is removed from the surface. In another version, the paint is knocked off by a conventional hammer. Back to contents</a>
Sequence of work
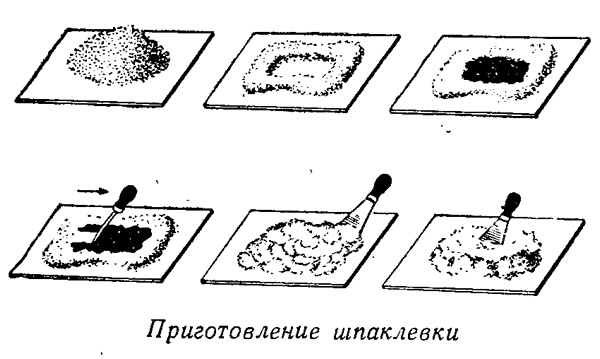 Scheme of preparation of putty.
Back to contents</a>
Alignment of walls with plaster
 Wall plastering scheme. The process of leveling walls with plaster is more complicated. Despite this, the surface is flawlessly smooth and serves a long period. Usually such activities are calculated on people who already have experience in such activities. Before carrying out the basic works, pieces of furniture and things should be taken out of the room, otherwise they will get heavily polluted. For the organization of fruitful work it is necessary to prepare a number of devices:
- brush;
- level;
- Master OK;
- putty knife;
- rule;
- notched trowel;
- grater;
- capacity;
- gloves;
- a drill with a nozzle;
- hydro level;
- roulette.
Alignment of walls with plaster begins withthorough cleaning of the foundation from old types of finishes. The plane is washed and primed. Proper and thorough preparation will be a success in following up. From such a surface, the plaster will not separate. Then you need to take the tools and stock up the lighthouses. They will allow to correctly determine the foundation of future walls. The length of the rule used is 2 m. The height of the applied layer at all points can be markedly different. So, it can be from 1 mm to 4 cm or more. Then you have to spend a lot of solution. Back to contents</a>
Use in the work of beacons
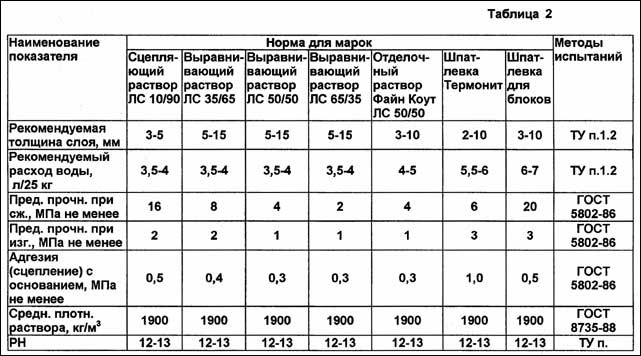 Table characteristics of putty solutions. Beacons are vertical slats that define the foundation of future coverings. They serve as a guide for the rule and allow you to lay out the composition on the surface. Establish such a device should be very carefully, since this exercise is considered the most responsible. The placement of beacons determines the geometry of future coatings. Misses in this case are unacceptable. First, the lines are stretched horizontally with a distance of 0.5-3 cm from the surface of the coating. They are fixed with nails in the corners of the room. The stretched filaments are arranged in a vertical plane parallel to each other. The plumb line will help to determine the evenness of such a design. The beacons are defined in a position under tensioned yarns. Such elements are placed vertically, slightly touching the threads. Mounted beacon at the septum filler and dowels. After fixing it, a rule is applied, it allows to identify possible irregularities. After that, you can install other beacons. The optimal distance between them will be 1 m. Such a distance will allow to achieve flawlessly smooth surfaces. Back to contents</a>
How to apply the mixture correctly: recommendations
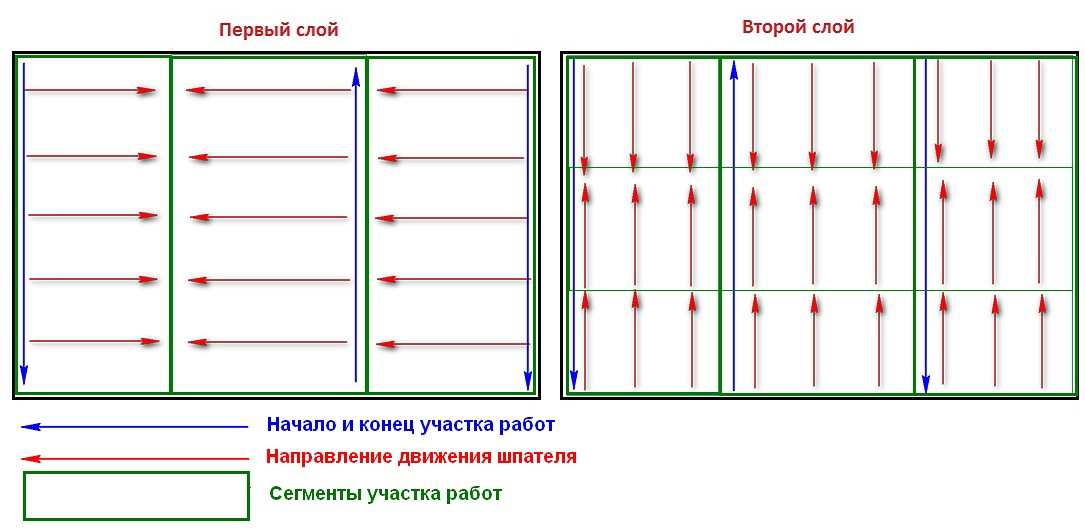
Conveniently, if the plastering of the walls will be just tworights. One of them is engaged in the preparation of the composition, and the other is leveling the rule. For the treatment of the base, use a steel scoop. With its help, the composition is easily extracted from the container and simply thrown to the surface. You can level the wall with a spatula. Using the rule, the line between the beacons is drawn, it helps to make the coating flawlessly smooth. This way all the partitions in the room are covered. The area of 12 square meters can be processed within 6 hours, if the master has experience in plastering surfaces. After the application of the layers, they need to dry thoroughly for 3 days. At this time, the room should not have drafts. The air temperature must be constant. Fill septums can be 7 days after the application of the plaster layer. </ ul>


