The decision is made and you start repair. The most reliable and practical way to make the interior original - to install on the walls of plasterboard. But before proceeding to this stage, it is necessary to establish a profile for drywall.  Types of profiles for drywall. Starting an independent job of installing a profile under the GKL, it is necessary to have a set of tools that will be needed for the further construction process:
Also need to purchase:
- press washer with drill;
- ceiling dowels for concrete;
- extension cords (if the height of the wall is greater than the length of the rack);
- hangers straight (frog);
- connecting crab;
- profiles: wall (UD); directing wall (UV); Ceiling (CD); directing ceiling (UD).
Room layout
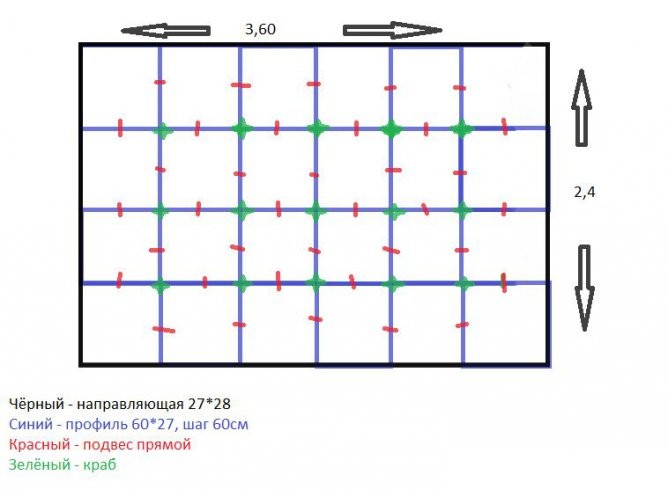 An example of marking the frame of the ceiling under gypsum board. Before installing the profile for gypsum board, you need to make a markup, it starts from any upper corner. With the help of the water level, we carry out the alignment of the upper part of the room, marking the mark in each corner. Then, using a marking cord, we perform a fixing of the line for fixing the ceiling guide profile along the entire length of the ceiling. Using a perforator, make holes in the wall at the place of attachment of the structure with a frequency of 500 mm, then fix the guides using wall plugs, hammering them with a construction hammer. In the installed rail we install ceiling profiles. Fasten each side of the ceiling (CD) with the guide profile of the press washer, using a screwdriver. Each next CD is mounted at a distance of 600 mm. Direct suspension is fixed to the ceiling with two dowels for concrete, and to CD - two or four press washers with drill. For greater rigidity of the frame, it is necessary to connect a CD through 500 mm, using 600 mm long blanks and a crab connector, the use of which will enable to mount lighting devices safely to it and use wall plasterboard for the construction of the ceiling, during installation and subsequent processing less deformable . It should be noted that the height at which the skeleton of the ceiling is lowered depends on the length of the direct suspension and should not be small, because, as a rule, mineral wool for insulation, lighting wires, communications for the kitchen are mounted under the frame. Back to contents</a>
Mounting of the frame
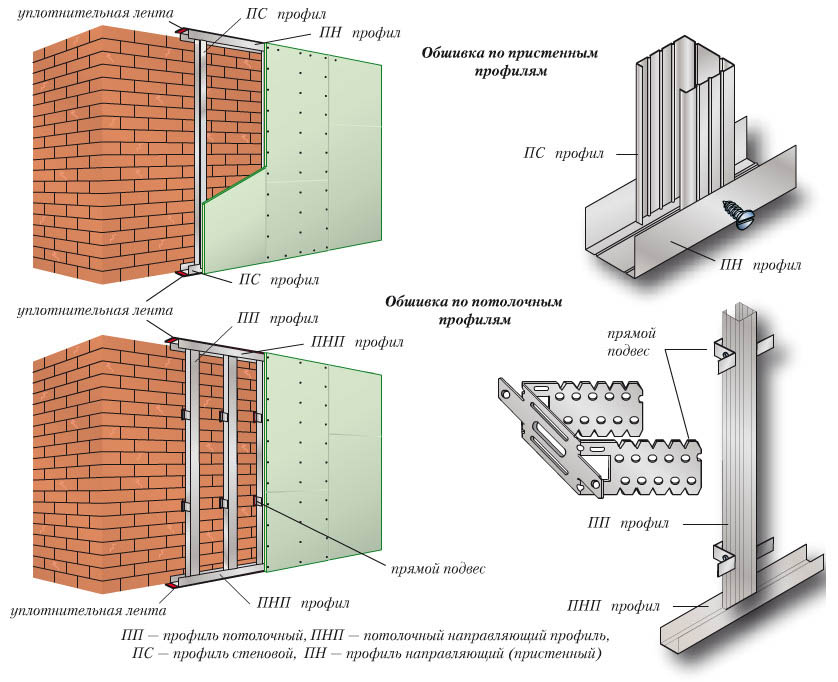 Scheme of plasterboard wall covering on metalskeleton. Having established a profile for gypsum cardboard on a ceiling, we pass to installation of a wall skeleton. The size of the indentation between the wall and the frame is chosen taking into account the fact that it is necessary to insulate the wall or install a soundproof material. We start the markup from the CD, using the building level, mark the vertical line to the floor. After that, using a tape measure and a corner, we draw a marking for the installation of the wall guide profile. It is necessary to carry out all the preparatory marking measures so that the room, which was later covered with plasterboard, had a regular geometric structure, that is, the presence of right angles on the joints of the profiles. This, in turn, will reduce the amount of waste from building materials in subsequent stages of construction and will reduce the cost of spending financial resources, which is important. On the lines marked on the floor and walls we fix the guide wall profiles using a perforator and wall plugs. Between them, they are connected at the junctions by a press washer with a drill. Correctly installing the wall guides, get a quadrangular frame, in which the wall profiles are fixed in turn. It is necessary to start work from the corner of the room, conducting the installation every 600 mm horizontally and 500 mm vertically, using straight pendants, which are also fastened to the wall by dowels, and to the frame - with a press washer. The specified course of work is applicable to all walls of the room being repaired. The fixture differs originality only in those places where it is necessary to install a window or doors, but in this case it is necessary to adhere to the installation rules. The profile for gypsum board in this case must be started from the doorway or the installation site of the window in order to obtain a rigid frame for the most stable fixing of drywall. After the installation of vertical components of the structure is completed, it is necessary to fix them among themselves along the perimeter at the ceiling and floor. This will in the future avoid problems when securing the skirting on the floor of the room, as well as when installing a stretch ceiling. The height and length of the room that is being repaired may vary, in contrast to the length of the profile. If the standard length of the metal profile is not enough, you need to use a standard industrial extension cable for it. It is fixed with the help of pliers. Back to contents</a>
Installation of drywall
Once the installation is complete, you can not go directly to theinstallation of drywall. It is necessary to conduct the distribution of sockets, switches, lamps and other household appliances, take care of the insulation of walls, their waterproofing and vapor barrier. Only after carrying out the whole complex of works it is possible to proceed to the next stage. The detailed instructions given on how to mount the profile for drywall should help to perform the work qualitatively and quickly.


