Pipes of various kinds of communications on walls are more oftenall can not be transferred even during the overhaul, and this problem can only be solved by creating a plasterboard box on the wall. Modern finishing materials allow you to create a quality European-quality repair.  With the help of gypsum board you can hidepipes, wiring or ventilation system. A gypsum board box is not the only possible solution. To hide pipes it is possible and in a skeleton from plastic, plywood or ДСП. But experts agree that it is gypsum board that is most suitable for processing, even a beginner can work with it. The plasterboard surface can be tiled, wallpapered or painted, it will be a strong and reliable box.
Gypsum board box: necessary materials and tools
By making such a box, you can not only improve the aesthetics of the bathroom, but to some extent protect the pipes from mechanical damage. You will need:  Tools for making a box.
- sheet drywall;
- Wooden beam;
- antiseptics for wood;
- putty;
- spatulas;
- plumb bob;
- mites mounting;
- roulette;
- level;
- drill or perforator;
- corner;
- knife;
- a hammer;
- dowels;
- eurosurf;
- self-tapping screws;
- pencil.
One sheet of moisture-resistant GCR standardThe size for processing walls is usually enough. For work in the bathroom or in the kitchen, it is best to choose a moisture resistant version, since condensate on the pipes is formed almost always. Both in the bathroom and in the kitchen area, humidity is most often increased, so that the moisture will then come from both sides. Wooden bars with a cross-section of 40x40 or 50x50 can be used for the frame or fixing the walls on a par with the metal profile. The profile is specially designed for work of this nature, and the tree is recommended to be covered with antiseptics beforehand so that its service life increases, and the surface does not become a breeding ground for rot and mold. Therefore, in some cases, the metal profile is the best option and it is much more convenient to work with it. It will take 2 types of profiles: a guide and for the formation of a frame.  Scheme of the box of plasterboard. Dubels and Euroshades, which are clogged, are used to fasten the frame elements to the walls. To connect parts of the box to each other using special screws, for a tree they must be roasted. Drilling holes in some types of concrete walls is very difficult, and the drill will be useless. With such walls it is necessary to cope with the help of a perforator. Back to contents</a>
Making of plasterboard box: marking of walls
The marking is started on the floor. The planned line will then be laid with a guiding profile (or support bars). From the size of the marked outline to the size of the drywall sheet, the final size of the box will differ, since the material is sewn over the frame. This should be taken into account when making markup. The perpendicularity of the lines to the walls, ceiling and each other is checked by level, plumb and square. The gypsum boardboard must not touch its pipe skin even in a small area, the distance must be at least 3-5 cm. The width of the outer frame is selected, considering the subsequent finish. When decorating with ceramic tiles, the size of the box can be calculated so that the tiles for laying do not have to be trimmed further if the width of the box does not contradict the previous points. It is convenient to use a plumb bob in order to transfer the markings from the floor to the ceiling. If additional marking for walls is required, it is done by means of a thread stretched between the floor and ceiling, which is located between two equally spaced points. Back to contents</a>
Gypsum cardboard box: fixing the frame
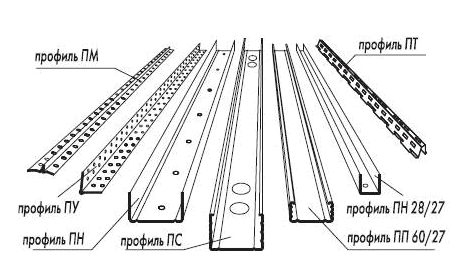 Types of metal profiles for the box ofdrywall. The box is a fairly simple construction fixed to the frame, but the features of all pipes that can be closed with its help are different. Therefore, during installation, it is necessary to know and take this into account. Profile or bars, located along the walls, laid out first. After them fasten the posts, which form the projecting front of the box. If the width of the box is more than 25 cm and its height exceeds 1.5 m, it is recommended to make jumpers to strengthen the strength between the support posts. The distance between each jumper should not be more than a meter. If a wooden beam is used, it must be treated, in addition to the original coating, with antiseptics, and in places where it is cut. Specialized wood mastics cope with this very well, as they are easy to apply and dry very quickly. In addition to high-quality protection of wood, such mastics guarantee the absence of creaking under deformations from heat and humidity, as when using them the box will not creak and will be more stable. If the box is located in the corner of the room, the profile is first secured to the wall with dowels. After that, put the guides on the ceiling, checking that the angle is 90 ° in either direction. Then, where the profiles at a distance from the wall intersect, another section of the profile is fixed, which is fixed with self-tapping screws. The next step is installing jumpers if they are needed. In the event that the box is not in the corner, but in the center of the wall, the initial stage of securing the frame remains the same: the profile is fastened to the wall using dowels. Profiles on the floor and ceiling are set by following with strict control compliance with the angle of 90 ° wherever necessary. The jumpers on the floor and ceiling are installed with the necessary distance from the walls, are checked by means of a level and fixed. Vertical racks are installed in the intersection of guides, if necessary, install jumpers. Back to contents</a>
How to mount a gypsum board on walls?
Cutting sheets of drywall is best,that the box consisted of whole layers, and not from several pieces. Therefore, the bands that become lateral faces are cut off first. The width should be equal to the skeleton (so as not to protrude beyond the already defined boundaries of the support racks). The dimensions of the remaining face are marked on the remaining sheet and cut out on it only after that. Edge edges should cover the edges of the stripes, so the material for it is cut taking this into account. 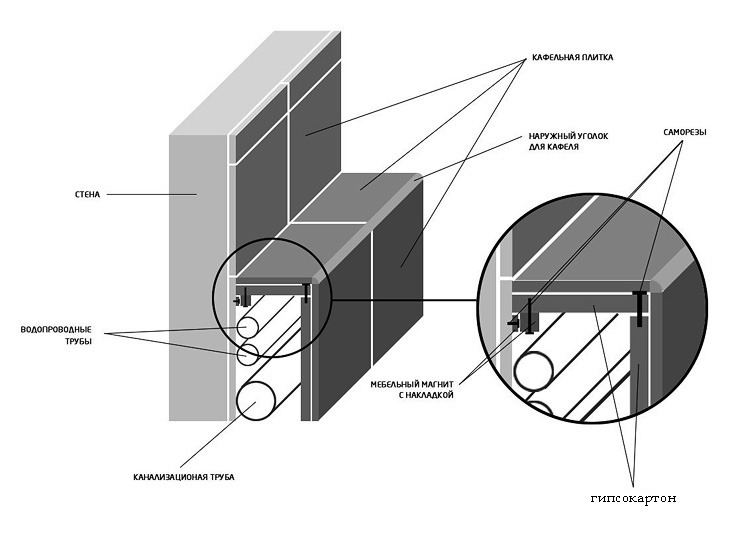 Scheme of assembly and finishing of the gypsum board box. The sheets are fixed using self-tapping screws, they are placed every 15-25 cm. If the width of the structure is small, then the sheets in addition to the jumpers can not be fastened. When all the sheets are fixed, you can start the putty and the formation of corners. They should be even and in places of contact with the walls, and at the box itself. In order to level the corners, use a metal corner or a special perforated plastic. Fasten the corners on a thin layer of the put on starting putty, before it starts to dry out. Back to contents</a> How to hide the sewer pipe? When installing the plasterboard box, in order to hide the pipes of the riser, it is necessary to take into account the need for an inspection hole in the box opposite the same one that is available in the pipe itself. This sleeve with a screw-on cap is used if it is necessary to clean the blockage in the pipes. Closing this box tightly is not recommended, it will be more practical to purchase a special plastic door or make a part of the panel shifting so that there is free access to the inspection hole. It is necessary to ensure constant access at the right time to those places of sewage, where it enters the common riser. Often there are leaks, replacement of elements is required. The door for access to this part of the pipes should be located strictly on the front, facing the output of the face of the manufactured box. To remove it in a more inconspicuous place, most likely, it will not be possible. Back to contents</a> Box for water pipes For these pipes tooIn some places, doors or process openings are required. Access is required such places as hot and cold water meters, as it is required to take their readings and check the operability. Additional holes will be needed if the pipes have check valves, reducers, valves or expansion joints. These doors can be located on the side of the box, so as not to catch your eye, if at the same time access to the necessary places is preserved to the full. To qualitatively produce such holes, in plasterboard sheets, it is required to cut holes that are 1-3 mm in size larger than the dimensions of the door prepared for installation. It is most convenient to do these manipulations before the sheet of plasterboard is installed on the frame in the required place. The door can be pre-marked and cut out only after the material is installed on the frame. The space inside the riser is recommended by professionals to be filled with mineral wool. This extinguishes the vibration transmitted to the pipes and the noise of water, which sometimes are very strong. After that, it is possible to apply the finishing putty and prepare the surface of the box for further finishing works, for example, for laying tiles. Having reached this stage, it is possible to consider the installation of the box as completed. </ ul>


