Quite often in the process of building a housefloor slabs are laid with a significant drop. with such defects, the plastering method is very difficult and quite expensive. When the house shrinks, large cracks appear on the ceiling, which appear again after repairing the ceiling. These problems can be effectively solved by creating an element such as a plasterboard suspended ceiling.  Elements of the frame. Giprokom refers to the same in its qualities of building material, plasterboard and GKL, which is used to level and warm the walls and ceilings of industrial and residential premises. It is produced in the form of sheets with a thickness of 9.5 to 12 mm and a width of 1250 mm in various lengths. According to its technical characteristics, it can be ordinary, moisture resistant and fireproof. Ceilings made of gypsum can be single-level and multi-level. If you want to create such a ceiling with your own hands is easy. With its help you can realize the most interesting design solutions for the ceiling, create an original illumination of the room, hide wiring and other communications behind the surface. The main disadvantage of this ceiling is the reduction in the height of the room.
Preparatory work
Before starting work, it is necessary to measurethe size of the room, choose a suitable ceiling surface design. Make a list and the number of required material and the necessary tool. To create a structure of gypsum, you will need the following materials and tools: 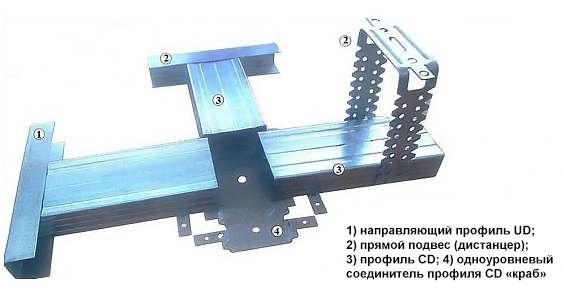 Scheme of installation of a skeleton for a false ceiling from giproka.
- ceiling gypsum board;
- polymer mesh (for sealing seams);
- putty;
- abrasive sandpaper;
- self-tapping screws (for fixing sheets of plasterboard);
- dowels (for fixing the profile and suspension);
- wall profile;
- the profile is ceiling;
- fastening elements;
- hacksaw for metal;
- perforator;
- Screwdriver;
- knife (for cutting gypsum board);
- roulette;
- construction level;
- hydro level or laser level;
- a string of paint;
- putty knife.
Back to contents</a>
Layout of places for installation of frame elements
After completing the preparation phase, themarkup for setting a profile. The ceiling height is measured from the floor level. The bottom point is defined, from which approximately 30 mm (per profile width) retreat. Using the hydro level, the obtained label is transferred to the other corners of the room. Clamping the paint cord to the marks made on the wall, along the perimeter of the room mark the line of installation of the wall profile. Having pressed to the wall a profile, outline the places of its fastening. On the surface of the ceiling, with a step of approximately 50 cm, lines are being applied to install the hangers. Back to contents</a>
Installation of false ceiling
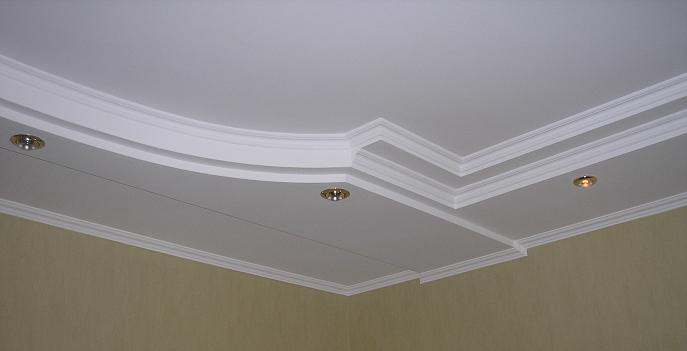 A ceiling made of gypsum will help to realizeinteresting design decisions, create an original illumination of the room, hide wiring and other communications behind the surface. After finishing the markup, proceed to install the frame, plasterboard and then finish the surface. The works are performed in the following order:
When assembling a multilevel ceiling to the assembledthe frame is added one more level, according to the designer's design. The difference in its assembly is only that the suspensions are attached not to the concrete base, but to the first level profiles. To close the end between the first and second levels, a strip of gypsum board is attached to it, which for a greater elasticity is moistened and rolled up with a needle roller. Having installed a false ceiling from a gyro with the hands, it is possible to get rid of its frequent repairs for ever, to give to an apartment a new aesthetic kind and to save thus a considerable sum of money.


