The use of plastic for interior decoration of premises is becoming widespread. It is used for both walls and ceilings. will solve many problems related to the quality of the ceiling.  Plastic panels have excellentperformance and attractive appearance. Plastic panels have many positive qualities. They are quite technological and beautiful. From a huge assortment you can always choose what you like. Suspended ceiling made of plastic by own hands is convenient, quick and practical.
Features of material selection
Suspended ceiling can be made from differentmaterials (wood, chipboard, foam, etc.). One of the most common designs is a suspended ceiling made of plastic. Such a surface has a number of advantages: easy installation, low weight, large color gamut, low cost. The most important thing - a plastic ceiling has a high moisture resistance. It can be washed with water. Plastic does not deform when humidity and temperature change. The most optimal material for plastic ceilings is polyvinyl chloride. It can be used in the form of tiles or panels. The longest use is the long PVC panels. They are made of two types - seamless and relief. Seamless panels have a continuous flat surface, and smooth edges allow you to seamlessly join the panels together.  Types of ceiling plastic panels. In the relief panel, the edge on one side ends with a groove, and the other edge has a longitudinal spike. When docking the panels, the spike enters the groove, and an even rectangular groove is formed along the joint. The panel is made in the form of two layers of plastic, between which are formed stiffeners, which provides sufficient mechanical strength. The front surface of the panel is polished (varnished). Standard PVC panels are available in widths of 25 cm and lengths of 2.7 or 3 m.</a>
Choosing a ceiling design
A plastic ceiling can have two basicconstruction - hanging and tension. Stretch plastic ceiling is made of vinyl film. During installation of such a ceiling, the film must be heated to 70º, which requires the use of special heat guns. Installation tension ceilings, as a rule, produce professionals. To install a plastic ceiling, the most suitable is a suspended structure made of PVC panels. The suspended ceiling is a horizontal surface formed from a glossy layer of PVC panels mounted on a metal frame. In this case, the frame is fixed to the wall and ceiling, at a certain distance from the ceiling ceiling. 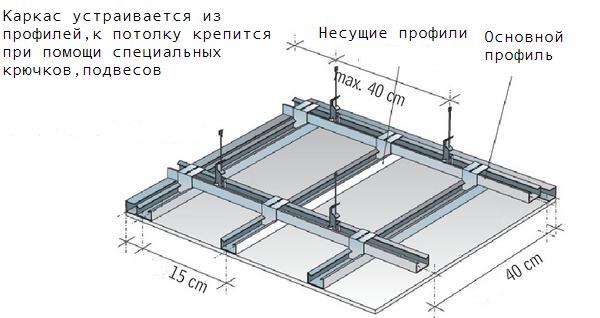 Scheme for the installation of a frame for a suspended ceiling. The frame is a tightly connected mounting structure in the form of a grid. A frame is made of metal profiles. To the wall, the frame is attached using a U-shaped guide profile. Usually, the profile type PN 28x27, 28 mm wide and 27 mm high is used. The main is the ceiling profile, which has a C-shaped shape. The profile type PS60x27 is used. From this profile a lattice construction of the frame is created. To the ceiling, the frame is fastened by means of hangers that secure the profiles to the ceiling. For the cruciform connection of the profiles, the "crab" attachment is used. Between the ceiling profiles are connected with a U-shaped connector with a 30-40 mm din. When installing PVC panels, the connection along the length is carried out with the help of a plastic docking profile (H-shaped molding). In addition, when plastics are installed to cover the initial gaps, plastic skirting boards, starting profiles, cornice profiles, corners (outer and inner), and kleimers can be used. Back to contents</a>
Preparatory work
 The scheme of preparation of the ceiling for the installation of panels. The main ceiling after installation of the suspended one will be hidden from the foreign eye, therefore, its surface is not subject to increased demands. However, we must not allow it to crumble, and most importantly, that it left traces of mold or fungus after flooding. The surface of the ceiling ceiling should be primed and plastered so that there are no cracks and chips left on it. Plots with the appearance of mold must be pretreated with an antiseptic, for example, a solution of copper sulfate. Back to contents</a>
Surface marking
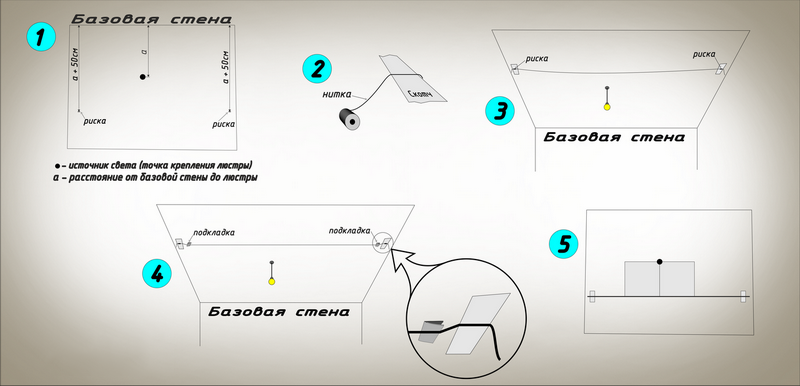
An important preparatory stage, which affects thethe quality of the whole false ceiling is the marking. First, the true height of the main ceiling is determined at different points in the room. To do this, the height of the wall is measured by a tape measure at least in three points - in the corners and in the center. In the corner with the lowest height of the wall, a mark is made at the height of the suspension of the carcass profile, that is, at a distance of 5-10 cm from the ceiling. The distance is determined by the need for communication. If the installation of built-in (spot) lamps or the installation of pipes on the ceiling is envisaged, this distance is 8-10 cm; if nothing superfluous is planned, then 5-6 cm is enough. Then a mark is placed on the wall in another corner, but taking into account the real height of the wall. The suspended ceiling should be parallel to the floor. Through the marks in the corners, a straight line is repulsed using a well-stretched and pre-colored pigment construction cord. Similarly, the opposite wall is marked. The lines are interconnected by the marking of other walls. Thus, a line is drawn along the entire perimeter of the room - it is the lower boundary of the guide profile of the frame. 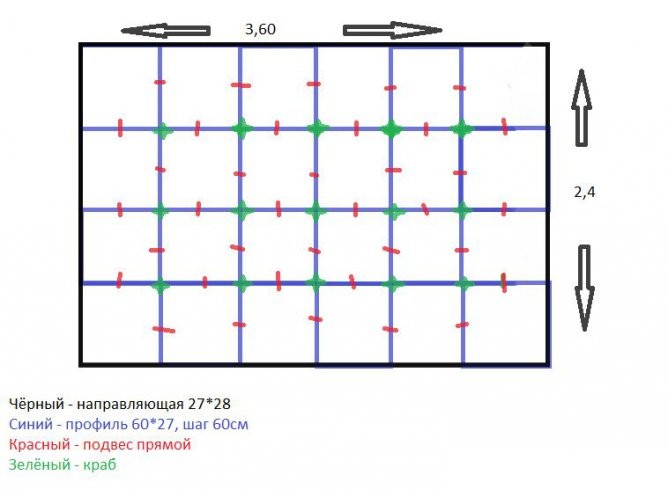 Layout of the ceiling. The ceiling profiles are marked on the ceiling surface. To do this, at first, parallel lines are beaten by the cord in the longitudinal direction. The first and last lines are held at a distance of 15-20 cm from the wall. Between them, parallel lines with a pitch of 30-40 cm are carried out. Similarly lines are marked in the transverse direction. On the ceiling there should be a grid that indicates the location of the central line of the ceiling profiles. Layout of the installation of suspensions is made on these lines. The first marks are made at a distance of 25-30 cm from each wall, and all subsequent ones in steps of 50-60 cm. The marks should not coincide with the crosshairs of the lines - they must be displaced no less than 5 cm from the crosshair. Back to contents</a>
Installing a Guide Profile
The installation of the skeleton of the false ceiling begins withInstallation of a U-shaped profile on the wall along the scribing line. First, the holes for fixing to the wall are drilled in the base of the profiles: the first - at a distance of 10-15 cm from the edge, the next through 30-40 cm from each other. Then it is applied to the wall, and marks are placed on it. By marking a puncher or an electric drill in a wall holes of 8 mm in diameter are made. Plastic dowels are inserted into the holes. Profile PN is fixed in dowels with screws. Thus, guides are installed along the entire perimeter of the room. Horizontal installation should be checked by level. Back to contents</a>
Installation of ceiling profiles and installation of communications
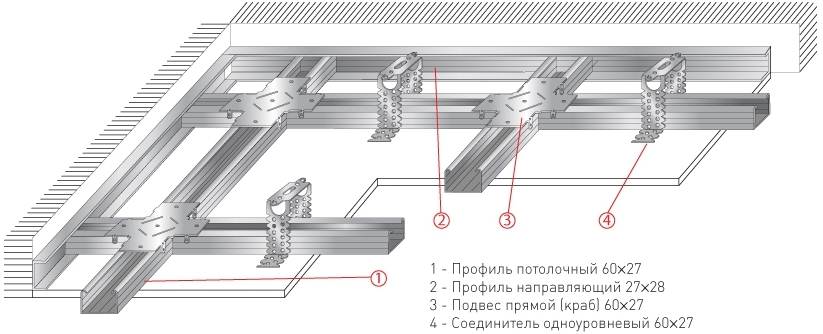 The scheme of the device of a profile of a false ceiling. At first, profiles are set up along the short wall. These profiles must be stretched from wall to wall. If you can not select the profile of the desired length, then it is joined from two segments. The connection must be reliable and rigid - using a U-shaped standard fastener or metal strip. Installation of PS profiles is performed in accordance with the marking on the ceiling. The ends are fixed inside the guide profile fixed to the wall. The profiles are located downward. The PS profiles in the perpendicular direction are assembled from segments whose length is equal to the distance between the installed PS profiles. Attach them with a crab attachment. Fastening of PS profiles on the ceiling is carried out through suspensions. Suspensions are bent, forming a U-shaped shape. The height of the side frame should strictly correspond to the distance from the ceiling to the PS profile. The suspension area is fixed with screws in the dowels on the main ceiling in the marked places. The legs of the suspension are fixed on the sides of the profile with self-tapping screws. Before attaching plastic panels, it is necessary to place the entire communication system inside the frame (if necessary). First of all, it concerns electric wires - for a chandelier or a system of spotlights. The wires must be assembled in a bundle and placed inside the corrugated hose. The wiring is made to the place of attachment of the lighting equipment. Wires are carefully attached to the frame profiles. Back to contents</a>
Installation of plastic ceiling coverings
First of all, around the perimeter of theguide profiles fixes the angled strip (initial profile) to install the skirting board. Fastening is carried out by screws on distance about 30 sm from each other. On the corner bar is installed ceiling skirting, which snaps into the groove. Plastic panels are cut to the required length. If necessary, join the H-molding. Installation begins with an extreme corner panel. Initially, it is placed in the groove of the baseboard, and then fixed to the skeleton of the ceiling. The fixing is done with self-tapping screws. A hole in the panel is drilled at the point where the screw is twisted. The distance between the screws is 25-30 cm. Each subsequent PVC panel is inserted with its longitudinal spike on the edge in the groove of the previous panel. Back to contents</a>
Required Tools
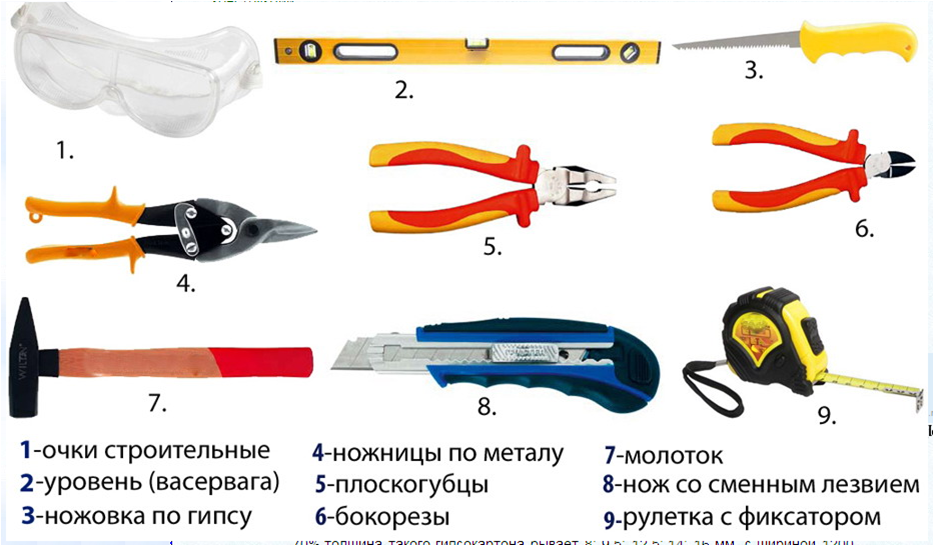 False ceiling mounting tools. To install from plastic, you will need the following tool:
- perforator;
- electric drill;
- Screwdriver;
- hacksaw for metal;
- scissors for metal;
- vise;
- a hammer;
- knife;
- cord construction;
- level;
- screwdriver;
- pliers;
- jig saw electric;
- roulette;
- line meter.
Suspended ceiling of plastic - beautifulsolving many problems. With its help, you create the right interior, and hide all the sins of the main ceiling. Modern PVC panels allow you to install it yourself.


