The lining of the ceiling with clapboard can be attributed topractical and modern solutions that allow you to noticeably transform and decorate any room. This type of paneling was first used for finishing railway cars, which is where the name came from. Modern paneling is made of wood, plastic, and MDF. Despite the differences in the composition of the materials, their external characteristics have similar features. Any novice craftsman can create a paneling ceiling with his own hands, having figured out the installation scheme and armed with the necessary tools. To increase the service life, the lining is pre-treated with an antiseptic.
Tools required for installation
During the installation of the ceiling from the lining, the following devices will be required:
- electric drill, screwdriver;
- Rubber hammer;
- roulette;
- hacksaw;
- a building corner;
- rule;
- level;
- scissors for metal.
Return to Contents</a>
Preparatory stage of works
 Stages of fastening the lining.To understand how to make a ceiling from clapboard, you should study in detail the main points of installation and the nature of the preparatory work. Thus, the original ceiling covering should be thoroughly dried, visible defects should be eliminated. Further actions are associated with the construction of the frame. It can be made of wood or metal. The correct installation of the skeleton of the structure will provide it with precise geometry and a perfect plane, which will significantly facilitate further work. First, the lowest point of the ceiling is found, the height of the beam and the thickness of the clapboard are added to these indicators. A mark is made on the wall, then it is transferred to other partitions. The designated points are connected with a nylon thread.
 Types of lining profiles.The wood used for the frame installation needs to be pre-treated with an antiseptic to prevent it from rotting. This should be taken care of in advance. Then the frame base is installed, and the lining will be installed on it later. Metal corners or wooden blocks are used for fixing. Using a building level, markings are made along which the lower part of the ceiling skeleton will be installed. A line is drawn in accordance with the marked points, which will allow the frame to be fixed along it. Another thread will be stretched across the entire ceiling. It will not allow it to get lost during the work. The permissible thickness of the wooden blocks used will be 25 mm. Metal hangers are fixed with screws and dowels, which is completely unnecessary for a wooden frame. The permissible distance between the parts of the sheathing should not be more than 40 cm if the lining used is made of plastic or MDF. For sheathing, this distance is equal to 0.5 m. Electric wires are needed to connect lighting fixtures. For this purpose, cable channels are made of safe materials. They must be fixed at the base of the ceiling. Return to contents</a>
Installation of lining on the ceiling
 Installation of vinyl siding. The sequence of actions is as follows:
- installation of a wooden frame;
The main stages will be:
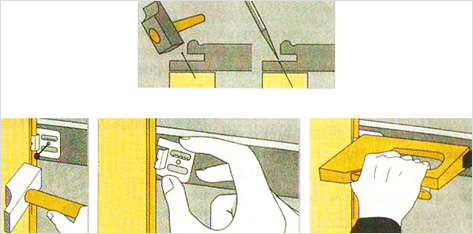
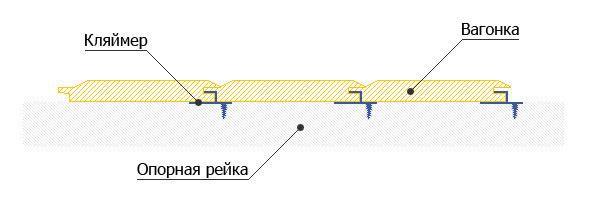 Scheme of fastening the lining to the clamp. The fishing line used allows to obtain the most accurate results of plane alignment:
- installation of a metal frame;
The installation of this element is carried out using a similar technology described earlier. The differences will only be in the fastening elements. Crabs are used to increase the rigidity of the structure.
- installation of lighting equipment.
After the electrical cables have been laid, the following actions are performed:
Return to Contents</a>
Cladding fastening: practical recommendations
 Scheme of installation of lining.The beginning of installation work carried out independently must be associated with an accurate calculation of the fastening of the first part. This is due to the fact that the final lining should be a little narrower, and it requires cutting its length. The order of work:
At the points intended for screwing infasteners, it is recommended to make a hole with a drill. This will prevent chipping. To make an opening in the plastic surface for the lamps, you need to take a sharp knife and heat it up. This will make the material easier to cut. To make an opening for a lamp of a given size, first cut a small hole in the plastic surface.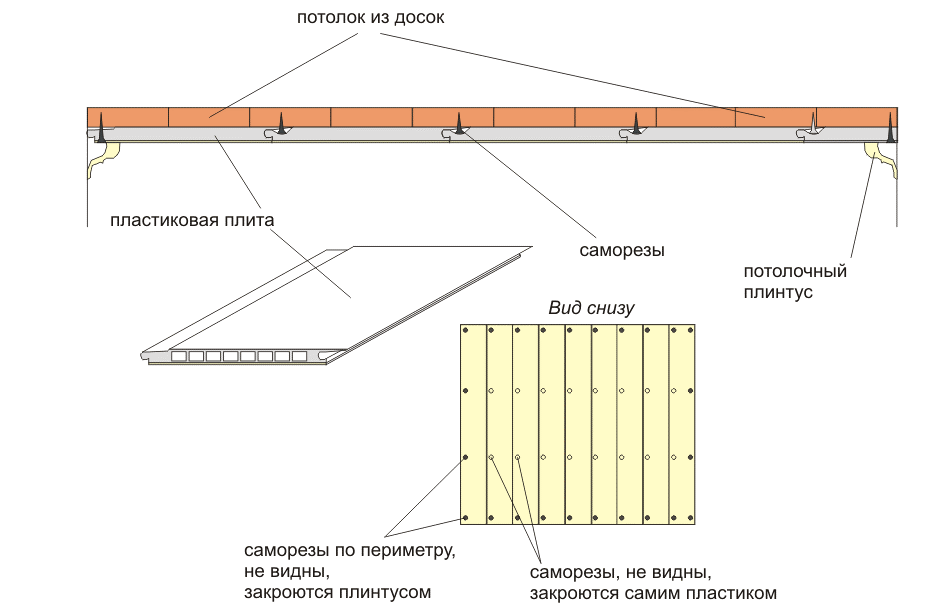 Sheathing the ceiling with plastic lining. Its diameter can be gradually increased, being extremely careful in the work:
A ceiling finished with clapboard will last a long time,if the main points of installation are observed during the installation process. By approaching the work with trepidation and soul, you can independently cope with the installation, learn a new craft and significantly save your own money.


