It is not as difficult to do as it might seem.The living room is the main room in the house, his face. And the windows are the "eyes" of the house, always attracting the eyes of the people in the room. Without window decoration, the living room looks unfinished, and curtains that are correctly selected in color transform the room, make it complete.  Correctly selected curtains decorate the interiorrooms and protect the room from sunlight. Curtains are also called dense curtains - curtains that cover daylight from sunlight, and at night from illuminations in the street and curious eyes, and light transparent curtains. Usually one window is closed by 2 curtains and 2 drapes.
 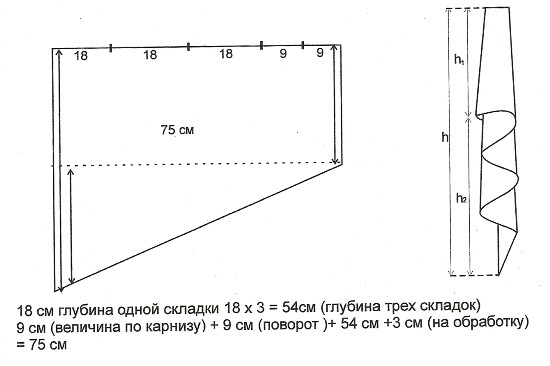 Scheme of side lambrequin. The figure, color and shape of the curtains sets the mood and the image of the living room, but this does not mean that they should be chosen only with the help of a designer, but must be sewn in the atelier. Romantic or classical style, modern or high-tech curtains will underline any of them. The color of curtains and curtains should be in harmony with the color of the walls and furniture. If the curtains have a decorative pattern, they will fit well with tulle without a pattern, and vice versa. A large picture looks spectacularly in spacious rooms, and if the living room is narrow, then a monophonic fabric of light tones will help visually enlarge the room. You can make curtains with your own hands even when there is no sewing machine at hand. In this case, you can use the finished tape on an adhesive basis to process the sides, bottom and top of the fabric.
Calculation of width and length of curtains, processing of sides
 The process of making curtains. Calculate the width of the curtains is easy. The simplest and most economical way to calculate: the width of the canvas is equal to the length of the cornice or the width of the window (if the cornice is not yet selected). The solemnity and elegance of the living room will be given by drapes and curtains with drapery and deep folds. In this case, the assembly factor is used to calculate the width. The more it is, the more noticeable the drapery, the deeper the folds on the canvas of finished curtains. The build ratio can be from 1.5 to 2 or 3. Then the width of the window (or the length of the cornice) is multiplied by the desired coefficient. If the sides of the canvas are not processed, add 2 - 3 cm from each to the hem. For example, if the length of the cornice or the width of the window is 130 cm and the curtains will consist of two curtains with deep warehouses, while the sides need to be machined, then 130 * 2 + the allowance for the hem of the sides (2 + 2 + 2 + 2) + 4 cm on the overlap of two canvases in the center of the window = 272 cm.
 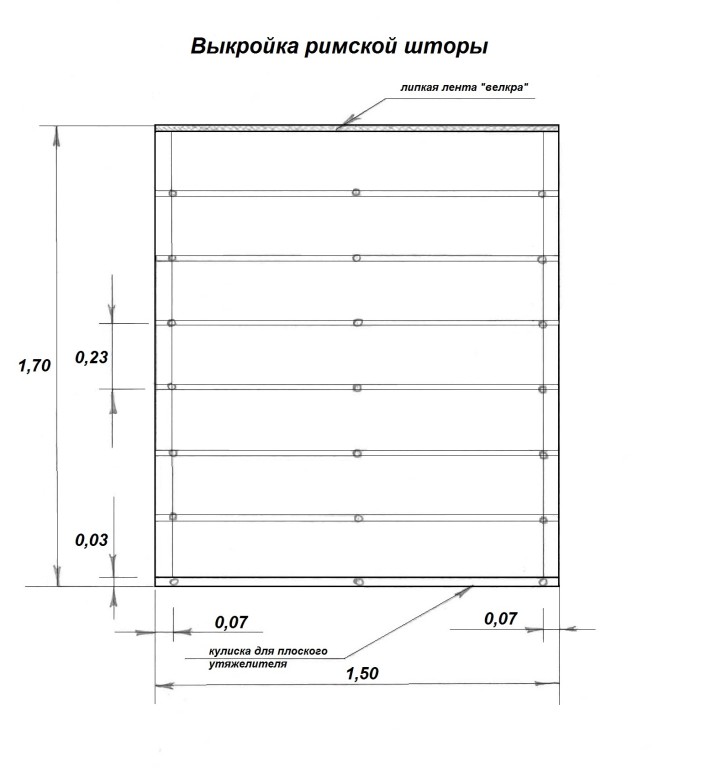 Pattern of Roman curtains. If the calculation is not based on the length of the cornice, but on the width of the window, it should be taken into account that for the living room the option is suitable when the curtains come to the walls on either side of the window for 10-15 cm. For example, the calculated curtain width 272 cm + walls 15 + 15 (30 cm) = 302 cm. It should be noted that a denser curtain fabric will look good and with an assembly ratio of 1.5 - 2. However, curtains from tulle and organza look better when they are not stretched, but form waves from lush folds, so when calculating the width of a light curtain, it is preferable to use lzovat ratio of at least 2 - 3. Another detail: the sides of the curtain of tulle or organza hem should not exceed 1 cm, otherwise transparent fabric edge will look ugly. For example, the width of the window or the length of the cornice is 130 cm, then the width of the curtain is 130 * 3 = 290, plus 1 cm from each side to the hem (if the curtain is not divided into two parts): 290 + 1 + 1 = 292 cm.
  Pattern of curtains. If the living room is spacious, the curtains with drapery look more impressive, but in any case the assembly factor is a matter of taste. The length of the curtains is equal to the distance from the cornice to the floor, as most often in the living room they are made flush with the floor or higher by 1 cm in order to avoid wear and tear. Adding another 5 - 10 cm will allow to use as a decoration curtains catching or garter. Then the extra centimeters of the length of the canvas will help create a beautiful drapery on the sides of the window. It should be borne in mind that when processing the bottom of the curtains and curtains, the tissue is bent more than when processing the sides. From the bottom, the curtains are bent approximately 10 to 15 cm to insure themselves in the future in case of shrinkage of the fabric, which can be up to 10% of the height with an incorrectly selected wash schedule. In addition, the large fold below plays the role of a peculiar weighting agent of the fabric. If the fabric is not very dense, you can treat the edge with a sticky tape "spider", so that a smooth bend can be made on the tape itself without basting and pins. The edge of the canvas bends over the ribbon and is ironed.
 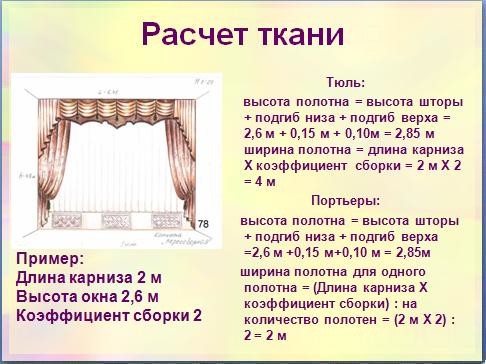 Calculation of fabric for curtains. The top can also be processed with a simple fold, if a curtain tape is applied to it, or curtains will be attached to the clips. Another point that should be considered when determining the width and length of curtains is the figure of the fabric. If there is a pronounced repeating ornament, then it is necessary to make allowance so that the repeating element of the picture, called rapport, is not cut off. Materials and tools:
- centimeter, ruler;
- the cloth;
- thread;
- chalk or pencil;
- scissors;
- sewing machine;
- iron;
- curtain tape (if the option of fastening on hooks is chosen);
- eyelets (if the option of fastening on the eyelets is chosen).
Back to contents</a>
Curtains on the kulisk
 Figure 1. Blind on the kulisk. Kuliska is one of the easiest ways to fasten curtains to windows, but this does not mean that such an option is not suitable for the main room in the house. Curtains on the kulisk fit into any style of decoration of the room, they look good on the windows of the arched or panoramic type. Fabric can also choose any - from heavy curtains to light and airy. Kulisk is a pocket-"sleeve" in the upper part of the canvas, into which a round cornice is threaded. No hooks, loops, curtain tapes. This option is suitable for those who first decided to make curtains with their own hands. The main thing - to determine the width of the cusp that the cornice freely entered the "sleeve". The width of the kuliska is equal to the length of the circumference of the cornice multiplied by 2 + 1 cm. If desired, you can make curtains on the kulisk with a so-called scallop, which looks better if its height does not exceed 5 cm. Then turn the fabric over the width of the cusp and add the desired height of the scallop. In this case, making a double fold on the top of the curtain, the first line for the kuliska must be laid, having receded from above on the desired width of the future scallop. As the kuliska looks, you can see in the figure (Figure 1). Back to contents</a>
Curtains with eyelets
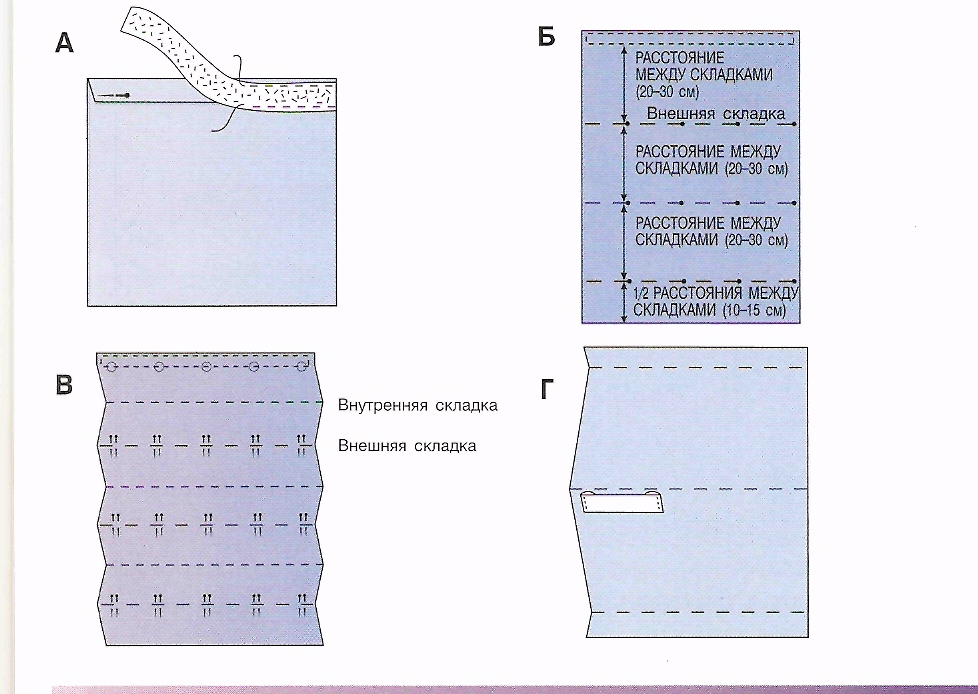
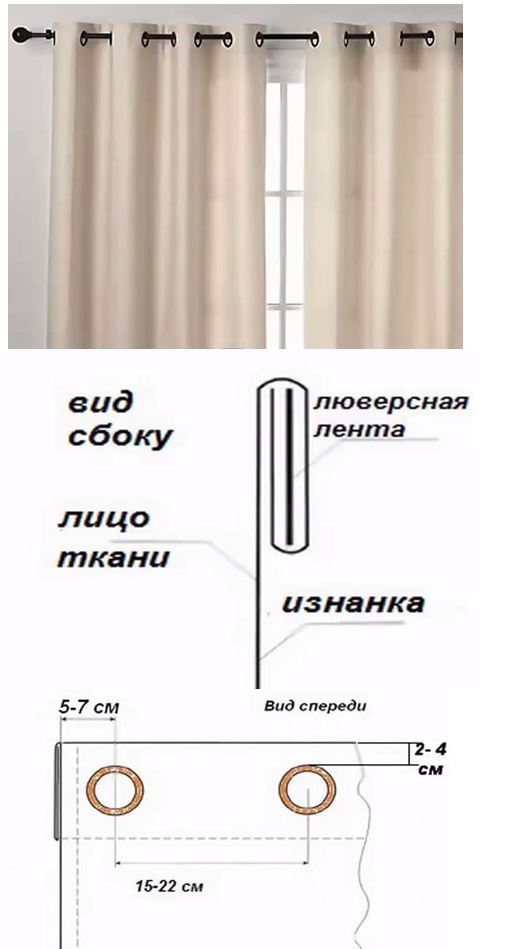 Figure 2. Curtain on the eyelets. Very spectacular in the living room will look curtains on the eyelets - metal or plastic rings that compress the hole in the fabric. They are attached to the rod cornices. Eyelets allow to achieve even folds and free movement of curtains on the eaves. The eyelets are of different shapes, so they are themselves a decoration. The internal diameter of the eyelet must be greater than the diameter of the eaves, which should be taken into account when purchasing. Before punching eyelets, the top of the curtain should be prepared. To do this, the edge of the fabric must be bent three times, placing the inside of the ribbon, you can use non-woven fabric. The width of the tape should be greater than the outer diameter of the eyelet at 2 to 4 cm on each side. Glue tape should be glued on top of the iron. A tape-seal without an adhesive backing can be stitched from the wrong side.
 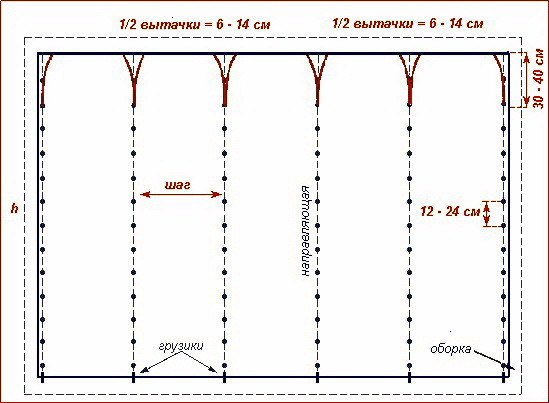 An example of a pattern. It must be remembered that the number of eyelets must necessarily be even - in this case the edges of the curtains will be turned towards the window, and not into the room. In order for the folds to look good, the eyelets should be spread at a distance of 15-22 cm from each other, and the first and last - at a distance of 5-7 cm from the edge. The smaller the gauges, the deeper the folds of the curtains. Having placed eyelets at a distance of 2 cm from the top edge of the canvas, chalk or pencil should be drawn around the inner diameter of the eyelets, through which a hole is cut with scissors. Attention! Cut the hole is not exactly along the line drawn, but wider by about 1 - 2 mm, so that the eyelet can then snap securely. How to look ready curtains on the eyelets, how to properly arrange the ribbon and eyelets on the canvas, you can see in the figure (Figure 2). Back to contents</a>
Curtains on curtain tape
This is a classic option of fastening the curtains. Crochet hooks are threaded into special pockets of the tape. Laces, laid in the belt, are tightened, and creases appear on the fabric. A dense tape will be better to hold the folds on a heavier curtain fabric. The length of the ribbon is equal to the width of the finished drape (curtains) with embedded sides, plus 5-8 cm, on the hem of the tape itself on both sides. It should be noted that the white curtain tape before stitching is better to steal, as they can significantly decrease after washing.  Figure 3. Types of assembling curtain tape. As the curtain tape looks, you can see in the figure (Figure 3). Cloth curtains need to be spread out on the table face up, attach the tape with pins to the edge of the cloth, on which the sides are already sealed. On each side, bend the tape 2-3 cm. Attach the curtain tape 1.5 mm from its lower edge. Then fold the tape to the wrong side so that it is not visible from the front of the curtain, leave the allowance of 3 mm, secure with pins. Stitch the side, after releasing the shoelaces, holding them so as not to stitch them. Stitch the second line at a distance of 1.5 mm from the bottom edge of the tape. If the width of the curtain tape is more than 4 cm, then in order to keep it better, at the final stage you can attach it to the canvas with the third line laid in the middle of the tape. When the tape is stitched, the laces on its edges must be tied, then tighten, so that creases form on the curtain. It remains only to hang the finished curtain on the eaves hooks. The pleasure from the process of transforming the living room, the pleasure of creativity, as well as the opportunity to save significantly - a sufficient motivation for making curtains for the living room with their own hands.