Beautiful and stylish curtain not only decoratesapartment, but also gives it a unique elegance and coziness, so many turn to designers who help make the right choice. Consider how to sew Roman blinds with your own hands, which models are more popular, have a lightweight design and simple cut.  Scheme of the Roman curtains.
What to look for when choosing a fabric
This type of curtain is borrowed from the Greekseafarers, because in those days the ships had sails, which they folded (raised), then lowered, and at that moment the entire beauty of the pattern of the fabric was in sight. By the same principle make this kind of curtains, which consist of a straight cut with a few draperies, so they will need much less material for sewing than for curtains. The second positive feature of the Roman curtain is that the beauty of the pattern is visible, so the choice is made based on your taste, taking into account the color range and style of the room.  Scheme the size of the window opening. Consider how to sew Roman blinds yourself, if there is a small cut. If you take into account the size of the curtains, then you can purchase expensive designer material, since for such a design it is necessary to know the size of the window. Then add a few centimeters on each side to the seams. For example, if the window has a width of 2.3 m and a length of 2.4 m, then a cut length of 2.5 m and a width of 2.4 m, but if the material you like does not have this width, then buy two lengths, that is 5 m. Before use, the fabric is smoothed. You can sew Roman curtains of thick material, which will prevent the penetration of sunlight, that is, completely closes the window. For such a curtain choose a dense fabric black out, which has a special treatment from the wrong side. Another design of Roman curtains involves the penetration of light into the room, but at the same time it tightly closes the window opening from other people's eyes. For such a curtain, a translucent fabric is quite suitable. Therefore, making the choice of a cut, evaluate it and the lumen. At the same time pay attention to what pattern on the fabric, take into account that the material looks more beautiful with a complex, dense weaving. Back to contents</a>
How to fix the curtains correctly
In order to sew Roman curtainsindependently, choose one of the types of fasteners and only then proceed to calculate the cut-off rate. Consider how to hang the Roman blinds. The first option involves fastening the curtains inside the opening, while the fabric is located directly at the glass. 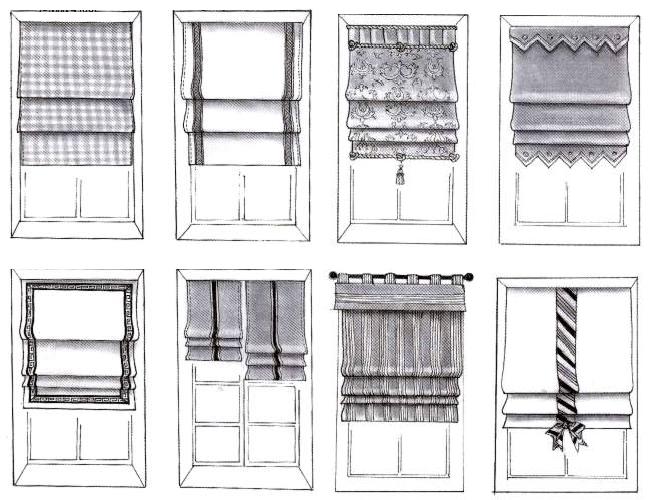 Types and styles of Roman curtains. If the window has a window sill (wide), then the lowered Roman blind does not prevent it from being used. Or if this curtain design - along with the curtains, they are the wrong side. The second option involves securing the curtains from the outside. But this method is used only when the window has flaps (for ventilation), and open it in height. In this version, the Roman blind goes in both directions by 5-10 cm in relation to the slopes. Create this design is simple enough. After measuring the window opening, add 5 cm to the side seams, and 12-15 cm for the allowances from below and from the top. After that, calculate the number and dimensions of the required folds, this depends on the length of the Roman curtains (Fig. 1). Then follow the instructions:
  Figure 1. Table calculation of folds of Roman blinds.
- on the wrong side of the fold, in the folds (to make the drape look beautiful, they are equidistant from each other), the ringlets make marks;
- process sidewalls;
- to the bottom of the wooden strip attach velcro, for this use nails or stapler;
- they process the upper cut, too, attach a velcro to it, which will make it possible to remove the curtain freely;
- to perform the correct tailoring of Roman curtains, from below make a hem-pocket, and its width should be such that the strap (weighting) freely passed inside;
- from the wrong side sew a border or other finish;
- In the pockets of the pockets, insert the slats;
- note the location of the rings (they are fastened to the bar with carnations) and sew them by hand;
- on the bar fix the curtain, using Velcro;
- on the frame fasten the fastening element of the lace (to limit the movement of the curtains it is wound on this part);
- thread the cord into the rings, starting from the bottom, at the end tie the knot and fix it, applying glue;
- continue to do the same operation until the cord will not go through all the rings and through the top rings will not be brought to one side;
- all the ribbons tightly tighten so that the folds are evenly distributed, after which they fix the drapery;
- attach the wooden bar to the frame, remove the laces that hold the folded blind;
- after the curtain is lowered, align the tension of the laces and hold them, tie the knot in such a way that it is located behind the last ringlet;
- then the braid is stretched, passing through the handle, designed to lift the curtains, so at a distance of 46 cm from the first nod they tie a second, below which the cords are cut.
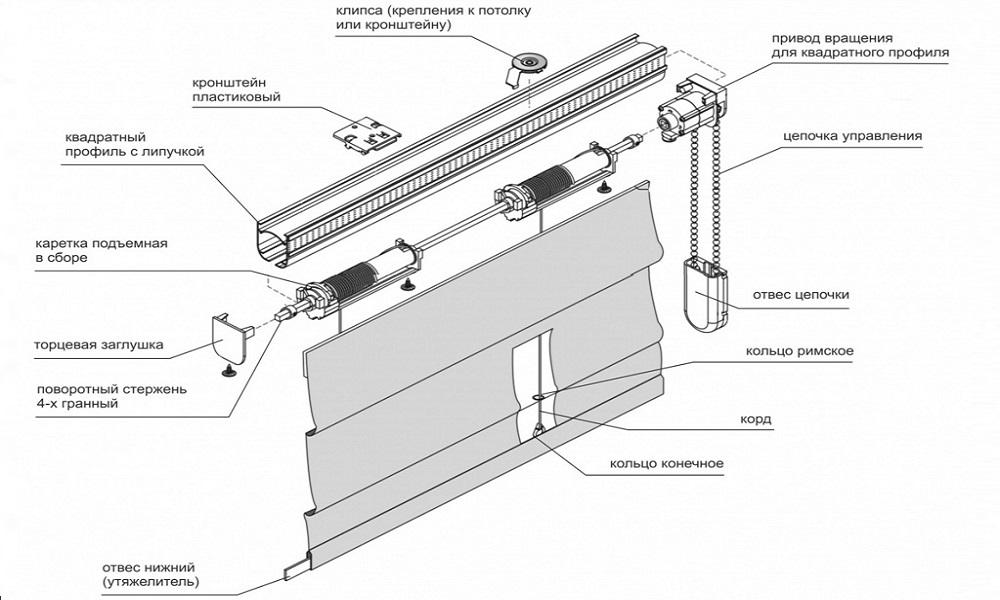 Diagram of the device of the eaves for Roman curtains. So you can sew simple curtains with your own hands. Back to contents</a>
Sewing Roman curtains with your own hands for the kitchen
In the event that this room is locatedon the sunny side of the building, it is appropriate to produce an independent sewing curtains. For the kitchen, a Roman curtain is suitable, which not only protects against direct sunlight, but also fits nicely into the interior and design of the room. Consider how to make the correct tailoring of curtains yourself. Detailed step-by-step instructions: 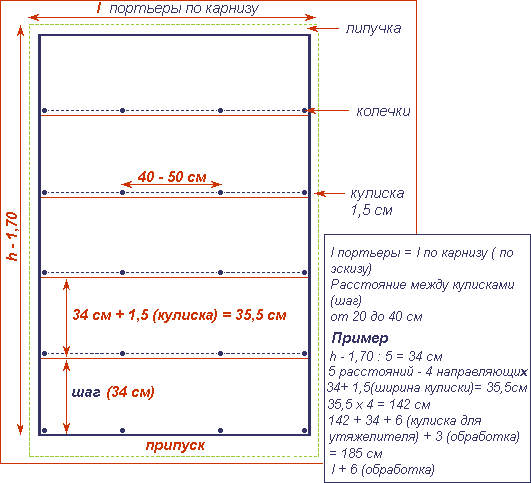 The scheme with the calculations of the Roman curtains.
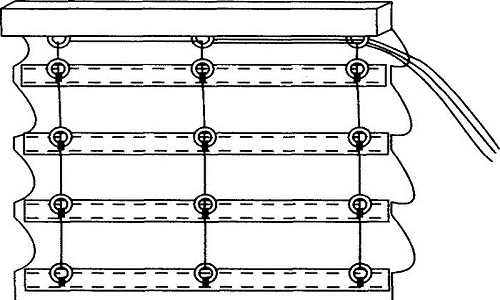 Figure 2. The scheme of installation of the bar for Roman blinds. Back to contents</a>
Tools and materials
So, we examined how to fix Roman curtains, how to sew them correctly, what materials and tools are needed. If all the work is done correctly, beautiful curtains will please for many years.