Home is the place where you want to gocome back and never go out again. Every person wants their home to be as cozy and comfortable as possible. The very first thing in improving a home, and any other room, is finishing the walls with laminate (as well as the floor and ceiling). Layout of the laminate.Each person chooses the material for wall cladding individually. The main thing is that it should not only be beautiful and aesthetically pleasing, but also serve for many years and be easy enough to maintain. Initially, laminate was used for floor covering, but having realized its practicality, convenience and durability, many began to use it for wall cladding. It is much more often used in office premises, but it is also becoming increasingly popular among individuals when decorating their own homes. In the modern building materials market, laminate is presented in a wide range of colors and textures, so the consumer can easily choose it to match their interior and design.
Some features
Laminate is a panel that haslayered structure based on fiberboard and several layers of paper. At the bottom, the panel is protected by a waterproof and soundproof layer, and it is this that gives the panel rigidity. On top is a decorative layer, which distinguishes the laminate by color. Frame method of finishing walls with laminate.The material is gaining more and more popularity precisely because it has many advantages. It is very reliable and resistant to abrasion and mechanical damage. It is very easy to install and does not require any special skills from the installer, so finishing the walls with laminate with your own hands is quite possible. It is very easy to care for such walls, wet cleaning is enough for them, since the laminate has the property of repelling dirt. It is not afraid of dirt, grease, or even children's drawings with felt-tip pens. It is absolutely heat-resistant, can withstand high temperatures, which is very significant when lining the walls in the kitchen near the stoves. Another huge plus is its high environmental friendliness, it is made only from natural materials. With proper installation, laminate can last about 20 years, and it is more likely that the owners of the premises will simply get tired of it than become unusable. With a variety of colors and textures, it can fit well into any design solution. Laminate has an optimal combination of high quality and a fairly reasonable price. The only thing this material is afraid of is sudden temperature changes. As for the necessary tools when finishing walls with laminate, these are:
- level;
- hammer (mallet);
- hacksaw;
- roulette;
- glue gun;
- marker or pencil.
Return to Contents</a>
How to choose a laminate yourself?
 Technology of finishing walls with laminate.To cover the walls with laminate, you first need to choose and buy it. Since the laminate is chosen for the walls, not the floor, it does not necessarily have to be extremely durable, and thanks to this, you can buy cheaper options. This will allow you to save significantly on wall finishing. But you should not choose based only on price. You must also consider the conditions in which the laminate will be used:
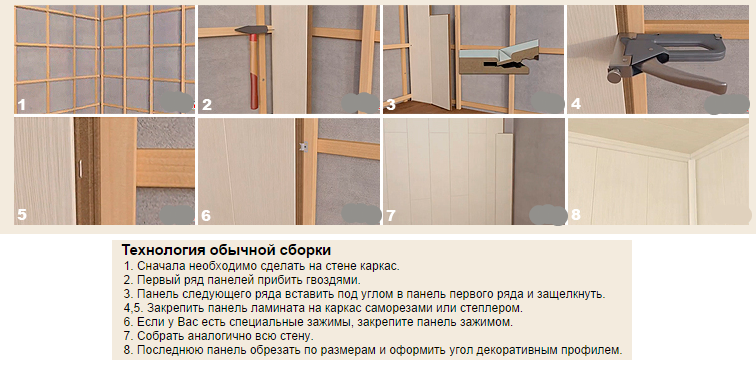
The main method is the fastening method, which is divided into two types: tongue and groove and click laminate. When choosing the most suitable one, you should take into account the quality of the walls being sheathed. Laminate flooring installation diagram.If the walls are not very even, you should first nail the lathing to them, it will significantly level them. For such walls, the tongue and groove option is suitable, which is attached to the lathing using stop clamps or special nails. Click laminate is more advanced and of higher quality, it is attached using glue or liquid nails. When buying laminate before installation, it should be in the room being repaired for 2-3 days and oriented to the appropriate microclimate, then it will be of higher quality during operation. When choosing fasteners, you should consider in which direction the panels will be attached. If the laminate is to be located vertically, then the fastening can be any, but if horizontally, then the load, especially on the lower fasteners, will be very significant. And therefore, you should choose more durable types of fasteners. Return to contents</a>
Laminate wall cladding
The work is literally not dusty and notrequiring special skills. Panel installation is possible in two ways: on an adhesive base or on a lathing. Both of these methods have slight differences, but in general the algorithm of actions is almost identical. Laminate latch lock.First, you need to correctly calculate the required amount of laminate, which is easiest to calculate by calculating how many squares the wall area is (simply multiplying its width by its height). But if you want to buy panels more profitably, then you should select more suitable options in size so that as little scraps as possible remain. The next step will be directly preparing the wall intended for cladding. If you choose the option with an adhesive base, then the wall should simply be leveled, getting rid of all the irregularities with plaster. When the surface is absolutely flat and dry, it is ready for work. But if the laminate is to be attached to the sheathing, then you can ignore the unevenness of the wall itself. The sheathing is attached using a building level, perpendicular to the panels, which will make the finished wall perfectly flat. It is also necessary to decide from which point to start attaching the panels. If they are located horizontally, then you should start from the ceiling. But if the placement is vertical, then the laminate is always attached from left to right. And you should remember about the gaps left in case of possible deformation. They are 10-15 mm from each wall. Now that all the preparatory stages are behind us, we can begin the actual installation. Return to the table of contents</a>
Practical recommendations
The adhesive method of fixing laminate involves the use of special glue or liquid nails.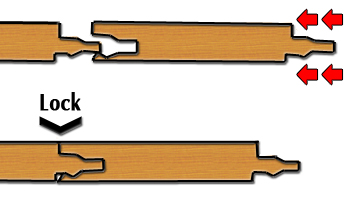 Laminate hammer lock.If necessary, window and door openings should be removed for the duration of wall cladding work. The back of the panel and the wall are treated with glue, the first row is fixed using a level. Then each subsequent row is prepared and installed in the same way, the rows are connected to each other by inserting into the lock. In this case, for greater strength of the wall, small nails or staples are driven into the lock, if desired. It should be remembered that when adjusting each subsequent row, you should not lean too hard on the hammer, since you can shift the previous rows from their fixed position. Fastening of the laminate to the sheathing is carried out using special fasteners - clamps, which are used when fixing all building panels. They fix the panel at the top and bottom, but if the clamp does not allow the panel to enter the groove, then it is possible to trim in the area of the lock. When cladding both walls and floors with lock-type panels, their joints are treated with a sealant to prevent moisture from getting under the panels, which can lead to their deformation. After all the rows of laminate are installed, you should think about processing their edges at the cut points. Leaving the cuts unformed is not aesthetically pleasing, and besides, this can affect the durability and quality of the products. For this, depending on the fastening of the material, either baseboards or corners are selected, which are fastened with a sealant. When installing laminated panels, as with any other construction work, you should give time for shrinkage and drying, and only then can you carry out all the work on decorating the interior. Good luck with your work!


