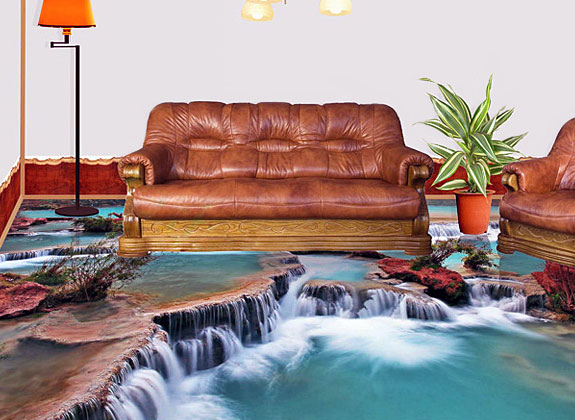
Recent changes in pouring technologypolymer floors made it possible to use them not only for industrial facilities, but also for the arrangement of private estates. From the many options for decorative flooring, you can always choose the one that will match the expected loads and the type of room. When creating, the interior of the house is necessarily transformed and prettier. This is due to the magnificent design of the self-leveling floor, which is formed with the help of interspersed bright elements, patterns of quartz sand and original designs.  Filling floors are very popular due to impact resistance and relative cheapness.
Technology of creating polymeric floors
The technical process of pouring polymer floors is not very difficult, but with self-packing there are still questions:
- how to dissolve cement mortar;
- how to prepare the foundation;
- how to perform 3D floors;
- what tools are needed.
 Using quartz sand, you can createoriginal drawings on the floor. Filling floors require the creation of a high-quality rough floor. It has a great influence on the behavior of the finish coat during operation, the service life and compliance with technical regulations. The optimum variant of the substrate for the filling floor is a concrete screed. The main thing that on it there were no cracks and humidity before filling did not exceed 4%. The procedure for creating polymer floors is divided into several stages:
Filling floors consist of cement mortar and special filler. The construction of a concrete substrate requires cement and sand. Sand can be replaced with expanded clay, screening, rubble. Back to contents</a>
How to Install Beacons for a Concrete Base
To create a screed and a polymer floor, you need construction tools, which include: 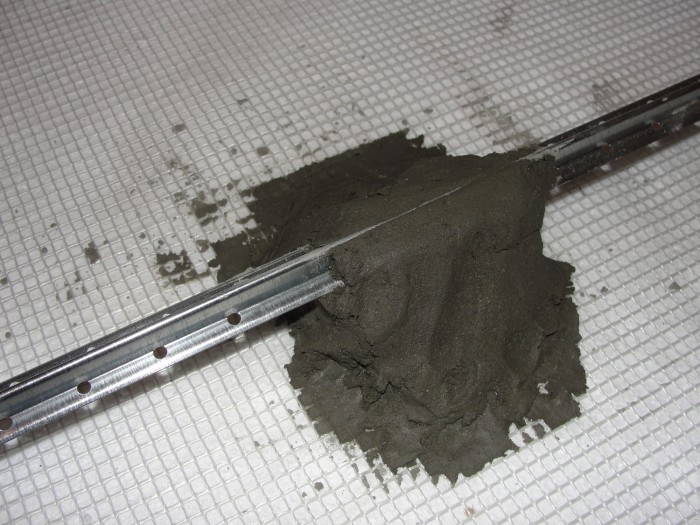 Beacons for a concrete base are made of perforated profiles.
- solution tank;
- beacons from perforated profiles;
- rule;
- laser and building level;
- Master OK;
- putty knife;
- aeration roller;
- roulette;
- squeegee;
- stakes;
- a trowel;
- thread for marking;
- buckets.
Creating a substrate in the form of a concrete screedbegins with backfilling of crushed stone cushions. With the same purpose, you can use screening, expanded clay or sand. All this will serve as a good base under the screed and as a heater. The backing is made with a uniform layer, leaving no depressions or bald spots on the surface. The thickness of the cushion depends on the required height of the future screed, the tuberosity of the base and the material used. The minimum layer of sand for backfilling is 2 cm, screening - 3 cm. Expanded clay or gravel layers should be made thicker due to large particles in their composition. After the backfilling process is over, the cushion is neatly leveled and tamped carefully.  For cement batching, it is best to usestationary concrete mixer, as this will save time during the work. Over the entire length of the room with the help of the spirit level, the upper boundary of the concrete base is marked. You can make the markings in the corners and repel even boundaries with a cord or stretch it around the level as a stop. To install beacons, a strip of cement mix is made and a perforated profile is laid out on top. Penetrating the solution, the solution freezes and firmly holds the lighthouses. Beacons are placed along the marking contours of the cord or on a tight thread. With the help of a rule or a long construction level, you need to check the evenness of the beacons. The gap between them should be shorter than the rule for 10-15 cm. Before pouring, it is necessary to wait about a day to grasp the solution under the beacons. Back to contents</a>
How to make a mortar yourself and pour concrete screed
Mixing of the cement mixture can be carried out inconcrete mixer or manually, using a solution tank and shovel. The number of constituent elements depends on the brand of cement. A bucket of 400 cement requires 4 buckets of sand, for a 500 grade cement, 5 buckets are needed. The ratio of components varies with the use of screening. Here everything depends on the size of the fractions of the additional component. The larger they are, the more dropouts are required. For grade 400, you need to add at least six buckets of screening to a single bucket of cement. The resulting mixture is stronger and in fact there is concrete, but the difficulty lies in the need to exert great effort in leveling, and the trowel is prevented by small stones. The solution for pouring can be placed on stretchers or buckets and distributed on the surface between the beacons so that it slightly exceeds the height of the beacons. For leveling use a shovel, chopper or trowel. Excess cement mortar is tightened by the rule, moving the tool to the right and left. The rule needs to be constantly moistened, then the surface will be very smooth and even. 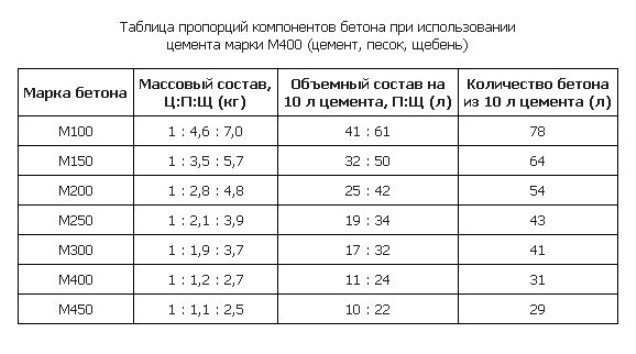 Table of proportions of concrete components atuse of cement grade 400. Filled screed for the next day should be wiped. This is done using a trowel or a half-wiper. If, at the same time, voids are found on the surface, they are filled with cement mortar and mashed after hardening. It takes 3 weeks for the final hardening of the screed. After drying, the concrete surface must be treated with a special primer so that it penetrates into all pores and microscopic cracks. Therefore, it is better to hedge and repeat the process. The primer should not dry for more than 24 hours, but less than 4 or 6 hours will not be enough. Back to contents</a>
Polymer floors with own hands
When the primer turns into a strong film,you can proceed to pour the polymer floor. Make flooded floors better together with a partner. Here the continuity of the process is important, when one master dissolves the compound, and the other is engaged in pouring the mixture and rolls it out with a roller. The solution is kneaded by means of an electric drill with the required packing. Information on how to prepare a mixture is always present on the package. We must not forget that the pouring should be done quickly, because after 40 minutes the solution will lose the necessary fluidity. The entire process of pouring the polymer floor is not difficult and consists of the following stages:
The fill is started from the side of the room thatis located at the opposite end of the entrance, and continues towards the doors. A portion of the composition is poured into 2 square meters of area and rolled with an aeration roller. The time interval between serving portions should not exceed 10 minutes. After 3-6 hours, the flooded floors will finally harden. All this time, the room, where the flooded floors are located, should not get drafts and direct sunlight. Uneven drying leads to a caramel effect, when a liquid solution remains under the upper solid layer. After 24 hours, observing all the subtleties of technology, a smooth and beautiful surface is formed. If the result suits, then the filler floor can be varnished.


