You noticed that the projector of the starry sky is not badsold out? Do you think advertising is to blame for this? Perhaps this is a certain amount of truth, but this is not the main reason. The fact is that a person is naturally dreaming, looking at the fire or the starry sky. So the manufacturers of the projector played on the thousand-year instinct of mankind.  Glowing ceiling will be an excellent elementdecor of your bedroom. But there is an alternative to the projector - a luminous ceiling. In the dark, it looks amazing. The children are delighted with him, and adult people are relaxing, looking at him.
Cost of a luminous ceiling, views and installation
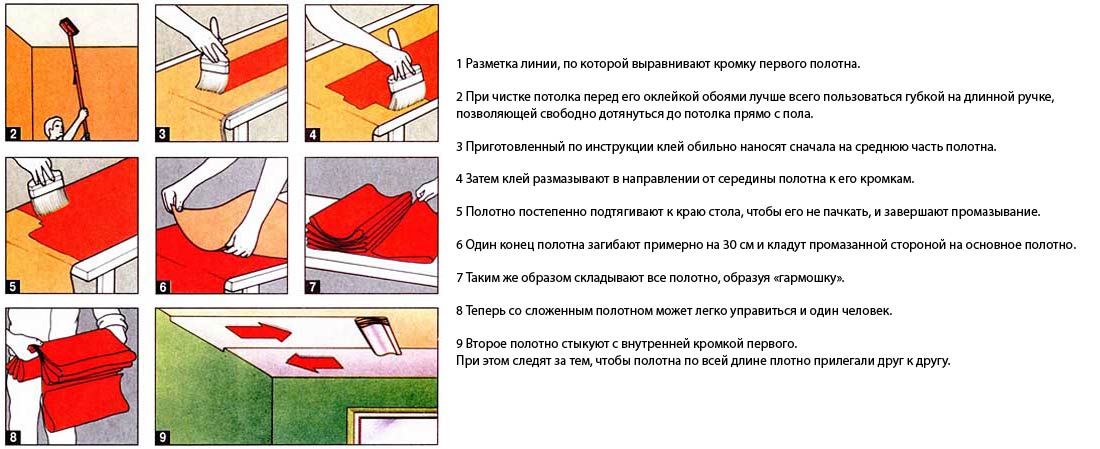
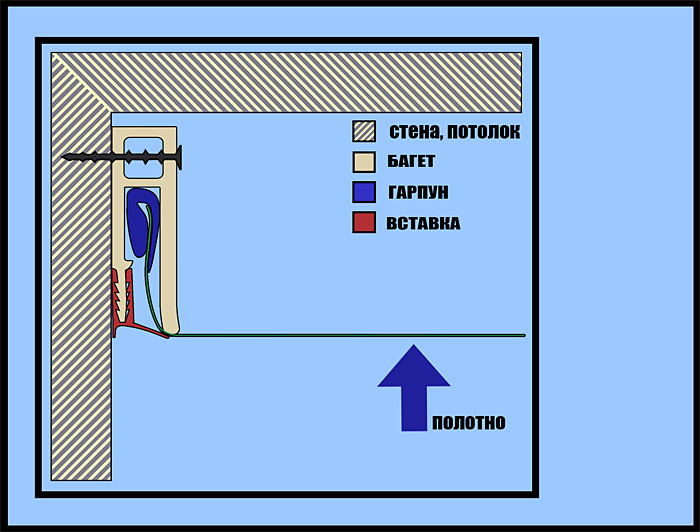 Scheme of stretch ceilingsharpoon spsob. So on the market of building materials appeared luminous ceilings, and their variety is very large. One does not quite please - the price for such a ceiling is too expensive for an ordinary person. Yes, and installation of it will cost a lot: since an independent installation will deprive you of the guarantee, then you will have to entrust this work to specialists. Any man at the same time thinking: why not make a luminous ceiling with his own hands? But first you need to understand the structure of such ceilings, their advantages and peculiarities of working with completing materials. Conditionally, it is possible to divide all luminous ceilings into several main groups: ceilings that emit light; ceiling, reflecting light radiation, and ceilings that do not have lighting elements. Back to contents</a>
The advantages and disadvantages of ceilings without lighting elements
 Installation of fabric tension ceilings. The last type of ceilings is the most primitive and affordable. In this case, it is not necessary to work with electrical appliances or cables completely, since all light from the ceiling is radiated by elements containing fluorescent dyes. For example, it can be a ceiling painting with the mentioned paints. They are able to "shine" at the slightest hit of a light beam on them. It's enough to illuminate the night street, as the reflected light will fall on the paints and they will instantly start to glow. Skeptics grin while reading these lines. But you do know that there is no absolute darkness, so a small glow of the ceiling will be permanent. But the constantly changing illumination of the windows will allow the paints to shine at full strength. We also take into account the fact that when the angle of incidence of a light beam changes, the degree of luminescence changes. And this is a very significant plus of the ceiling, since it will not bother you with its monotony. The only drawback: the colors are not always bright (the quality of the colors is not always high), and this color is kept relatively short. The main advantage is the exclusivity of this ceiling, as it can be painted on your own. And it is not necessary for this to have artistic abilities. It is enough only to have in the mentioned mentioned paints, brushes of different sizes and a primer for the ceiling. Back to contents</a>
Order of applying luminous paints
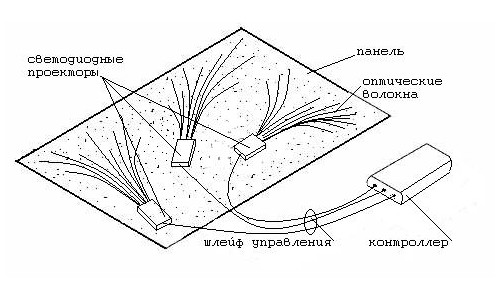
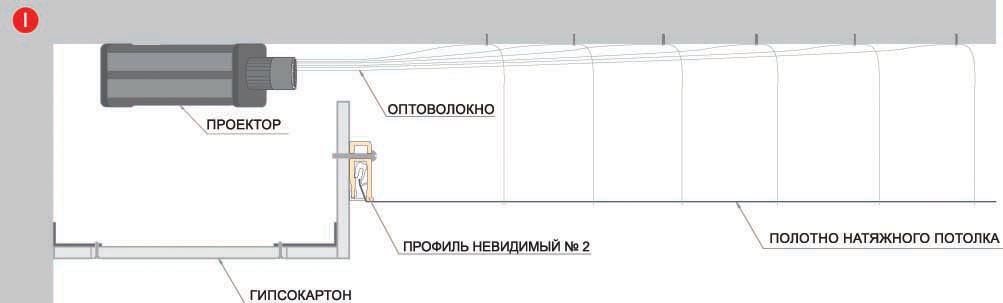
 Stretched ceiling scheme Starry sky withoptical fiber. First, clean the surface of dust and apply a small layer of primer to it. The dried primer allows drawing. The star can be painted simply: dipped the paintbrush into the paint, remove excess paint from the edge of the container and perpendicularly direct the brush to the ceiling. The bristles must disperse to the sides and form small rays on the surface. The asterisks are made with brushes of different sizes (then the stars will be different) and we use colors of different colors for this. Well, we draw a comet similarly, but at the final stage we move the brush along the arc. To create such a ceiling with your own hands, you only need the ability to draw the moon. But even a person who has never held a brush in his hands will cope with this work. Back to contents</a>
Luminous ceiling with stickers
 Scheme of lighting organization of suspendedgypsum plasterboard ceilings. The modern market is very much saturated with luminous stickers, which can be used successfully if you want to create a ceiling with your own hands in the children's room. Such elements simply stick together, they are quite inexpensive, their position is also very simple to change. And they are "charged" from any light source, even from a normal light bulb. One hour of light consumption is equal to two to three hours of constant soft glow for the elements mentioned. They emit rays of light-green color, but if you want, you can significantly expand the spectrum, as more and more color solutions appear. One drawback is still there is a loose fit to the ceiling surface. Whether with an adhesive basis, something is wrong, or whether the ceiling requires pretreatment. The way out of this situation is simple - use double-sided adhesive tape. First a piece of adhesive tape is glued to the label, and then the element is tightly pressed against the clean surface of the ceiling. We remind you that when gluing all the elements in the room there should be a normal humidity, otherwise the scotch will not firmly hold the luminous figures. At first glance, there is nothing terrible if one (or several) elements fall off. But if this happens at night and the fall will fall into the area of the person's face, then instead of the soothing effect of the ceiling you will get extra sleepless nights. In the rest there are no problems. Unless in the daytime such a ceiling looks simple. Back to contents</a>
Luminous ceiling wallpaper
 The scheme of gluing wallpaper on the ceiling.We must not forget about the special ceiling wallpaper. They are also available in different types and may contain reflective elements, fluorescent paints. Such wallpapers work in the same way as described earlier. It will not be difficult to glue them to the ceiling, you can not be afraid of falling off elements. Wallpapers that have recently appeared on the market of finishing materials look more elegant on the ceiling. The process of their manufacture is kept secret by the manufacturers, but it is simple to describe them: the finest silver threads, formed in the form of certain patterns, are included in the wallpaper. These threads begin to emit a slight glow in the dark. This glow can be adjusted remotely. using such wallpaper is very simple, you just need to glue them according to the instructions on the smooth and primed surface of the ceiling. The disadvantages of such a ceiling, oddly enough, exist most of all: the wallpaper is expensive, the drawing can get bored very quickly, since it is not able to change from certain conditions. But the most frightening thing is that the technology for the production of wallpaper is not disclosed - you never know what may be in their composition. And if excessive humidity appears in your apartment (and this cannot be ruled out)? What then will happen to the expensive wallpaper on the ceiling? These lines cannot be considered anti-advertising of the product; rather, they are expressed by the unknown principle of work. But if you want to decorate the ceiling with your own hands using wallpaper with silver threads, then you need to inquire in more detail about their composition and the principle of operation from distributors (trading companies). They are required to provide information about the product and have a corresponding quality certificate for the specified products. Back to the table of contents</a>
Multi-level gypsum plasterboard ceiling with point light
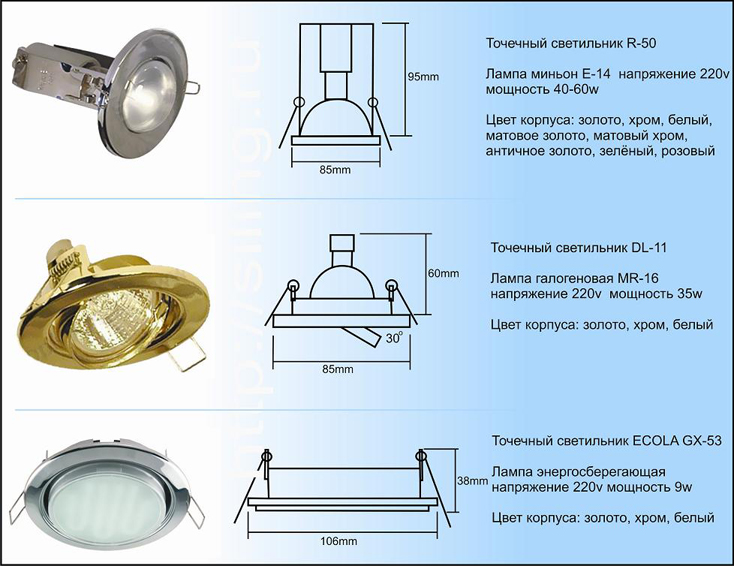 Types of spotlights: incandescent lamp, halogen lamp. More reliable and beautiful are considered ceilings that have their own sources of lighting. The simplest of them can be considered multilevel gypsum plasterboard ceilings, in which point lighting elements are mounted with a horizontal location in the depth of a certain level (or several levels). The illusion of the starry sky, they will not create, but in the daytime they will look like a real work of art. This trend in the design of home interior existed several decades ago and remains relevant until now. To the disadvantages of such ceilings can be safely attributed only to the need to frequently wipe the installation site of lighting elements (next to them, always accumulates dust). Back to contents</a>
Stretch ceiling with light
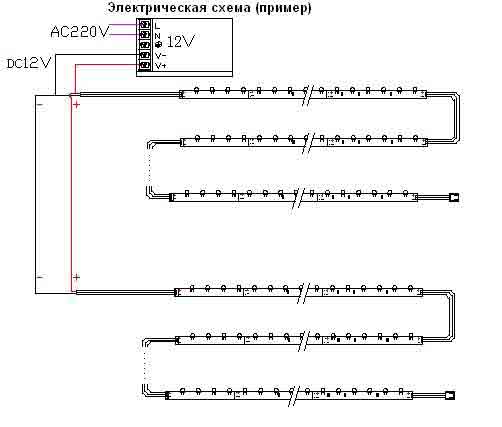
 Ceiling scheme with illumination. Stretched ceilings with lighting can be safely considered the leader among all the luminous ceilings - a beautiful view at any time of the day, different modes of luminescence and a wide color palette make them so popular. We add here the possibility of adjusting the glow, which is also an additional advantage. It is not difficult to make such a ceiling with your own hands. It is enough for you to have:
- film for the stretch ceiling (matte, with a transparency of about 50%);
- accessories for a tension ceiling;
- transformer (220/12 V);
- electrical wiring;
- Screwdriver;
- aluminum tape;
- lighting elements;
- stepladder;
- insulating tape;
- indicator;
- building hair dryer;
- building level.
Manufacturing begins with marking.First, you need to mark a horizontal line around the entire perimeter of the room. All panels for the ceiling are to be fixed along this line. But this is all much later, since now it is necessary to mount the backlight with high quality. To this end, we cut the aluminum tape into strips, the length of which will be equal to the width of your room. These strips will act as a kind of reflector for light, which will allow the backlight to be uniform. For the same purpose, all strips must be attached to the ceiling at a distance of about 30 cm. If you do this at a greater distance, then you risk getting the effect of a mattress, and the light stripes on the ceiling will become annoying after a while. Already attaching the tapes to the ceiling is also not always good, since you will get a ceiling that is too bright. Back to the table of contents</a>
Installation of lighting system
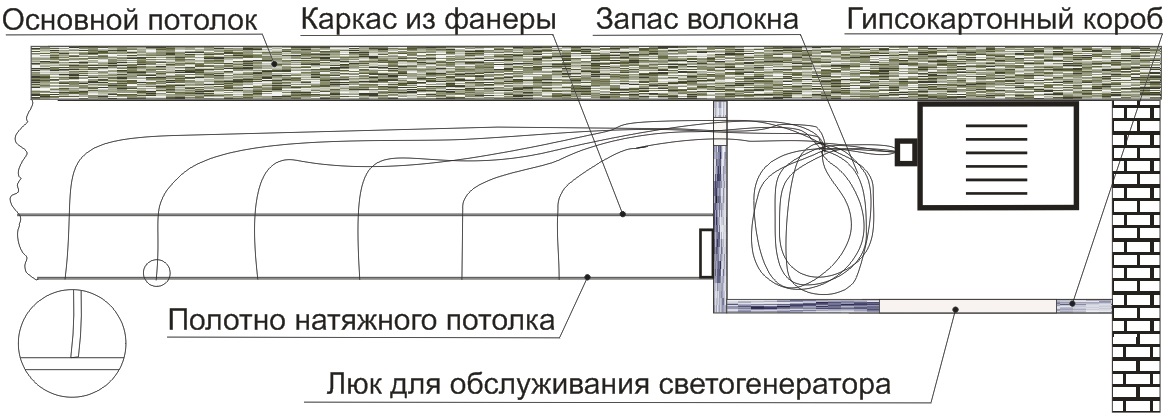
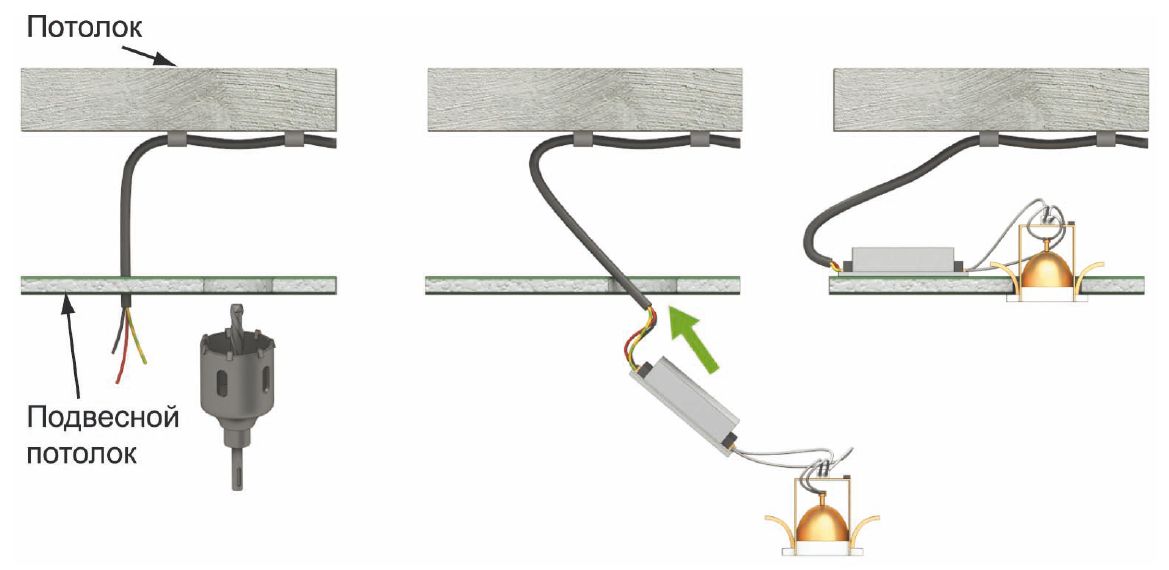
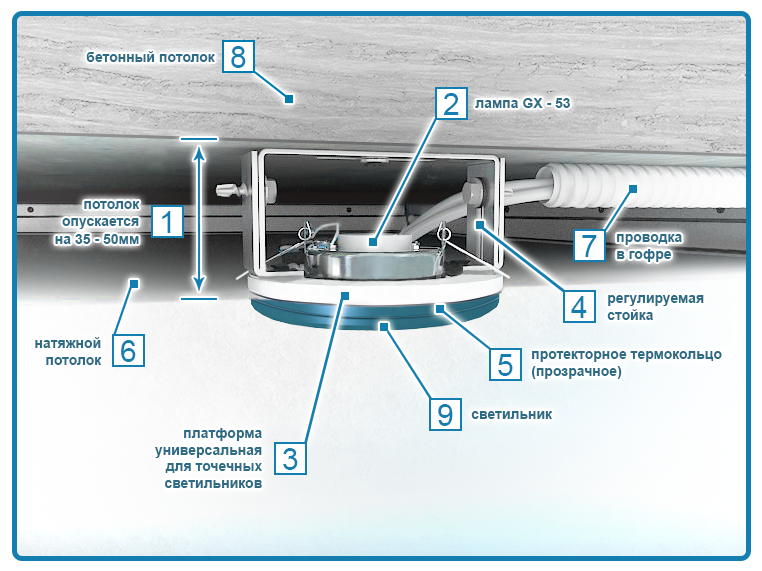 The device of the point light. Now you need to mount the main element of the ceiling - the lighting system. Use for this can be both neon light bulbs and LED strip. There are a lot of them on sale, so the choice will not be very difficult. The peculiarities of all these lighting elements is that they consume very little electrical energy, they have a long service life and are not heated (practically) during operation. The last moment is one of the most important, since the fire situation in the apartment you absolutely do not need. To fix the lighting tape on the light-emitting diodes is simple. The main thing is that the contact wires from it are near the power source. It is often advised to fasten the transformer directly on the ceiling. The meaning of this is only when you do not want the lead wires to be hidden from the prying eyes. There is nothing more to add to this, since for other reasons such a layout of the transformer loses. First, in case of necessary repairs, you will have to work very hard to get to it. And secondly, the transformer allocates a large amount of thermal energy, and with prolonged use of the backlight you risk the fact that the temperature above the suspended ceiling rises and the ceiling membrane deforms. It makes sense to arrange the transformer somewhere near, so that it would be easy to get to it. In this case, the lead-in electrical cable must be placed in a special box or patch the wall and lay the cable in the received inner box, and then plaster this cavity. Back to contents</a>
Lighting tape and leveling the ceiling
 Installation of LED tape. After installing the lighting tape, you need to check the quality of the glow in a darkened environment. In this case, you need to consider that the glow of the stretch ceiling will not be so saturated and somewhat blurry. If the illumination suits you, then you can proceed and install the ceiling membrane itself. It is stretched on the bearing profiles according to the attached instructions. After the tension, the suspended ceiling is heated with a construction hair dryer. The film should stretch itself if all the preliminary work was done correctly. It only remains to let the material cool down, fix the ceiling plinths - and you can admire the glow of your product. By the way, at present there are various types of lighting tape on LEDs. Many models can be customized, and they are remotely controlled. Adjustment will allow to change intensity of a luminescence of light-emitting diodes and their radiated spectrum. Well, mirrors (pieces of aluminum tape) will repeatedly increase the glow. For this reason, and it was necessary to check the luminosity, until the ceiling has not yet been completely mounted, so that it does not shine too brightly. Reduce the brightness of the luminescence can be with the help of additional resistance or rheostat, built into the network. The rheostat is preferable, because with its help it will be possible to change the illumination, depending on the situation. If you purchased the entire backlight kit together with the control panel, then no additional elements in the circuit are absolutely unnecessary. To create a luminous ceiling with your own hands, you will have enough of the details that you were offered at the retail outlet. Back to contents</a>
LED ring and its mounting
Interesting illumination of the ceiling is obtained withuse of LED ring. If you place more light-reflecting elements inside this lighting element, the effect will be absolutely magnificent. We remind you that when you connect electrical components to the network, there should be no voltage in it. It is desirable that all mounting processes are accompanied by measuring operations, all contacts are dense and have reliable isolation. Back to contents</a>
Christmas tree garland for ceiling decoration
 LED installation diagram.For a children's bedroom, you can do it yourself using the technology described earlier, but using not special LEDs, but an ordinary Christmas tree garland. The flashing of the light bulbs bewitches the child and makes him more calm. The fear of the dark will pass by itself, but the anticipation of the holiday will be present every evening. Such an effect cannot but cause the child to feel a fairy tale and happiness. This ceiling option is quite modern and very inexpensive. All the ceilings described earlier are distinguished by only one feature - the static image. Agree that it would be ideal to make the ceiling with your own hands with the image as close as possible to the twinkling starry sky. Back to the table of contents</a>
Moving elements and combination
This can only be achieved with the help of mobileelements, skillfully mounted above the level of the suspended ceiling. Such moving elements can be both lighting and reflecting parts. For example, the LEDs can be located on a movable curved axis. The rotation will change the direction of the beam, and lights will play on the film of the suspended ceiling. It is not difficult to do this. But here again you will get a few small problems: the noise from the electric motor will disturb the overall idyll of the created atmosphere. And, finally, there is an opportunity to make a ceiling with your own hands, combining various ways. Then it's for sure that you and your family members will not be bored with the monotony: many options for highlighting the ceiling will allow you to see something new every evening. This will be the best rest for the eyes.


