At the entrance to the room, people first turnattention to the ceiling. The general impression of the interior often depends on the appearance and condition of the ceiling structure. Therefore, it is very important to maintain this element in a proper condition, in due time it monitors its cleanliness. Sometimes it may be necessary to perform a capital or cosmetic repair of the ceiling structure.  Types of ceilings. In this case, you can use the services of expensive specialists or repair yourself. You should know that such work will be able to perform every person who has at least a small experience of performing repair work.
How to make a ceiling with your own hands?
Cost of repair of ceiling structures will bedepend on the complexity of the work. It is cheaper to primer the structure and create insulation. The cost of this type of work is approximately 55 rubles per 1 m². The most expensive are putty work. Back to contents</a> Existing types of ceilings Today in residential buildings there are different types of ceiling structures. The most common are the following:
- painted construction;
- whitened design;
- glued ceiling;
- suspended structure;
- tension ceiling.
 The scheme of pasting the ceiling. Each of the existing species has its own characteristics, on which the cost of repairs and labor costs depends. Repair the ceiling you need to start with the preparatory work. At this stage it will be necessary to clean the structure of old finishing materials, primetovat and align the base, to repair all joints. The thoroughness of preparation will depend on what type of ceiling structure you need to make. For example, the base of the ceiling structure for whitewashing should be made even, while for a stretch ceiling an even base will not be needed. Back to contents</a> How to clean the ceiling? If you plan to make repairs in a new apartment or a private house, you will not need to remove the old covering. In this case, you can immediately go to repair joints and primer work. If you plan to repair the ceiling in an old room, the first thing you need to do is to clean the ceiling base. In most cases, the ceiling is whitened, plastered with mortar of lime or pasted wallpaper. Clear the construction of these materials is simple enough. To do this, you need to take an ordinary roller and a bar to it. The roller should be moistened with water and squeezed out slightly so that the water stops flowing from it, but it was wet. After that, you need to ride part of the ceiling. First, the tool should not be pressed hard, but each time you need to press harder. Once the roller is completely dry, it will need to be dipped once again into the water and repeated all the steps in the new section of the ceiling structure. You will need to wet a plot of a few m², then take a spatula and start cleaning the whitewash, wallpaper or stucco mixture to a concrete surface or putty.
  Methods for cleaning the ceiling. If a layer of putty is found under the old finishing layer, check for strength with a spatula. If it is securely fastened to the base of the ceiling, it can be left in place. If the putty begins to fall off and crumble, it should be removed and a new one applied in the future. In some cases, the ceilings are painted with paint. You should know that removing such material is quite difficult. This can be done by several methods: chemical and mechanical. For the first method, you need a wash, which is sold in any construction shop. After the base is impregnated with a wash, the paint can easily be separated from the base. It is worth noting that the process of softening the material can take about 10 hours. The second method involves cleaning the paint with various tools, but this is a long process. If there are decor elements or polystyrene tiles on the ceiling, they can be removed with a spatula with a metal blade. It may be that a part of the adhesive mixture remains on the ceiling structure. To remove it, it will take some effort, but as a result there must be a clean foundation. If the overhead or tension structure is overhauled, it is necessary to disassemble and dismantle the structure so that it is possible to reach the floor. In this case, there are no recommendations. Back to contents</a> How to make a ceiling primer?
  The scheme of a priming of a ceiling. After the ceiling has been cleaned from the final coating and decor elements, it will be necessary to primer the surface. The primer starts by checking all joints and seams. They need to be filled with a plaster mixture or plaster, which will hold firmly. If the mixture in some places of joints will scatter a little from impacts on it, it will be necessary to clean the joints and once again fill them with a mixture on a gypsum or cement base. In this case, you can use a solution from a special dry construction mixture with fiber elements. After the seams are filled, you need to equalize the protruding mixture with the plane of the ceiling structure and allow it to dry completely. The next step is the priming of the ceiling. On the substrate, a deep penetration primer should be applied in order to obtain better adhesion and strengthen the base. To apply a primer, use a roller or brush. To do the work you need to wear gloves, so that you can protect your hands from the solution. For subsequent work can only go after the complete drying of the primer. Back to contents</a> How to perform shpatlevanie and plaster? This work will necessarily have to be done, as in most cases the concrete surface is uneven. This is especially important in case of plans to repair the ceiling with wallpapering, painting or whitewashing. The leveling method will depend on the skills of the builder and the preferences of the owner of the apartment or private house.
 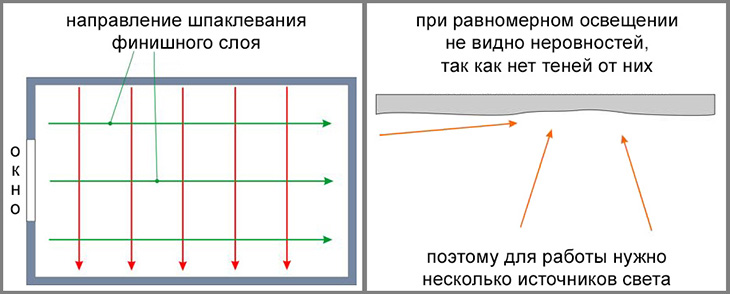 Scheme of the first and second layers of puttyingthe ceiling. However, there are some features that may influence the choice of the alignment method. Plaster, for example, will reduce the overall height of the room by several cm, and it also has a sufficiently large mass. Putty will give a considerable shrinkage, it will need to be applied in several layers, which can affect the time and complexity of the work. The plaster of the ceiling structure is distinguished by the simplicity of the work, with its help it is convenient to level the base. With the putty it is possible to get a smooth base with a small layer thickness and a low mass. Back to contents</a> How do I make a plaster ceiling? In order to produce the plaster of the ceiling structure, you will need to purchase the following elements:
- priming composition;
- dry mortar for construction;
- beacons with fastening for plaster;
- rule length of 1.5 m;
- electric drill;
- building level.
Plaster works should be carried out after complete cleaning of the substrate. You can do it this way: 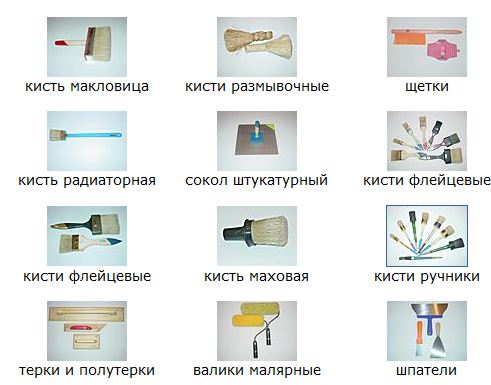 Tools for plaster ceilings.
The process of plastering the ceiling is similar toplastering the walls. The difficulty lies only in the fact that the base is not vertical and is located above the head. After the building mixture has dried, a flat base will be obtained, on which it will be possible to apply the puttying mortar and the finishing coat. Back to contents</a> How to make a ceiling putty yourself? Ceiling putty allows to level its base, however this process takes more time than plaster. In addition, such work is difficult to perform, if there is no experience with the relevant tools. To produce the putty you need the following elements:
- rough filler mixture;
- finishing mortar;
- priming composition;
- Painting mesh;
- spatulas of large and small width;
- solution tank.
Ceiling putty is made as follows: 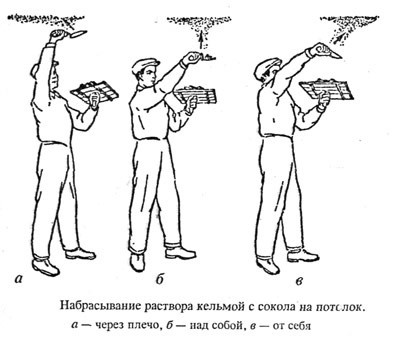 Scheme of applying plaster to the ceiling.
To be able to get an even foundation,sandpaper should be used. Once a flat base is obtained, it is possible to begin to apply the finishing finish of the ceiling structure. Another option for creating an even foundation is repairing the structure with drywall sheets. The whole surface will have to be sheathed with sheets, then once again level with a mortar mortar. This method of leveling the substrate is necessary for the subsequent painting of the structure, whitewashing or pasting with wallpaper or other materials. Back to contents</a> How to paint the ceiling with your own hands? 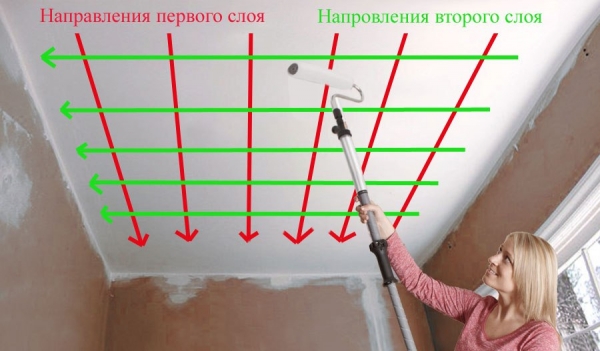 Scheme for painting the ceiling. In most cases, oil or water-based paints are used for painting. Preparation of the material consists in stirring and bringing it to a suitable density. You can start painting only after completing the preparatory work. For work you will need to purchase a roller on the rod and a brush. The coloration process is not difficult. To begin to paint it is necessary from the edges which are processed by a brush. The rest of the area will need to be painted with a roller. In some cases, the painted ceiling structure is repaired. The first thing to do is to inspect the base for the peeling material. If there are such places, they should be cleaned with a spatula. Then they will need to paint again, but this option is a temporary solution, in the future will need to make major repairs. If the paint is everywhere to hold securely, then on the whole base it will be necessary to apply a new layer of material and leave to dry. Back to contents</a> How to whitewash the ceiling with your own hands?In most cases, it is the whitewashing of the ceiling that is performed. This finish will suit any interior design, but you should be aware that it is not so simple. Lime should be used as a material for whitewashing, which is diluted with water, filtered and distributed over the ceiling. To do this, use a roller, brush and spray gun. If you use only a roller and a brush, then the lime will not be applied very evenly. With the help of technology, it is possible to obtain the best results. You should be aware that the whitewashed construction is not as durable as the painted one. The advantage of whitewashing is the cost of the materials required. Back to the table of contents</a> How to properly cover the ceiling with wallpaper? To glue the ceiling with your own hands is quite difficult, since it will be necessary to coordinate the actions of several people.
 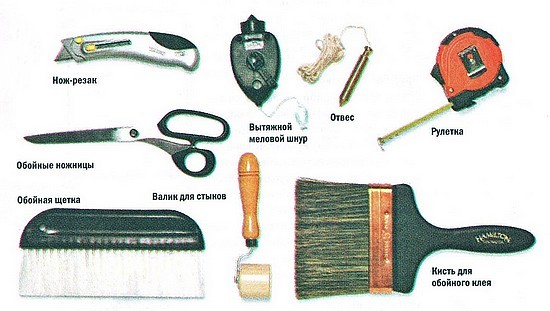 Tools for gluing wallpaper on the ceiling. In this case, you need to use wallpaper glue and wallpaper. From the tools you will need the following: a knife, a roller, a container for an adhesive mixture and a rag. To make a ceiling with your own hands in a similar way can be as follows:
Speaking of which, you should know that there are a fairly large number of different ways to repair such a structure.


