The slatted ceiling kit consists of narrowpanels, edging profile (skirting board) and suspension system. This type of finishing is used both in public buildings and in private buildings. Suspended ceiling, mounted from decorative aluminum slats, has good moisture resistance. The design allows to hide ventilation communications and electrical wiring. Panels-slats of various color shades are made of aluminum, covered with varnish. Scheme of suspended slatted ceiling.The installation of the structure in rooms with high humidity is especially relevant. It is possible, without having special experience in finishing works. The installation of the system, in comparison with the installation of a stretch ceiling, is simple and is performed without special equipment.
Material preparation and marking of the main ceiling
Before performing installation worksuspended ceiling, decide on the direction of the slats relative to the walls of the room. Usually, the elements are attached along the direction of light from the window. In narrow rooms, a transverse arrangement of the slats is possible to visually expand the volume. To finish multi-level ceilings, it will be necessary to draw up a detailed diagram of the location of the fasteners and structural elements. If there are no plans to place household communications above the surface of the false ceiling, the distance from the main ceiling is left at least 50 mm. With normal horizontality of the ceiling covering, marks are made in the corners using a building level and tape measure. Then the fastening lines of the edging profile along the perimeter are beaten off with painted painter's thread. If the ceiling overlap deviates in the horizontal plane, it is necessary to use a hydro- or laser level. Tools and materials for rack installationceiling: grinder, hammer drill and screwdriver, building level, metal scissors. The panels are freed from the protective film and are prepared with a length of 3-5 mm less than the distance between the walls. When laying on the corners, they should have a slight play. In the marked places on the panels, holes are drilled for the lamps using a drill and a crown bit of the required diameter. Holes are drilled on the corners (profiles), which will be attached along the line marked along the perimeter. The distance between them is maintained at 50 cm and 30 cm from the ends. Nests for dowels are drilled on the wall using the holes obtained. The corners are attached with a wide shelf to the wall. The bearing load should not be transferred to the profiles installed along the perimeter, the edging has only a decorative purpose to close the cracks near the walls. The weight of the ceiling will be borne by pendants. The places for fastening the hangers are marked at intervals of no more than 1.5 m and at a distance of 30-40 cm from the walls. When marking the lines for fastening the load-bearing crossbars, it is necessary to maintain their parallelism relative to the side walls and perpendicularity to the end walls. Return to contents</a>
Fixation of bearing elements
When installing the structure, you will need a set of tools: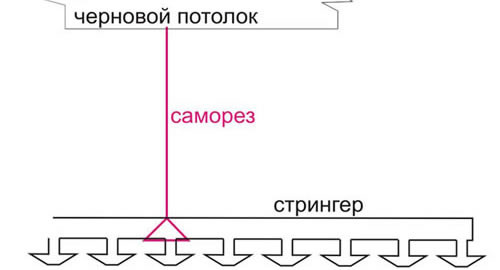 Installation diagram for suspended slatted ceilings using self-tapping screws.
- perforator;
- a drill with a diamond crown;
- scissors for metal, pliers;
- screwdriver, hammer;
- laser or building level, measuring tape;
- a pencil, painted strings for chipping lines;
- stepladder, protective equipment.
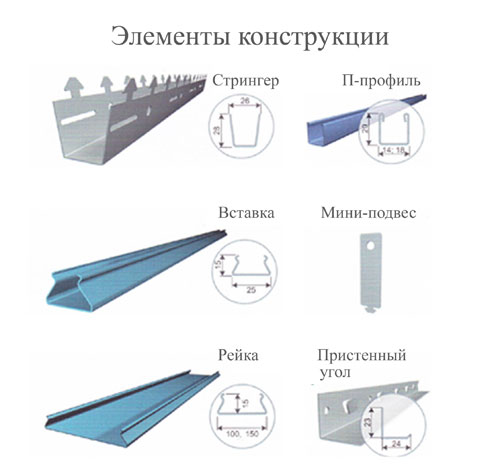
The supporting system of the slatted ceiling includes:Stringers (crossbars) with grooves for fastening slats and hangers of various designs. Comb-type crossbars can be attached directly to the ceiling with long dowels, with the ability to adjust their horizontal position. Depending on the required height of the above-ceiling space, the installation technology involves the use of a tension spring and a spoke. The crossbars are joined together using self-tapping screws and special pads. It is easier to install a slatted ceiling with your own hands on adjustable hangers, which allow you to level the surface of the structure with extreme precision. They are attached according to the markings using a hammer drill and dowels. The ends of the crossbars should be 1 cm from the wall profile on each side to compensate for possible deformations. Return to contents</a>
Mounting of rails
 Elements of the slatted ceiling design.According to the assembly type, the slatted ceiling system can be gapless, open and closed. The gapless type of construction is mounted with longitudinal adjacency of panels without gaps. With an open ceiling system, special strips are inserted into the gaps between the slats. The closed type slatted surface has blind gaps between the panels. Slatted ceilings in the kit have panels of standard length of 3 or 4 m. After cutting to the design size, they are inserted into the edging profile with a diagonal turn. The slats are put on the teeth of the stringers until a characteristic click is heard. The outer slat is adjusted in width using metal scissors. Transverse cuts are made for the width of the part to be removed, then the part is cut to length or the strips are broken off by bending and unbending with pliers. The last slat is installed with the cut side in the edging profile. The solid edge is fixed on the tongues of the stringer. Then the solid penultimate panel is installed. If the suspended slatted ceiling is of an open type, spacers are inserted between the slats. Suspended slatted ceilings differ in a variety of colors, patterns, and imitation of textures of various materials. The ceiling surface can have perforation with different diameters of holes. By installing a slatted ceiling with your own hands in compliance with the installation technology, you can create an original reliable design that can last up to 20 years.</ ul>


