Today, more and more popularpanel ceilings, which can be successfully used in any room, including in a room, the conditions of which are high humidity. During the repair, you can install a simple or two-level ceiling with your own hands, in the latter case you need an element such as an involute. Such decoration is not exposed to fungi and microflora, does not rot from dampness and rust. It is easy enough to wash with the use of disinfectants. During the repair installation of such a system will not be accompanied by an impressive cash outlay, as the material is inexpensive, and it can be installed independently without the involvement of specialists.  DIY suspended ceilinghelps to make the interior of the room unique. Install a simple one or you can install it on a pre-prepared system. First, you need to measure the perimeter of the room, which will determine the final length of the U-shaped profile. This element is installed on the walls and allows you to provide an aesthetic abutment of the ceiling slats to the walls of the room. To install a panel ceiling, you should prepare some materials and tools:
 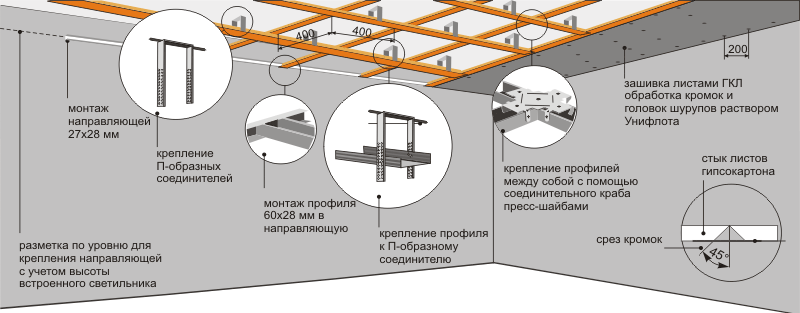 Scheme of installation of a single-level false ceiling.
- ceiling set;
- perforator;
- drill;
- Screwdriver;
- marker;
- roulette;
- building level;
- ruler;
- knife;
- scissors for work on metal;
- pliers;
- dowel-nails;
- self-tapping screws.
Preparatory stage
Before starting to install pendantceilings, it is necessary to make a layout. These works assume the application of a perimeter, along which a U-shaped profile will be fixed. If you want to mount an ordinary horizontal system, then on one of the walls with a certain indentation from the ceiling surface it is necessary to put a zero level, relative to which the line should be drawn in a horizontal projection. You can use a chalk cord for this. Increase the future ceiling space is necessary in the event that it is not planned to fill in anything. The minimum clearance should be equal to 5 cm. If it is planned to supply the system with illumination by one's own hands, it is necessary to draw the profile installation line somewhat lower, depending on the dimensions of the devices.  Scheme of a two-level suspended ceiling fromdrywall. The next step is marking for the installation of stringer. Their location should be perpendicular to the rails to be installed. The U-shaped profile should be fastened by means of dowels. From the edges you need to retreat 5 cm and drill holes, the remaining holes should be removed from each other by 0.5 m. Drilling is necessary outside the profile, this will eliminate the appearance of burrs. After the installation of the profile, you need to prepare the places intended for the hangings, guided by marking, which can look like plates or wires. The most convenient are adjustable suspensions, since they allow for the most exact alignment of the ceiling system. The edge points should be removed by 30-40 cm from the end walls, while the intermediate points should be located at a distance of 1.2-1.5 m. Now you can proceed to installing stringer, which are grooved tires. It is on them and will fix the rack panels. Their length should be such that a groove of 1 cm remains between them and the wall profile. This gap is necessary to compensate for the deformation of the rails at temperature differences. If the ceilings in the room are located at a low altitude, and the room itself is relatively small, then from the installation of such a system is preferable to refuse, since after the work ceilings will be lower by 8-10 cm.
  Diagram of the components of the false ceiling.The smoother it turns out, the thinner the ceiling space will be. Therefore, it is recommended to pre-level the ceilings before starting work. All communications can be integrated into the system. They are located in the hollow space after the installation of a heater or sound insulator, if their presence is provided for by the design. In parallel with the laying of communications, you should consider the location of the lighting fixtures. Back to the table of contents</a>
Assembling the panel ceiling
Suspended ceiling with their own hands is installedafter the panels of the required length have been prepared. To do this, they need to give a length of 3-5 mm less than the step between the profiles into which the ends of the rails are supposed to be mounted. After you can begin assembling the ceiling surface. Reiki need to be inserted into the grooves of stringers, and in the end, you should hear a characteristic click - a signal that the edges of the rails are securely fastened to the reeds of the tire. If the final staff does not fit in the remaining space, cut it. To do this, along the length, it is necessary to draw a deep line with a knife, which will determine the location of the cut. On the part to be removed it is necessary to make perpendicular incisions, and the pieces of the panel formed by them should be broken off, bending several times in both directions. 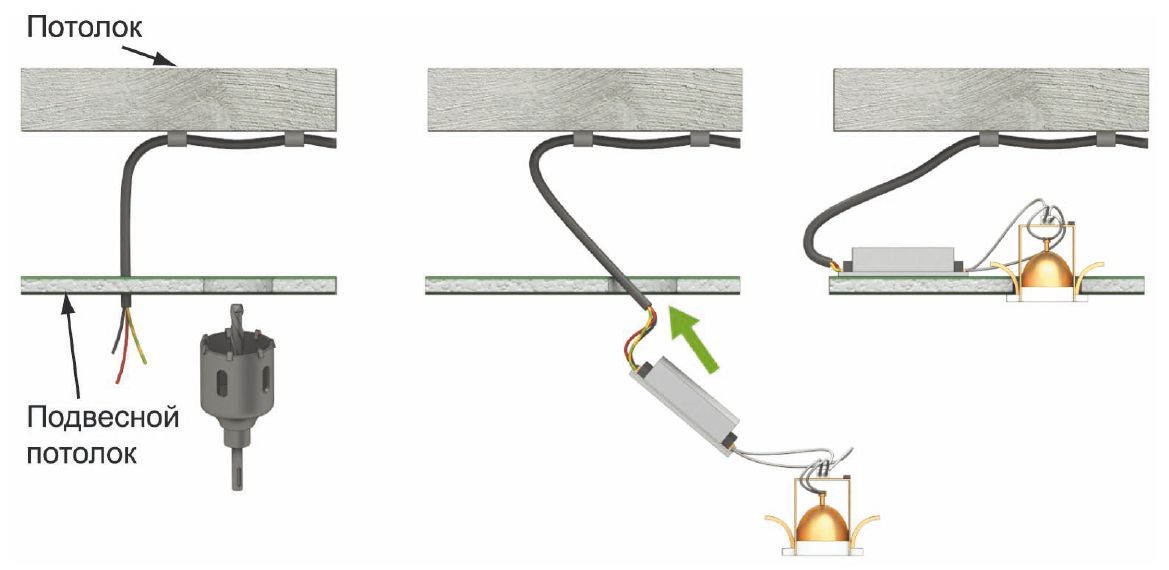 Installation of halogen lamps with transformerin a false ceiling. After the edge rail can be installed by the cut side in the profile on the wall, while the other edge is fixed on the stringer tongs. For greater convenience, the trimmed rack is mounted next to the penultimate one, and the latter must be reduced by 14 mm. In the process of mounting all the rods you need to bring them into the wall profiles, directing diagonally. But the final one should initially be shifted in one direction, to start the first edge in the profile, only after that insert the other edge, giving the element the desired position. In this case, both ends should be located evenly in relation to the walls. Then the rail is to be fixed on the supporting rail. Back to contents</a>
Recommendations for ceiling installation
At the time of planning the usual rack or piniontwo-level ceiling should take into account the direction of the lines that are formed by joints. As a rule, they are placed from the source of daylight to the opposite wall. If the room is narrow, then the lateral location of the rails will allow you to visually change the proportions in a more favorable direction. If the room has a square ceiling, then it is preferable to choose the diagonal arrangement of the panels for installation. In the case of a large room, the installation of racks requires the splicing of the panels. To do this, you need to purchase or check the presence of a set of intermediate inserts, they can provide an aesthetic interface elements. Rack level or two-level ceiling allows you to mount a point-type lighting system. For this purpose, the holes must be prepared on the panels first. In advance, it is worth noting the circle on the panel in the right place. From the center of the circle to the external line with the help of metal scissors it is necessary to make radial incisions. The resulting petals need to be folded into the ceiling space. The smaller the size of the petals, the more quality will be the installation of fixtures. During the assembly of the panel system, care must be taken to ensure that the integrity of the finish is not compromised. The surface should be protected from scratches and abrasions, as this will negatively affect the appearance of the finish. After all the main slats are snapped to the stringer, check the levelness of the ceiling with the level. If necessary, it is necessary to tighten the suspensions, which will allow adjusting the system. Only after that you can proceed to the process of filling the space between panels with inter-tiered inserts. If a ceiling ceiling is to be installed in the bathroom, the walls must have a finish that does not interfere with the installation of the system. This can be, for example, ceramic tiles, the upper level of which will be slightly below the ceiling of the ceiling system. Alternatively, a stretch ceiling can be installed in the bathroom, however, only specialists can install it.


