Repair work indoors, whether it is residential oroffice, always begin with the process of finishing the ceiling. Apply different technologies at the same time. Whichever one the master chooses, the preparatory work will have to be done initially. At this stage, the question arises as to how to properly level the ceiling with putty.  Regardless of which technology you have chosen for the ceiling, it is necessary to carry out its shpaklevku.
Tools and materials
In order to make the putty on the ceiling, materials and tools should be prepared:
- steel spatula;
- capacity;
- mixer;
- paint brush;
- roller;
- sandpaper.
 To putty the ceiling you will need: a spatula, a stirrer, a paint brush, a roller, a sandpaper for grinding and a container for stirring the mixture. For the works the master must use three types of spatulas, each of which has different sizes, however, as a general characteristic of these tools is a rubberized handle. Shut the solution in a container, whose volume is 20 liters, while the beads should be high with straight walls. This will prevent splashing of the mixture during mixing and further application. The straight walls have their own function, which consists in the convenient removal of the mixture from the tool by means of a spatula and without residue. The mixer will be used in the preparation of the solution, but the application should be done with a paint brush and a roller designed for priming. After you manage to level the ceiling, you will have to use a construction sandpaper that will allow you to finish the ground.
 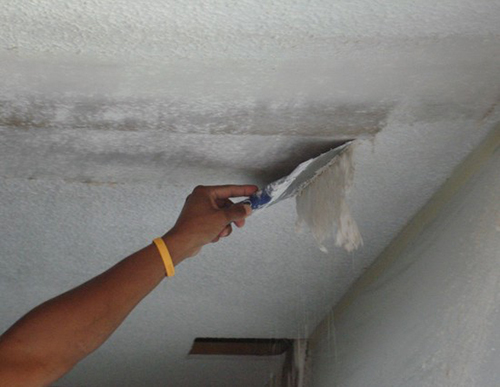 On how thoroughly you clean the ceilingfrom the old coating, the quality of the future finish depends. Before you level the ceiling, you should remove the surface from the remains of the old coating. To produce such procedures should be as carefully as possible, since the quality of subsequent finishing works depends on this. Eliminate old coatings by using a special scraper (sometimes it is replaced with a spatula). The paint can not be wetted beforehand, removing it in a dry form, however, removal will be more effective after the surface has been sprayed with liquid. Then the work will be completed in less time. After the paint is removed from the ceiling, it must be thoroughly rinsed. Back to contents</a>
Preparation for application of putty
Most often, the ceilings in the room are unevenoverlapping. This requires preliminary preparation of the surface before applying putty. At altitude differences, the level of which reaches 5 cm, plastering can be considered the only correct solution (except for the arrangement of hinged systems). Plaster can be applied to any substrate: concrete, wood, steel, etc. The cleaned surface should be primed: this will allow a more efficient mix of the mixture and the substrate. 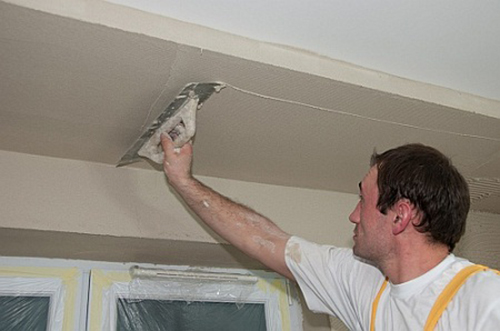 Almost all ceilings are unevensurface, so before the putty it is necessary to level the surface with plaster. If you have to work with wooden or steel surfaces, then before applying the plaster mixture you need to pull a metal grid with square cells, the side of which is 10 mm. Its fixation must be made, not excluding the joints and seams, using this should be special studs that have wide hats. Plastering is necessary on lighthouses. Start the process with a designation on the walls of the zero mark, for which it is customary to use a paint line. It is necessary to determine where the point is located, which acts as the lowest point on the ceiling. It will become the place of installation of the launch lighthouse. Under the beacons with a step of 300 mm on the surface of the molding it is necessary to apply plaster marks on which they should be mounted. On the ceiling, it is not necessary to lay a layer of the mixture, the thickness of which exceeds 5 cm. After that, you can begin to close the solution, which can be prepared on the basis of gypsum, cement or lime. If it was decided to use the first version of the mixture, then proceed to the application of the next layer after 25 minutes after the previous one. As for the cement composition, this interval is increased to 2 hours. The next layer of the lime mixture must be applied after obtaining the previous layer of white color, but do not wait for the complete drying.
 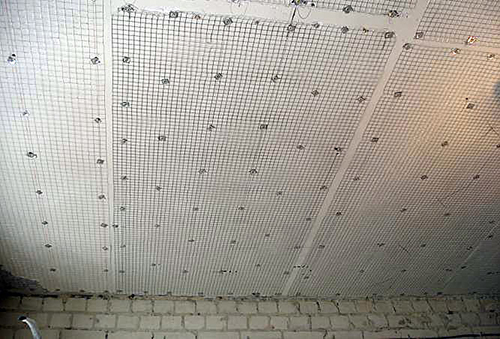 If the ceiling is wooden or metal, thenBefore the plaster you need to pull the metal mesh. The starting layer should be applied by the spray method, which does not need to be leveled. Then it is necessary to wait for the set time and apply a few primer layers. Each of them has to be leveled and analyzed, so that they are not above the level of lighthouses. At the next stage, after leveling the undercoating layer, you can get rid of lighthouses with stamps. In the area of the places where the lighthouses were located, it is necessary to apply the applied solution. Now you can check how smoothly the plaster was laid, and you need to use the rule. If irregularities are detected, they must be eliminated by cutting or adding a mixture. In parallel with this, it is necessary to seal internal corners and areas of joints of the ceiling and walls. You need to do this, armed with a half-arm. In conclusion, it is necessary to lay the covering layer, and then carefully level out to get a smooth surface. Once you have completed the "rough" alignment with plaster, you can proceed to the final leveling, where the putty will be applied. Back to contents</a>
Technology of puttying
 Scheme of the application of putty. Now, when the surface is devoid of significant changes, you can proceed to the application of putty. These two compositions differ only in the fractionation of the filler. In putty it is much smaller and does not exceed 1000 microns. For this reason, the named compound is most often used to cope with irregularities on the wood (cracks). After such alignment, the master can achieve ideal smoothness. If you are faced with the question of how to level the ceiling, then you should know that the application of the mixture must be done extremely thin layer. Therefore, the surface must first be checked for smoothness and treated with construction sandpaper, which can be replaced by a hinged grater equipped with a long handle. Afterwards, on the base to be finished, it is necessary to strengthen the paint net with the help of PVA glue or a special compound. Its second name is a serpian, since it has a similarity with gauze. For more comfortable use, you can buy a sickle, which has a self-adhesive base. After all the preparatory work is finished, you can proceed to the closure of the mortar for putty. To do this, use a dry mixture in an amount of 30 kg, which should be filled with water in a volume of 12 liters. The composition should be mixed thoroughly and quickly. It is most convenient for this use a construction mixer, which has a whisk of a large width. Some masters use for this purpose a drill with a special mixer. Readiness of the composition can be determined by consistency: the mixture should resemble thick sour cream.
 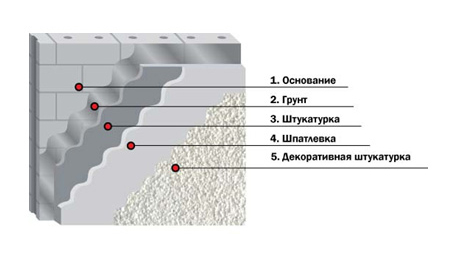 Scheme of the sequence of layers of the ceiling finish. The subsequent work is recommended to be carried out quickly, this is due to the fact that the prepared mixture will soon begin to set, and then - to gain firmness. If you are still unfamiliar with how to level the ceiling, then you should use the instructions below. Using a spatula with a narrow working surface, the mixture must be laid on a spatula, which has a wide blade. After the solution can be applied to the base and tightly pressed. You do not have to work hard to get rid of the arising divorce, since they can be easily removed after hardening using a trowel. After the last applied layer of the mixture has obtained strength, it is possible to proceed to the grinding process. To do this, you need to apply a special paste with a grid, as the least roughness is to use 120 units. Before you level the ceiling, it is preferable to purchase all materials, including putty, primer and paint, from one manufacturer. According to experts, this will help to achieve better results. In order to know how to properly level the ceiling, you should familiarize yourself with the order in which the work is done. First of all, the disposal of concrete floors from all kinds of old coatings. From unevenness, the level of which exceeds 2 mm, it is also recommended to get rid of. In this case, you can use a perforator, which has a special nozzle. Then you can go to priming, use at the same time the composition of deep penetration. The application of the starting putty should be carried out by arranging a layer 1 cm thick. In order to obtain a smooth surface, a half-tone should be used. Back to contents</a>
Finishing puttying
 After the plastering of the ceiling it is necessary to applyprimer (paint can be used). The final step is to apply the finishing putty. Application should be done in two layers. If the room temperature regime is kept at a level above 18 ° C and intensive ventilation is provided, then the final mixture can be leveled 4 hours after the surface treatment with the starting mixture. Otherwise, the drying of the previous layer may occur a little later, in which case the application of the formulation can be carried out the next day. If the room has suitable conditions, then the next day you need to begin work on grinding the base. It is preferable to use a vibration grinder for this. Whatever alignment technology has been chosen, it is worth considering that before painting on the surface should be applied a primer coat, in the role of which you can apply paint. It is supposed to be used for subsequent work. Back to contents</a>
Tips for applying putty
Before starting the application of the material, twospatula. The one that has a wide canvas, must be held in the left hand, it is on it to apply the mixture. Do not need to grab a large amount of the mixture at once. The solution must be distributed in the center of the working surface. You need to move the tool so that you get a level ground, you do not need to go back and rework the treated areas. Otherwise, the strip will appear on the surface, which can lead to improper retention of the tool. The spatula should be slightly inclined to the surface, so that the working surface and ceiling form a small angle. It is important not only to properly prepare the mixture and apply it to the surface, following the technology, you still need to correctly choose spatulas. Their working surface should not be too hard, excessive softness is also undesirable, since it can cause excessive deflection and twisting of the side edges forward. This will cause the appearance of strips on the ceiling. If necessary, a standard spatula can be subjected to some self-development, where you should use a file that will grind the sharpness of the corners. As a result, the end of the blade will be somewhat oval. After the work on the leveling of the ceiling is over, you can proceed to leveling the walls, using the appropriate instructions. You will be able to do it.


