A variety of modern products for repairsurprises and amazes. Thanks to the latest developments and technologies, in virtually every apartment on the walls are glued non-woven wallpaper. How to correctly paste them, we will consider in this material.  Flizeline wallpaper has a lot of advantages: they are durable, perfectly shaped, they can be painted, they visually level the wall.
Preparing for pasting
Before starting repairs in an apartment or otherindoors, you need to decide on the material. One of the most advantageous materials at the moment is flizeline wallpaper. The positive side is the fact that they can be painted. And you can do it repeatedly. This type is suitable for different rooms, as non-woven wallpaper is not afraid of moisture and wash well. If you get tired of the appearance of the walls, they can easily be repainted in any shade you like, and it takes much less time, money and effort than plywood. 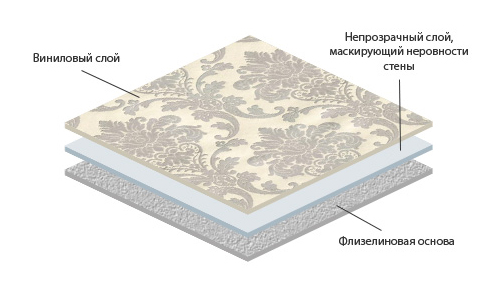 Structure of layers of non-woven wallpaper. If the room that is to be glued is large, then the wallpaper with a width of 1.06 m is best. If the room is small, the width of 0.53 m will suit perfectly. For the best result, it is necessary that the walls are smooth, dry and without residues of old finishings. It should be borne in mind that if you leave the old wallpaper of dark colors, and on top of them glue the non-woven wallpaper of light tones, the dark pattern will come through due to the properties of the non-woven material. When the walls are aligned, you must turn off all electrical appliances that can create drafts. These can be air conditioners or fans. Also it is worth remembering that it is necessary to close all windows and doors for the best result. The wallpaper must be cut after the height of the room has been measured. We should not forget about the allowances. Floor must be covered with polyethylene or other clean material. This is especially important for light and monochrome shades.
  For gluing non-woven wallpaper is necessarybuy special glue. If you cut a strip somewhere there will be a speck, it can spoil the whole appearance of the room. This is especially important for monochrome or light wallpaper. The main thing - do not forget to leave "allowances" of centimeters on five from above and from below. This is necessary in order that after gluing the entire surface to smoothly cut off unnecessary wallpaper. After a competent cutting of stripes, sticking non-woven wallpaper can not be difficult. And they can be left as is, and it will be possible to paint in any vending color. Prepare the glue will not be difficult. In a necessary quantity of water of a room temperature it is necessary to pour dry glue, constantly stirring. Initially, it is better to take a smaller amount of water and, if the solution is gushovat, add it a little. Experienced finishers do not pay attention to the proportions indicated on the box with glue. After all, if you observe them, the glue turns liquid and can not keep the wallpaper. That's why it is advised to take less water and with further addition bring the mixture to the state of sour cream or thick jelly. If everything works out, the wallpaper will last for a long time without additional gluing. Back to contents</a>
Necessary materials
For sticking non-woven wallpaper you need the following tools and materials:  Tools for gluing non-woven wallpaper.
- non-woven wallpaper (narrow or wide, monophonic or with a pattern - the difference depends only on taste and preferences);
- special non-woven adhesive;
- Capacity for glue (plastic pallet for uniform application of glue on the roller);
- A wide brush or roller on a long handle to apply glue to the wall;
- Narrow brush for gluing edges;
- A special plastic spatula or roller (for smoothing on the wall, "smoothing" the joints);
- building level;
- Roulette for cutting;
- pencil;
- construction knife;
- glue stick;
- plastic bucket.
Back to contents</a>
The process of sticking non-woven wallpaper
To paste the non-woven wallpaper with your own hands, you need to correctly approach the whole process: 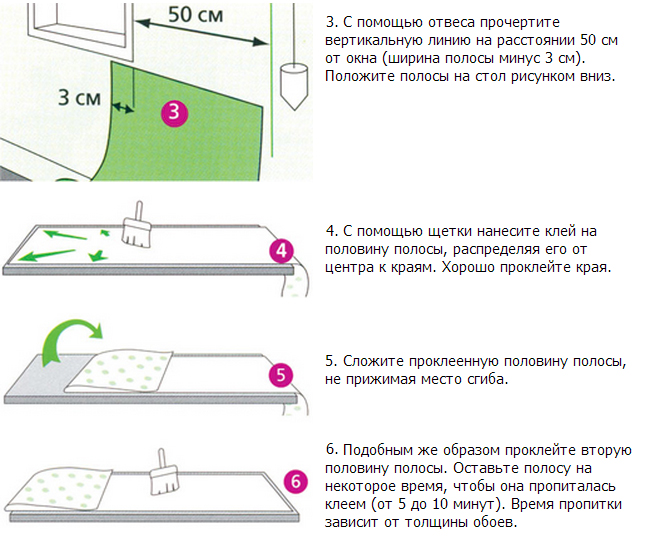 Scheme sticking flizeline wallpaper on the walls.
Back to contents</a>
Final work
At the final stage, it should be remembered that it is not difficult to paste flizeline wallpaper with your own hands. The main thing is to follow all the rules. The main points to remember:
- work indoors without drafts;
- Apply glue evenly to the walls slightly wider than the strip;
- if an undesirable overlap occurs, it can be cut off neatly;
- cut on a clean surface, it is better to cover the floor with polyethylene;
- after the work is finished, check all joints and edges, if necessary, glue with additional glue.
If all these rules are taken into account, the repair will seem rest, and the result will please the view for many years.


