During major repairs, suchwork like leveling the floor. This will significantly increase the sound insulation and heat insulation properties. But few know how to level the floor on their own. It should be noted that this procedure should be carried out in the first place. To do this, there are the following methods: leveling the floor by hand on lighthouses, build-up or bulk method. Each of these methods has its pluses and minuses.  The scheme of the device of a floor
How can I level the floor?
Before proceeding to work, the surfacemust be carefully prepared, that is, to clean it from all sorts of dirt and dust. If the floor has chips or cracks, they need to be ground and then treated with a primer. After a day can be taken directly for the alignment. Many experts recommend the lower part of the wall to be covered with a special tape, so as not to pollute the surface. But it does not matter. For work, some materials and tools will be needed: 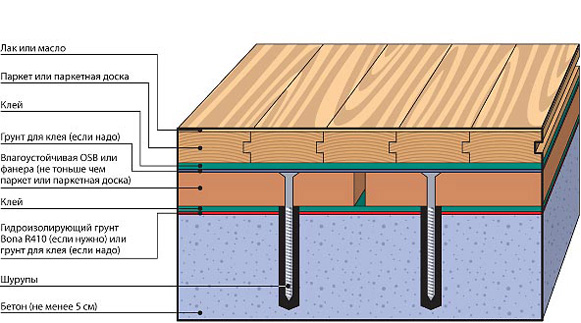 The scheme of leveling the floor with a moisture-proof plywood.
- a special mixture or other material;
- water;
- Needle roller on a fairly long handle;
- a drill for mixing the solution;
- large capacities;
- Master OK;
- building rule;
- kraskostupy.
To date, produce quite a fewvarious mixtures designed specifically for the alignment of the old floor. Some models have self-leveling properties. If you do not want to use ready-made solutions, then you have the opportunity to apply cement. To calculate how much a mixture is needed per room, you need to know how many square meters it contains and what height you want to raise the floor. For example, on 1 m² for a layer of 1 cm you need about 13-15 kg of dry mixture. Consequently, 15 must be multiplied by the common square meters of the room. If the layer is required in 2 cm, then you need to multiply 30 by the area of the room. In the event that you do not want to buy a paintbrush, which is not cheap, you can make them yourself. To do this, you need to prepare 2 shoes, equal in size to your shoes, 24 screws and a regular scotch. Water should be prepared in advance, as the dry leveling compounds quickly thicken, so the liquid must be ready. Back to contents</a> Basic methods for leveling the floor with your own hands 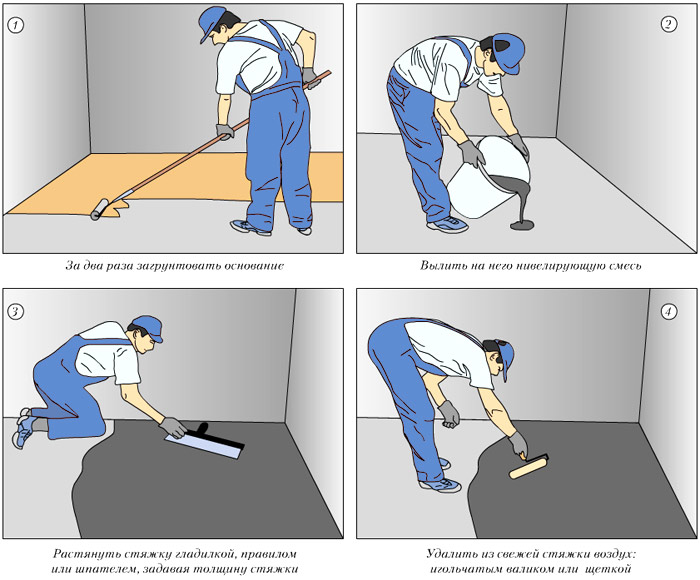 Gradual leveling of the floor leveling mixture. First of all, we need to focus on the method for lighthouses. It deservedly is popular among builders, as it is considered the most qualitative and lasting. Before you level the floor in this way, you need to stock up with iron bars, which in other words are called beacons. As a rule, this method is used for a very uneven floor and large rooms. A huge minus is a long time of drying, that is, drying can take about a month, but you will get a perfectly flat surface. The filling method is the fastest and easiest. It consists in the fact that the floor is poured with a special liquid solution, which is based on cement. The main feature of this mixture is that it spreads all over the surface quite evenly. The screed dries up quite quickly, because it has a smaller layer than in the method of alignment with beacons, that is, the layer should be from 3 to 35 mm in height. A huge advantage of the filling method is its low cost and excellent quality. The only drawback is that it can not be used for a very uneven surface. And the third way is to build up the floor. To do this, you will need logs of wood and plywood sheets, thanks to which the surface is leveled. During alignment by the build-up, it is possible to use heat-insulating material and various communications, laying them between layers. This is a fairly painstaking method, so it is applied less often. There is another way of leveling the floor, but it is used only when laying the tiles. This method is based on the fact that, when assembling the tile material, it is necessary to pour more solution into the places of errors. To do this, you need to determine where the highest point of the floor is, and, accordingly, lay the tile and pour the solution. Back to contents</a> How to measure the level at home?
  The scheme of leveling the floor with plywood. Before leveling the floor with your own hands, you need to make certain level measurements. First of all, it is necessary to dismantle the old floor covering and using the building level (long) to check the height of all sections of the room. Then the lowest and highest points are recorded. Surface irregularities can be due to the fact that the floor plate itself has unevenness or is laid under the wrong gradient. Also, the reason may be chipping, peeling, and so on. In the presence of a slope of unevenness of 35 mm, experts advise making floor leveling in bulk or by using a build-up. In the event that the height of the unevenness exceeds 35 mm, it is necessary to apply the method of alignment over the beacons. After the maximum height point is designated, the level near the door and the balcony must be checked without fail. Sometimes in these places the height can be much higher, therefore, you can not open the door. It is possible that the radiator is too low. In such cases, you need to raise the structure. There are also such that the main plane is flat, and at the joints of the floor slabs there are irregularities, the seams are smeared inaccurately. Then it follows, using a puncher, to bring down these irregularities, then slightly level with cement. It can be cement mortar with the addition of sand or dry mixes for the floor. Back to contents</a> Floor leveling by beacon
  Arrangement of lighthouses. As mentioned above, in this case, perforated metal corners are necessary, which must be placed along the room. At a distance of about 30 cm from the edge of the wall, the first rack is laid, the rest should be placed 1 m apart from each other. Beacons must be carefully fixed. To do this, you can use solutions of cement or gypsum. To produce these actions, you need to apply the solution in a row by slapping with a distance of 22-25 cm. On top of the stacked metal slats and adjusted to the level. When the beacons a little grasp, it is necessary to fill the formed voids with a solution. After all has dried up, the leveling of the floor is done by pouring the solution, the density of which should be similar to the consistency of sour cream. If the mixture is rare, then it will be problematic to level it, if too thick - the surface will not be smoothed out. Therefore, it is best to stick to the golden mean. First of all, the furthest corner of the room is poured, after which the direction continues to the exit. Simultaneous filling of the first two rows is done. This is due to the fact that the first and last rows have a distance from the wall of only 30 cm. Next, one row is cast. The poured mixture must be spread throughout the sector with a trowel, squeezing out the voids formed inside. Further, using the building rule, it is necessary to level the solution in the sector. For this, holding the rule by the edge, moves are made from side to side (towards oneself). After the surface of the floor is level, you need to hold a lighthouse. The temperature for rapid drying should be sufficiently warm, so in winter it is desirable to turn on the heater. Back to contents</a> Other ways of leveling the floor with your own hands
  Dry floor screed with your own hands. The self-leveling mixture is diluted in water as much as specified in the instructions. This material is designed for self-distribution of the solution on the floor, but all builders recommend using a needle roller. After you pour the surface, you need to roll this roller solution. This is necessary in order to avoid air bubbles in the solution. It should be noted that the length of the needles should be greater than the applied layer of the mixture. If you chose the method of building up the floor, then you can apply heat insulation material. A vapor barrier film is applied to the cleaned surface. If it is shorter in width than the room, then glue the joints with ordinary scotch tape. Wooden logs can be mounted both on certain metal plates and on the anchors. To ensure that the logs did not bend and were well fixed, planks (wedges) are placed under them and reinforced with screws. The logs are laid at a distance of 50 mm from the edge of the wall and at a distance of 50 cm from each other. After fixing the lag, the insulation materials are laid in each sector. It is desirable that it was glass wool. Then wooden plates (plywood, boards and so on) are mounted and fixed with screws. Further on any type of finished floor, floor coverings are laid. To do this, completely different material is used. Now you know how to level the floor on your own, while saving on the work of specialists. Back to contents</a> Step-by-step instructions for laying lag
 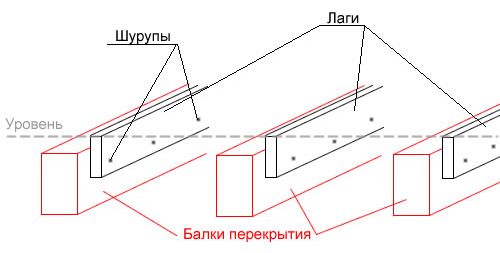 Layout of the lag. In addition to the above tools, when leveling the floor with your own hands using the logs, you will also need wood screws, a screwdriver and a jig saw. Initially, it is necessary to check the air level for humidity, because the wood and the substrate must be dry. Otherwise, mold can subsequently form. The maximum level should not exceed 60%. At home, it is done this way: the film is laid on the floor for a couple of days, after which the polyethylene is removed. If moisture is noticeable on the inside, then the condensate is raised. To eliminate this problem, it is necessary to dry and ventilate the room. The logs must be no more than 2 m in length, and the section should be 100x50 or 100x100 cm. After calculating the floor level, it is necessary to treat the concrete surface with a primer and place the logs around the perimeter of the room, but across the direction of the light rays from the window. Under the lag, experts advise putting pieces of linoleum or roofing material in order for the fixation to be reliable. It is in these places that anchors, self-tapping screws or screws mount to the substrate. Next, empty space should be filled with soundproof and heat-insulating material so that there are no gaps. Where the doorway is located, set the broadened lags that protrude beyond the dividing wall by 5 cm. It is necessary that in the adjacent rooms the flooring has an emphasis on the lags. After that, plywood sheets are stacked so that each edge is in the middle of the lag.


