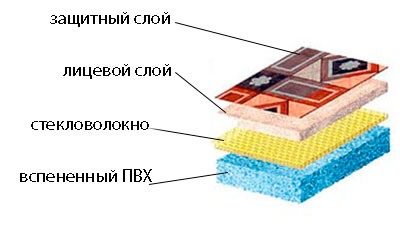
Linoleum - one of the most famous types of coatingsfor the floor. It differs from other materials by relative cheapness. In addition, it is easy to clean from contamination and is a good waterproofing. For these reasons, some of those house masters who build a warm floor in their home prefer linoleum.  Structure of household linoleum. True, its thermal conductivity is worse than, for example, ceramic granite or tile. Therefore, it is necessary to know which linoleum covering after installation will most effectively transfer heat from the coolant to the room. In addition, you need to choose a material that is more environmentally acceptable for use in the home.
What kind of linoleum to choose for flooring on the warm floor
Currently, there are 5 types of linoleumcoating. To choose the material for laying on the warm floor, it is not necessary to be an expert. Just need to know what markings are marked suitable for warm floors products. A sample of the marking is shown in Fig. 1. Next to it, the maximum temperature value at which the linoleum can be used is applied. Stopping your choice on alkyd material, as well as a coating of nitrocellulose or rubber is not worth it. 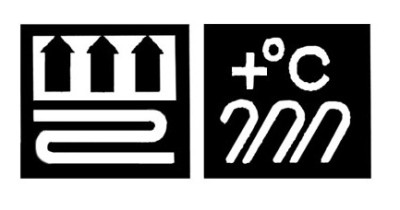 Figure 1. A sample of a linoleum label for a warm floor.
There are 2 types of coating that can be used for finishing the warm floor:
- marmoleum (material on a natural basis);
- PVC linoleum.
 PVC linoleum scheme.But even these materials retain their original characteristics only until they are heated to a certain temperature. The PVC coating can withstand 30 ° C, and for marmoleum the maximum allowable temperature will be 27 ° C. It is worth saying that the PVC material in the first weeks after installation will smell strong, but after a while the odors will disappear. Also, when purchasing PVC flooring, choose a material for commercial or semi-commercial applications. It should be no thicker than 1.5 mm and be devoid of an insulating substrate, which reduces the thermal conductivity of the coating. Of course, when making a heated floor underneath, do not forget to equip it with a thermostat that maintains the temperature of the finish coating within acceptable limits. Back to the table of contents</a>
Kinds of warm floors
You can arrange in the house one of three types of floor heating:
- water;
- infrared;
- electric.
 Scheme for installation of electric underfloor heating. Each of them has its advantages and disadvantages. The water floor is the most laborious in installation, but it is successfully used as a heating system without the high costs of daily operation. Its installation is difficult in apartments with centralized heating, since the installation of a water-heated floor is possible only after agreeing with the municipal services. In addition, the laying of such a floor is associated with a decrease in the height of the room, since a screed is poured onto the base in 2 layers. The operation of electric and infrared floors is associated with increased electricity consumption. True, it is worth noting that the heat carriers of the infra-red floor consume 1.5-2 times less energy than the electrical heating cables. At the same time, installation of both is much less labor-intensive than the construction of a water-heated floor. It must be added that the electrical base can be unsafe. In addition, it can cause overheating linoleum coating, so the electric heating floor will have to be removed from the list. It turns out that the best variant of a warm floor under linoleum is the infra-red basis as it evenly heats all sites of a finish covering, not supposing its overheating. Back to contents</a>
Installation of a warm floor
Back to contents</a> How to lay the infrared floor Laying the infrared warm floor under the linoleum is easy. For work it is necessary to get:
- thermo film;
- contact clamps;
- electrical wiring;
- insulating materials;
- thermoregulator;
- temperature sensor;
- dielectric heat insulator;
- conductive scotch tape;
- waterproofing.
 Figure 2. The scheme of connection of sheets of an infra-red floor. The base for the infrared floor must be free of dust and dirt, dried and leveled. A waterproofing membrane is laid on it, and a thermal insulation film is placed on top. As a heat insulator, it is better to use a foil-coated membrane that does not conduct an electric current. The reflective surface of the thermal insulation must be directed upwards. Neighboring, close to each other stacked heat insulation tape are glued together with a usual tape. Directly on the heat insulator, an infrared film is laid. Sheets of the warm floor are cut in such a way that the warm floor is not under the objects that do not have an air gap with a floor covering. In addition, the distance from the film to the walls should be from 10 to 40 cm. If the heating of the room is carried out only by this material, its area should occupy not less than 70% of the room space. The adjacent stripes of the warm floor overlap do not fit. To fix their position after laying it is possible with a paint tape. The heater is laid in such a way that the copper parts of the contacts are directed downwards and towards the thermostat, which is fixed to the wall. The maximum length of the heating strip should not be more than 8 m. One regulator sets the temperature on an area of 10-15 m2. In Fig. 2 shows the connection diagram of the sheets. All of them are connected in parallel. The contact clamps are attached to the copper strips with pliers. The wiring is installed. After that, the contacts are isolated. The temperature sensor is insulated and placed under the film. After connecting to the network, the infrared floor is tested. Additional protection from electric shock will ensure the grounding of the film with electrically conductive tape, connected to the grounding wire of the network. Linoleum is not applied to the warm floor itself, but to the moisture-proof plywood laid on it. Back to contents</a> Installing the water floor Before installing the underfloor heatingUnder the linoleum, the old screed is removed to the capital base. This allows you to repair the overlap and achieve smaller losses in the height of the room. After removing the remnants of the old coating, dust and dirt in the base of the solution, cracks and potholes are embedded. In addition, from its surface, protrusions are lost. After the drying of the ceiling and its treatment with an antiseptic, a waterproofing agent from polyethylene or roofing material is spread.
 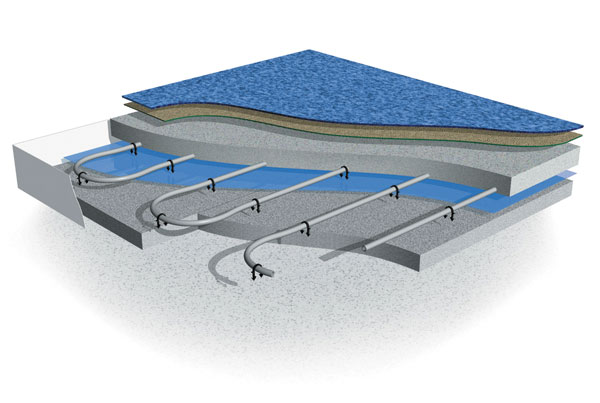 Figure 3. Scheme of pie of water-heated floor under linoleum. The leveling screed is poured after setting the horizontal beacons on the horizontal plane. Instead of a wet screed, the leveling can be carried out with expanded clay, which is compacted and also leveled by beacons. On the first coupler is placed a heat insulator made of polystyrene plates, provided with guides for laying pipes, or foil film. On it you need to lay a reinforcing grid, to which will be attached water conduits made of seamless metal-plastic with a cross section of ½ inch. At the perimeter of the room, a damper tape is attached to the wall to compensate for temperature expansion. In Fig. 3 shows the scheme of the pie of the warm water under the linoleum. Remember that:
- for heating 1 m2 of floor for linoleum you need 5 m of pipe;
- the first heating circuit is heated floor in an area of not more than 40 m2;
- adjacent tubes are located at a distance of 0.3 m from each other;
- the pipeline is fixed to the crate in every meter;
- There should not be any couplings, fittings, etc. inside the circuit.
After the pipeline has been laid andends to the collector, which regulates the supply of the coolant, another reinforcing grid is mounted on the tubes and beacons are placed. But before that, it is necessary to pressurize the circuit with water. At its end, another screed is poured and leveled. Within 4 weeks, it should completely harden. Before it is better to apply a self-leveling floor to the surface treated with a primer, which forms a perfectly flat surface. After the bulk mixture has solidified, the coating spreads. For its installation, traditional technologies are used using double-sided tape or adhesives. </ ul>


