Arch as an element of building architectureis designed to divide a room into zones without using a door. Recent years have seen the active use of these structural elements. Such an elegant device can ennoble and decorate any home, save living space, which is especially important for small spaces. They can often be seen in hallways, kitchens and between other rooms. How to make an arch at home? To do this, you need to study the features of installation work. Scheme for calculating the dimensions of an arched lintel.Such a ceiling can be purchased ready-made or made by yourself. The shape of such vaults is also different: from classic options to modernist samples. In the process of their production, different building materials are used: brick, stone, metal, wood, PVC, fiberboard, chipboard, gypsum board, plywood. The most popular are sheets of plasterboard. They are flexible and easy to install.
Preparatory work
To understand how to make an arch, it is importantinstall one by one. First, the designated space is measured: its width and height are determined. When starting to construct the arc, it is worth considering the fact that the door plane will decrease by 10-15 cm. These indicators concern the height. Later, this space can be lined with decorative inserts made of ordinary foam. Its width is measured and divided by two. These figures will be necessary so that the traditional semicircle turns out even and symmetrical. These data are equated to the internal distance corresponding to the opposite sides of the space. At the beginning of the work, the shape of the structure should be determined. Assembly and installation sequence diagramproducts. Traditionally, semicircular samples or plasterboard sheets are installed, which will be discussed below. How to make an arch correctly is just below. To begin with, you should focus on the verticality of the surface, otherwise the structure will look ugly and one-sided. If necessary, the inner plane should be leveled with plaster or putty, focusing on the installed beacons. Return to the table of contents</a>
Required attributes for work
The list of devices provided will allow you to carry out the installation yourself:
Return to Contents</a>
Installation of facial arch components
 Scheme for calculating the dimensions of the doorway andheight of the arch. You can get an answer to the question of how to make an arch by starting with cutting out the facade elements of the structure. The main problem at this stage is that you need to get two identical elements, regardless of the material from which the arch is made. Marking and cutting for each of them are carried out according to the same scheme. An even semicircle can be made in different ways. For example, by using any devices. As such samples, you can take a strong and elastic twine and a simple pencil.
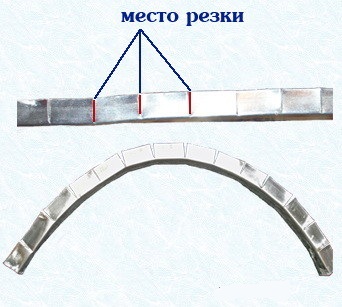 The profile for the arch opening is cut so thatget the required bend. The arch is made in a different way using a long and flexible element. For this, you can take a plastic panel, flexible baseboard.
The second method of making arches requires the involvement of an additional person in the work. It will not be easy to take accurate measurements alone. Return to the table of contents</a>
Raising the frame to the arch
You can make this important element in your home,having prepared a metal profile. Marking of guides with orientation to the width of the opening. Here these indicators correspond to 1000 mm. They are fixed on any side. On concrete and brick they are fixed with dowel-screws, for wooden surfaces special self-tapping screws are used. In order for the structure to be in the same plane with the wall, the frame should be fixed inside the opening by 12 mm.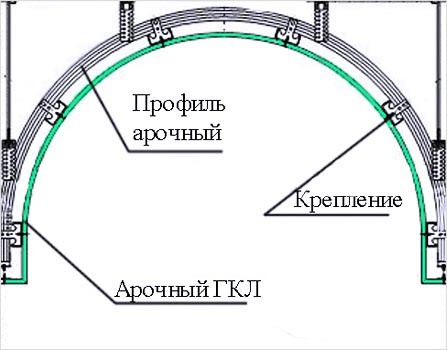 Plasterboard arch diagram.As soon as the plasterboard sheets are fixed and putty is applied, the base will acquire even parameters. Fastening is carried out from any side of both side parts of the frame. The length of such elements is 600 mm. The bottom of the profile is cut at an angle. Fixing the arch parts to the frame with self-tapping screws for metal bases. Return to the table of contents</a>
Final stage of installation
Next, the end part of the arch is closed:
A strong fracture requires the installation of a notch on the profile.
The length of such strips should be made slightly larger than the required dimensions, and the unnecessary part should be cut off during the work. The plasterboard strip is bent:
Upon completion of all work, the arch is brought tological completion: it is given the correct shape, all the flaws are masked, a corner with notches is placed along the curved part. Then the base is primed with a deep-acting compound. After half an hour, it can be puttied, then painted or wallpapered. Arched corners installed on any side will give the device a finished look. To make a wooden vault in a house, you should go through the same steps, only instead of gypsum board sheets, plywood and chipboard are used. A small sheet of fiberboard is used as a bending element.