Among the materials that are used forinterior decoration of premises, liquid wallpaper are becoming more popular. The process of applying them to the walls is simple, but as in any work there are some nuances in it that you need to know.  Types of directions of application of liquid wallpaper.
A few words about the material
Liquid wallpapers have an undoubted advantage overtraditional roll material. The method of application to the walls and the final result make them similar to decorative plaster. Various decorative fillers and dyes, which are part of the mixture, can produce surfaces of different colors and textures. Wallpaper can be combined, make up on the walls of the application. For application, any foundation is suitable: brickwork, plasterboard, cement, concrete, clay, wood and other surfaces. In addition, the surfaces can have a variety of shapes, even very complex ones. After applying the material, the wall looks monolithic, without joints. If as a result of mechanical influence on the wallpaper there is damage, it can easily be corrected by applying a little mixture to this place. 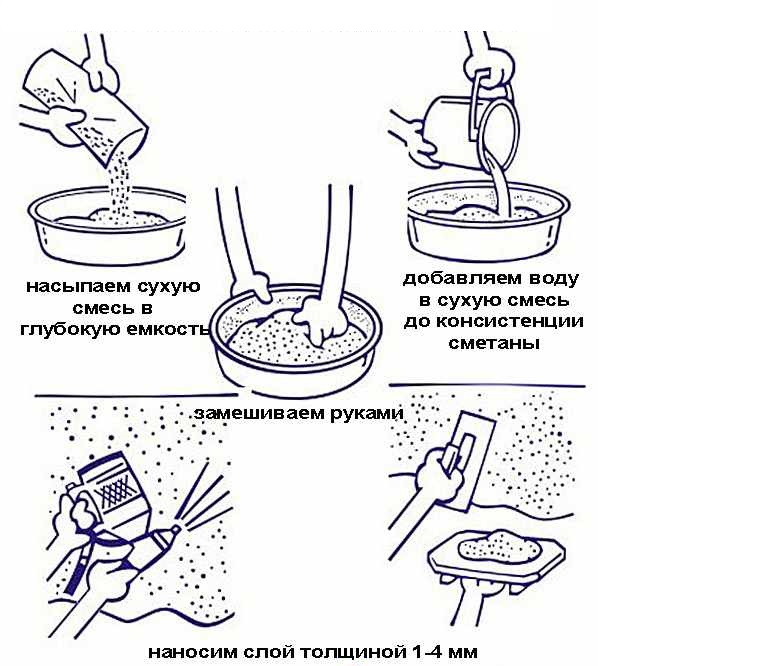 Stages of application of liquid wallpaper. If the varnish is applied to the base layer, this will strengthen the surface, increase its moisture resistance, and it will be possible to wash the walls. To work with liquid wallpaper does not need a complex tool. You will need:
Back to contents</a>
A well-prepared surface is half the success
you need to directly on the wall. Due to their elasticity, they make imperceptible minor flaws, but to get a good result, the surface before finishing should be prepared. Old wallpaper, straggler plaster should be removed, and the walls should be inspected carefully. Detected deep cracks expand and shpaklyuyutsya. Notable depressions and mounds maximally aligned. Walls need to be cleaned of objects, which can subsequently paint the wallpaper. Especially it concerns metal elements, which can be covered with rust, if they get moisture. If these objects can not be removed, they must be covered with paint that does not dissolve in water. It can be PF-enamel, latex or oil paint.  Scheme checking the smoothness of the wall. The basis for the liquid wallpaper should be a solid surface. To do this, it must be treated with a primer. The best option is a white or colorless means of deep penetration. Thanks to this, the walls will not only strengthen, but will also receive protection from moisture. The final stage in the preparation of walls is to give them a roughness. Liquid wallpaper can be immediately applied to the walls, which cover the starting putty or unpolished plaster. A smooth surface must be treated with soil, which contains quartz dust. Such a composition can be done on their own. Mix ordinary soil with quartz or marble dust. You can use the sand of the smallest fraction. Pre-sift it through a sieve. The roughness will make it easier to apply the mixture to the walls and will allow you to save material. The mass will be distributed exactly, there will be no ruptures. Distribute the mass over a smooth surface will be more difficult, it can begin to "drag" behind the tool. Back to contents</a>
We prepare the solution correctly
 Scheme of wall preparation for application of liquid wallpaper. To prepare a liquid wallpaper, you will need a container and water. Use no more than one packet at a time, so the capacity should be chosen in accordance with this volume. To make it more convenient to work, it is better to take a round shallow vessel. Mix the solution with hands only, the use of mechanical devices is categorically excluded. Therefore, it is better to take warm water. No effect on the material the temperature of the water does not have, just in warm water it is more comfortable and easier to prepare the solution. For your health, too, you should not be afraid. There are no harmful substances in the mixture. The contents of the package are poured into the container and filled with water. The mixture is thoroughly mixed until a homogeneous mass is obtained. If necessary, the water is added in small portions of 100-150 ml. In the end, you should get a mixture that resembles thick cream. If done thicker, then it will be very hard to apply, and the liquid will drain from the wall. Cooking liquid wallpaper to be applied in advance. According to the instruction, the mixture should stand for a while. If you plan to use decorative additives, then they should be poured first into a container of water and mixed, and then add a base. This technique will ensure an even distribution of the decor. Back to contents</a>
Features of application
The process of applying liquid wallpaper to the wall can becompare to making a frozen butter sandwich. If you spread the oil thinly, you will not feel its taste. If you put a thick piece, then it will simply fall off the bread. Also with wallpaper. If the applied layer is too thin, then the base will shine through it, which will affect the final result. Application of a thick layer of mortar can lead to cracking after drying and excessive material consumption. The optimum layer thickness is no more than 2 mm. with a spatula. It should be smooth and even. Hand movements should be relaxed. The tool should be placed at a slight angle to the wall. The wallpaper mixture is pushed out with a spatula in the direction of travel. There is no need to put pressure on the tool so that the mass is not compressed. The coating must be loose immediately after application. The surface to be treated should be at eye level; it is not recommended to squat or rise on socks. If you need to process the lower part of the wall, then it is better to sit down, the upper one - to stand on a chair or ladder. It is important not to stop working until the material has been applied to the entire wall. This will avoid various imperfections in the coating. After processing a small area, you must carefully check it. The base should not show through the new coating, there should be no tears, bumps or sagging. If any flaw is noticed, it will have to be eliminated. The wallpaper will dry for at least a day. Time will depend on temperature and humidity. After the coating is dry, it is ready for further use. Back to the table of contents</a>
Fighting damage
If the wallpaper on the wall is damaged or arosethe need to remove a small part for any work, then this place needs to be moistened with clean water. It is better to use a spray gun. The soaked wallpaper is removed with a spatula and collected in a clean container. After the repair work on the section of the wall is finished, it is primed with 2-3 layers. Each subsequent layer can be applied only after the previous one has dried completely. When the primer dries, the edges of the wallpaper around the open area are soaked with a spray gun. The wallpaper that was removed from the wall before repairing, is diluted with water until a thick mass is obtained and put on a wall with a spatula. During application, it is necessary to try to rub the edge of the coating on the wall with the newly applied layer. After the repaired area dries, it will become invisible against the general background of the wall.


