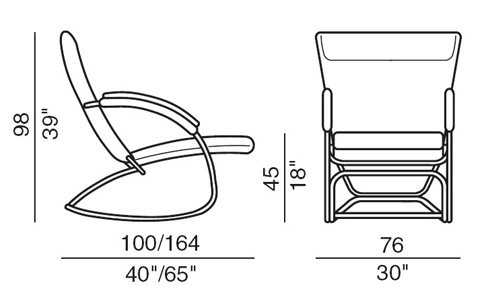
The chair is a good place for both work andfor relaxation. Before making a chair with your own hands, you need to familiarize yourself with its models, since there are a large number of chairs. For some models of chairs, willow or rattan is needed, since, being presented in other materials, they lose their charm. This piece of furniture can also be made of metal - forged rocking chairs look like jewelry in the interior. Drawing of a chair.
DIY Chair - Wooden Chair
Solid wood furniture is a symbolsolidity and reliability, even if these are lattice models. Making a chair from a bar does not take much time, and it will serve for many years without the need for restoration. For manufacturing you will need:
- average thickness of the timber;
- plywood;
- joiner glue;
- primer;
- stain;
- varnish;
- furniture dowel;
- self-tapping screws;
- sandpaper 3 kinds;
- Bulgarian;
- Screwdriver;
- hand drill;
- plane;
- Clamps;
- sponge or foam rubber;
- brushes;
- pencil or marker;
- gon;
- paint.
 Tools for making a chair.The thickness of the timber is not of great importance, but when buying, you need to pay attention to the uniform section, which simplifies the work and shows the quality of the blanks. Ideally, all blanks should be of the same thickness and with good linearity. If one of the parts is twisted, this will greatly affect the integrity of the product, it may warp or crack during operation. Return to contents</a>How to make a chair - manufacturing processThe timber is sawn into the required number of crossbars and supporting additional seat crossbars. A circular saw allows you to work well and quickly. The edges of the resulting bars are marked, and through holes are drilled at the same distance. The distance from these future fasteners to the edge of the bar should be at least 25 mm, otherwise the chair, made with your own hands, will not be strong enough. A drilling stand will help to maintain all the parameters for many holes, on which you can set such parameters as the perpendicular of the holes, their size and distance. Before making the chair, one more safety concern is required - to process the ends and surface of the bars to prevent splinters from appearing during use. In this case, all available edges are rounded using a grinder or plane. When the longitudinal bars are ready, the remains of the timber are divided into squares using a circular saw, which will separate the bars from each other in the structure.
 Assembly diagram of a garden chair.Holes are also drilled in them, matching those already present on the finished bars, they need to be sanded and the edges smoothed. Each craftsman will determine the number of long bars and squares for himself, based on the dimensions of the chair and the thickness of the bar. Dowel fasteners are inserted into the holes, a few drops of glue are added, after which each bar is connected to a pair of cubes on both sides. The blanks are aligned along the edges, placing a strip, then left to dry, tightening with clamps. After drying, the wood is treated with stain. A rope can be threaded through the holes on the parts and the painted parts can be hung to dry. Varnishing is done in the same way. To make a chair with your own hands, the back and seat for the chair are cut out of plywood. They are screwed together using a pair of screws on the right and left. Dowels can provide additional strength if holes are drilled for them and glued before use. All parts are painted in the desired color and varnished after drying. All that remains is to make the final assembly of the body using bushings and screw on the seat. This unusually shaped bright and eye-catching chair complements the interior well. Return to contents</a>
Garden light armchair with own hands
Not everyone likes plastic chairs, whichare now widely used to decorate a recreation area in a summer house or garden. Lightweight garden chairs made of wood look more appropriate on the site, and their manufacture does not take much time. Before making a chair, you need to consider that its design should be light and comfortable, it is best to prefer a folding chair. This will allow you to quickly move the furniture under the roof in case of rain, because even well-treated wood should not be exposed to moisture. Chair leg connection diagram.The wood for making the chair should be selected from hardwoods such as beech, walnut or oak. Pine, cedar, larch or aspen are also less susceptible to rotting, but pine is not resistant to mechanical impacts, leaving large dents on the surface. The boards should be well-dried or dried under a canopy before starting work. The following materials and tools will be needed:
- Circular Saw;
- milling machine;
- hacksaw;
- plane;
- Screwdriver;
- drill;
- Clamps;
- grinding machine;
- roulette;
- gon;
- pencil;
- sandpaper;
- screws or screws;
- joiner glue;
- drying oil or varnish;
- stain.
Return to Contents</a>Preparation and assembly of parts for a garden chairYou will need two back and two front legs, with the back ones being longer. You need to cut out 2 supports for the armrests, a backrest and a crossbar. For the back pair of legs, armrests, a backrest and a seat, boards of a color and texture are glued together until the desired width is obtained. To glue the wood well, grooves for dowels are selected in the ends. Paired parts can be cut out simultaneously, pulling two boards together with clamps. Drawing of a rocking chair.The parts are then adjusted to size using a router or plane. When cutting out the back, the glue seam, if present, should be positioned in the middle of the part. The upper edge is rounded off, and then you can begin assembling the garden chair, adjusting the other elements as needed. The back legs are attached to the back with screws, with the strength reinforced with glue. To prevent the workpieces from cracking during assembly, the holes for the fasteners can be drilled in advance. The strength of the assembled seat will depend on the correct placement of the boards on it. They should lie in the direction from one leg to the other. The front legs are also screwed on with screws or self-tapping screws reinforced with glue. The chair is made reliable and stable by the crossbar - a crossbar located between the front legs. It is attached in the same way as everything else, using glue and screws. Then the armrests and the support for them that runs behind the back of the chair are attached. The heads of all the screws used for fastening should be sunk flush with the surface, and then closed with special plugs. The wood of the finished chair is impregnated with hot drying oil or stain, dried, and varnished in several layers. You can opt for a special furniture varnish, but the most durable coating is that of parquet or yacht varieties. Return to contents</a>
Construction for rocking chair
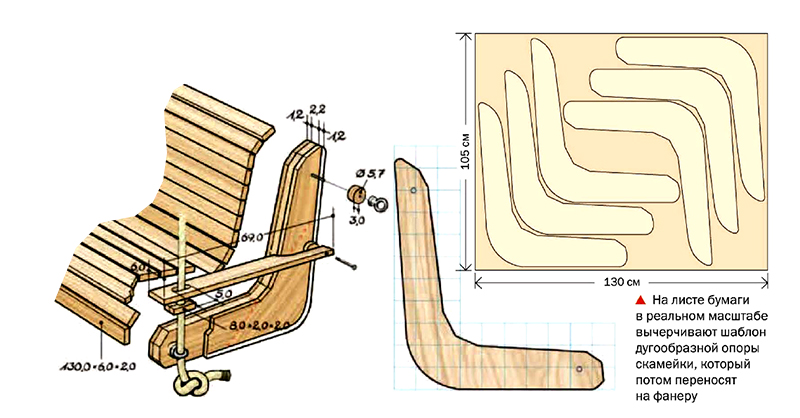
This chair can be used both in the garden and at home. By widening the seat, it is possible to make not a chair, but a whole bench on which several people can sit. To make it, you will need: Assembly diagram of the chair seat.
- electric jig saw;
- grinding machine;
- drills for wood of different diameters;
- Screwdriver;
- gon;
- roulette;
- pencil;
- plywood;
- self-tapping screws;
- confirmations;
- reiki.
If you are making a rocking chair yourself from start to finish, it is better to use high-quality materials so as not to ruin the work. Return to contents</a>Making a rocking chair Sides of the chair withrounded bottom are cut out according to the developed pattern first. They must be completely identical, and there should be no protruding corners on their lower part. Then the beam for the seat and back is cut, the quantity and length of which must be calculated separately for each model. The surface of each beam is sanded and polished, the corners are smoothed out. If you plan to use the chair outside, you need to pay special attention to the ends of the boards. They are varnished at least 3 times, since this is where the wood is especially loose and needs protection from atmospheric influences. To protect outdoor and garden furniture from destruction, the ends are soaked in hot drying oil several times, and the fibers are flattened with a hammer. The sides are pulled together to the required size with several tsars, drilling through the sides. Then holes are drilled in the ends for fastening the bars. The bars themselves are also drilled in advance to avoid cracks during work. It is more convenient to attach the bars not between the sidewalls, but on top, slightly going beyond the contour. In such a rocking chair there is more space, and it looks neater. Each screw should then be covered with an antiseptic and a plug should be put on top. After this, the final treatment of the product is carried out with waterproof types of varnish, with each layer drying for at least 12 hours. At least 3 layers are laid, coated with a thick layer, trying not to leave gaps. Only after this can the rocking chair be considered ready.</ ul>


