Recently appeared underfloor heating systemsare gaining more and more popularity. When renovating a bathroom, kitchen, toilet or hallway, they are laid under the tiles so that the result is not a covering that freezes bare feet, but a warm floor. And this is far from a complete list of places where this type of heating is installed. It is installed wherever it is necessary to make the floor at least a little warmer (including in a nursery, in a bedroom, and on a loggia with a balcony).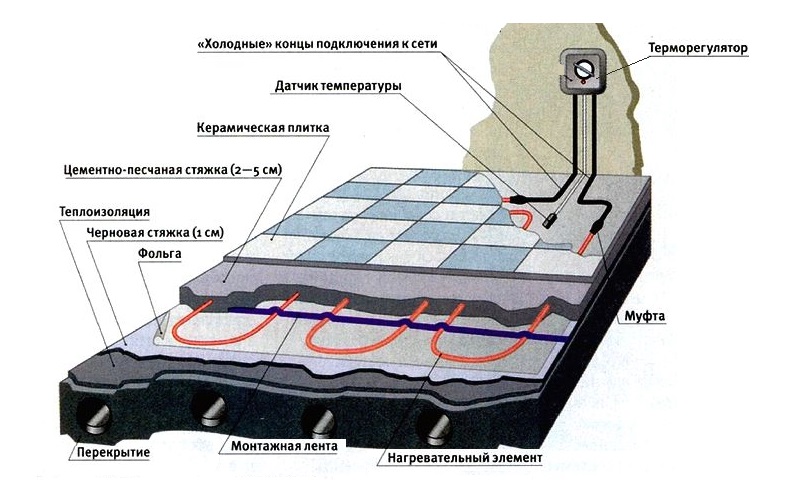 Installation of heated floors.Therefore, an important task at the initial stage is to accurately determine what role such a heat source will play: full heating of the room or additional. The main component of the electric floor heating system is a cable that converts electrical energy into heat. The main indicator is considered to be specific heat emission. It would be a mistake to assume that it is better to purchase a cable with this maximum value, since with the maximum specific heat emission, the cable may not heat the floor surface (concrete screed) at full power when its thickness is insignificant. As a result, overheating of the heat carrier insulation is possible, then a short circuit and cable failure, which involves expensive repairs, including dismantling the concrete surface.
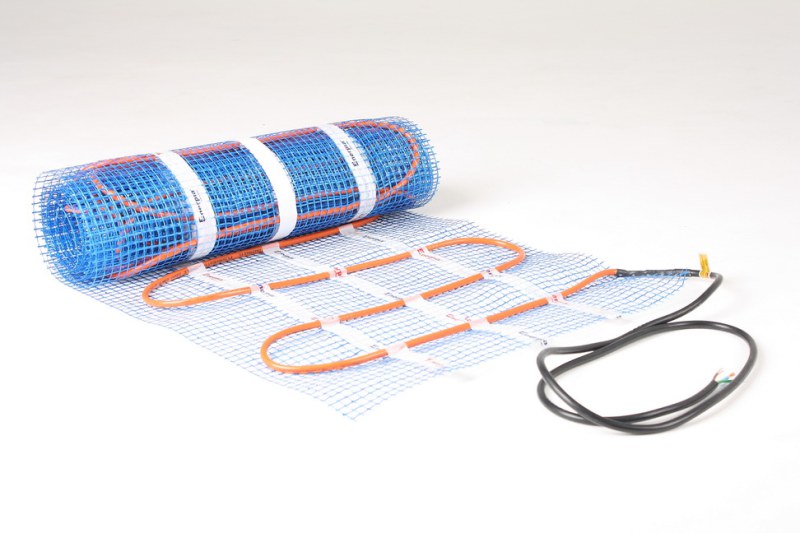 Cable underfloor heating can be installed ina special grid, this makes it easier to lay. Safety and ease of laying provide an excellent opportunity to arrange . And as a pleasant reward for all the efforts made, there will be a comfortable floor surface and, although small, but still savings in the family budget. Most, having decided to arrange , plan this operation as one of the final stages of repair work, first leveling the wall surfaces and plastering. But this solution is fundamentally wrong, since a do-it-yourself floor, working on the basis of electric cables, requires laying a separate line of electrical wiring. The need to lay the latter arises before starting wall and even ceiling work. At the same time, a control unit for a warm electric floor is mounted on the wall. There are different options for installing a warm floor: without a heat-insulating layer and with it. The mounting methods are also different: on a metal mesh or on a mounting tape. And warm floor systems can be like a heating cable or in the form of a special mat in which the cable is packed with a mesh with an already laid installation step. This type of heated floor is also called cable floor.
We make an equal floor with our own hands
 The floor is leveled according to the establishedbeacons. In the case when the warm floor takes on the role of the main heating, then a layer of thermal insulation is required. It is best to use polystyrene foam boards (density 35) as such. Their thickness will be determined by what is directly located under the floor slab. If the floors are insulated in an apartment higher than the first floor, then the layer is selected at 20 mm, for the floors of first-floor apartments with a heated basement underneath them, the thickness of the insulation will be 30 mm. For floors on loggias, balconies, with unheated basements underneath them on the first floor, the layer thickness is provided at least 50 mm. And where the concrete surface is placed directly on the ground surface, 100 mm. The insulation layer is laid using special adhesives or dowels (this is done at the next stage of installation, when the mesh is fixed). The floor surface must be even, have no visible distortions, depressions or large cracks. If any of the following is found on the floor surface:
- perform screed, if there are significant surface skews, the floor is leveled;
- Some flaws are sealed with cement mortar.
 Types of cable laying for underfloor heating.Before laying the heat insulator, the surface is primed, which prevents mold from developing. And gluing increases the degree of adhesion of the materials. Polystyrene foam boards are glued or fastened with dowels in several places. The plaster mesh is fixed over the entire surface using plastic clips or dowels with washers, the length of which is equal to a double layer of heat insulator. Such fastening will provide additional fixation of the boards to the floor surface. Return to contents</a>
Calculate the cable length and stacking step
The cable-covered surface should beabout 80% of the total area of the room. The power (for the main type of heating) of about 180-200 W per square meter is laid per square meter. Before laying, the resistance of the cable section is checked, which is allowed to be no more than 10% of the value indicated in the technical data sheet in each direction. Cables are not laid where there are household appliances, large pieces of furniture without legs. A gap of 5-7 cm is provided between the cable and the wall.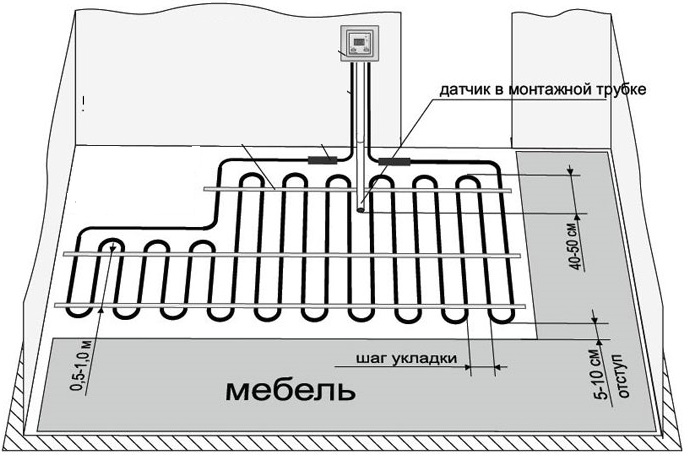 Cable laying diagram with dimensions.Find out such a nuance: at what distance between each other is it possible to lay cables? Since ignoring this indicator entails overheating with all the aggravating consequences. Calculation of the step for laying the cable is performed as follows. Find out the heating area, since this value according to the formula must be multiplied by 100 and divided by the length of the cable. It will not be superfluous to know that a section of a two-core cable has a connection with a heating wire only at one end, while a single-core cable - at both. Return to the table of contents</a>
We carry out preparatory work
Before installing the thermostat, the following are determined:with a place in the wall for its installation and then cut a recess and groove to the floor. In place, using alabaster, reinforce the mounting box for the thermostat. A corrugated tube comes out of it. The latter is placed in the grooved recess and sealed with alabaster. The end of the tube is brought into the heating area by 40 cm. And it is positioned there so that the temperature sensor is located in the center between the turns of the cable. Check that the pipe does not form sharp bends. Under its end (at the location of the sensor) put material for the purpose of elevation and location of the sensor directly under the floor so that it records the temperature correctly. The end of the tube is tightly covered with insulating tape in order to prevent the solution from getting into it during the manufacture of the screed. Return to the table of contents</a>
We lay the heated floor with our own hands
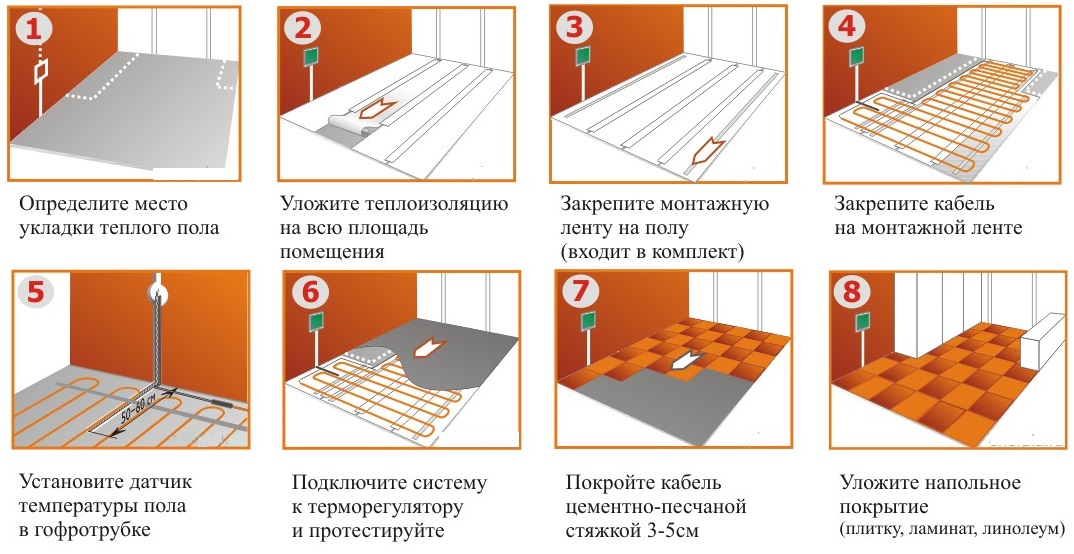 The order of execution of works when laying warmfloor. The cable is laid in a zigzag pattern, taking into account the calculated step. It is attached to the metal mesh using plastic ties of minimum length. Upon completion of the laying, the cable resistance is checked and recorded, a plan for the placement of the turns is drawn, the system is connected and the operability of the system is observed. Then everything is turned off and the thermostat is removed until all finishing procedures are completed. Return to contents</a>
Fill the floor screed
The screed is laid using a sand solution withcement in a ratio of 3/1 with the inclusion of special plasticizers or ready-made screed mixtures. The thickness of the fill should be at least 3-4 cm. It is permissible to add fiber to the solution. After the screed dries, floor tiles are laid, using a special composition of glue for underfloor heating. The surface is completely ready for use after 28 days. During this period, it is prohibited to connect the floor heating system to electricity.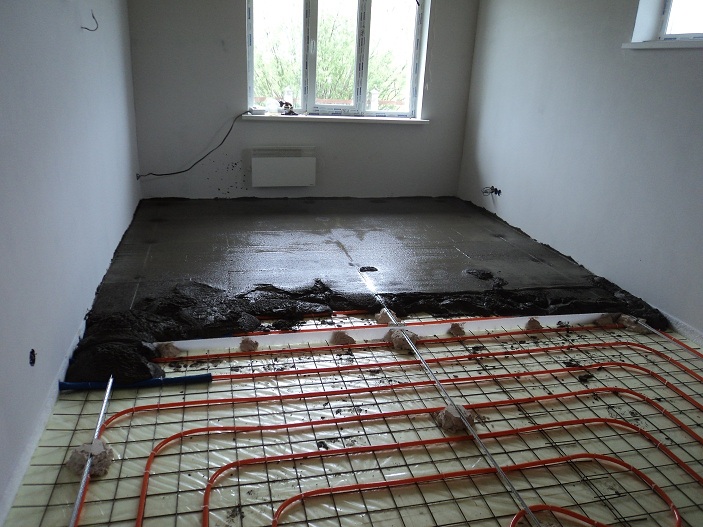 The underfloor heating screed must be at least 3-4 cm.When such heating systems are installed in separate rooms, the requirements for independent installation of electric underfloor heating are much simpler. Thermal insulation of the surface is not a mandatory requirement. Therefore, the wire turns are fastened with mounting tape directly to the base. It is permissible to lay a power of slightly less than 120-180 W per square meter. The ends of the wire that fall under the base heating elements are covered with thin cork insulation (2-3 mm) to prevent overheating. It is much easier to fix the wire turns to the petals of the mounting tape. But you should check that if the cable turns are located perpendicularly according to the connecting slab seams, it is advisable to lay them in a crescent with some reserve. Then, in case of deformation of the slabs due to temperature changes, it will be possible to avoid tension. There are no other significant differences in the installation of warm floor heating systems. The rules for installing warm electric floors and the entire sequence of actions described here will help a home craftsman who is faced with such a procedure for the first time to successfully install the cable on his own. If you follow all the advice, the warm floor in the apartment will last a long time, without requiring repairs or replacement.


